

What Subscription Plans are for
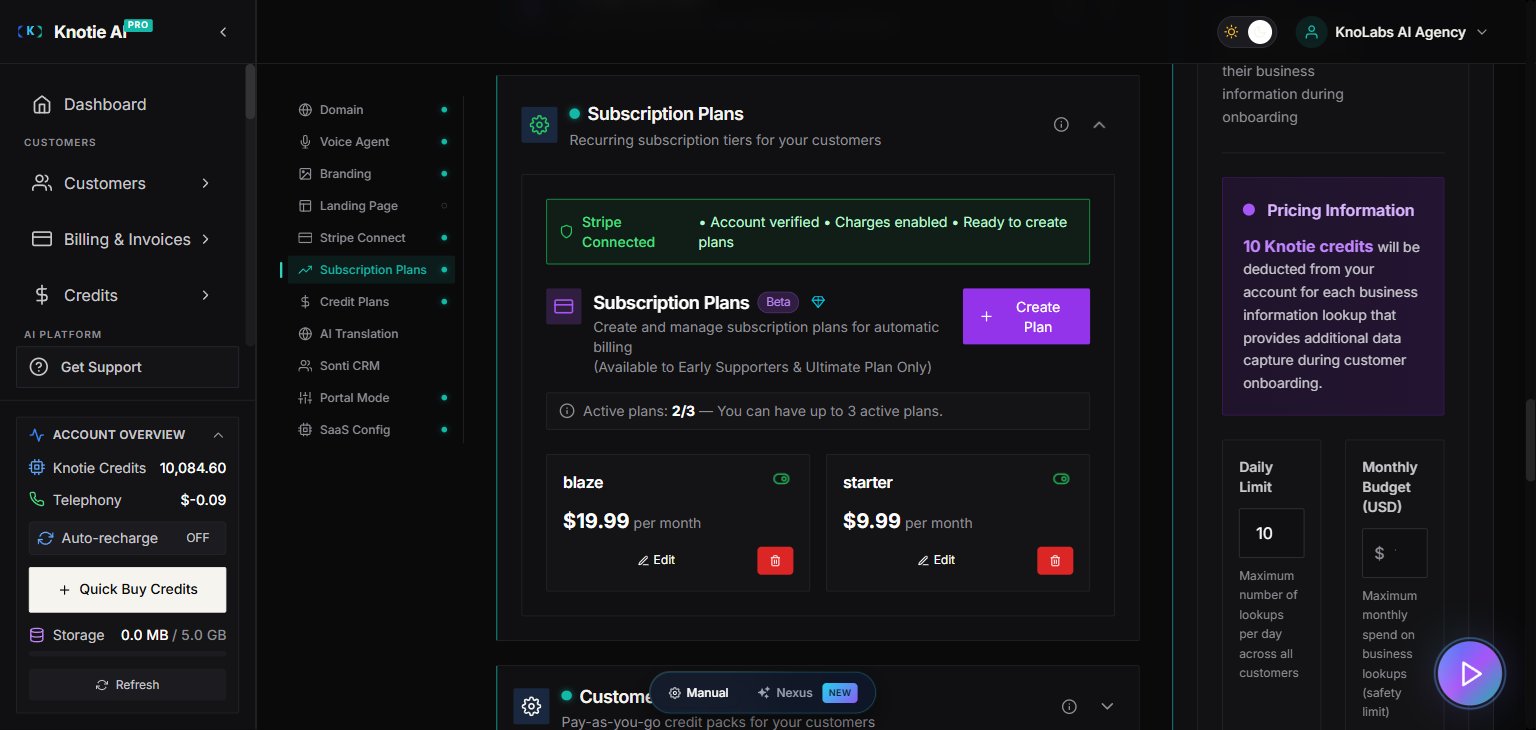
Subscription Plans are the recurring billing packages that customers select during your whitelabel SaaS onboarding. When a prospect reaches Step 9 (Summary & Deploy) of the onboarding flow, they choose from the active plans you’ve configured here before their AI agent is deployed. This section applies only when your Pricing Model is set to Subscription. If you use Pay-as-you-go or Fixed Price, see SaaS Portal Mode instead.Where to find it
- Open Settings in the Partner Portal sidebar.
- Click White-Label Portal.
- In the Section Nav Rail on the left, click Subscription Plans (under the Main column).
Subscription Plans lives inside the White-Label Portal page, not on the main Settings page. Look for it in the Section Nav Rail on the left under the Subscription Plans heading.
Prerequisites
Before creating subscription plans, you need:- SaaS Portal Mode enabled – Subscription plans only appear in the whitelabel onboarding flow.
- Pricing Model set to Subscription – Configure this in Settings → White-Label Portal → Portal Mode (Section Nav Rail).
- Stripe Connect configured – Required for recurring billing. Configure via Settings → White-Label Portal → Stripe Connect in the Section Nav Rail (or via the top-level White-Label Portal entry).
Create a subscription plan
- Click Add Plan (or Create Plan).
- Fill in the plan details:
- Name – Display name shown to customers (e.g., “Starter”, “Pro”, “Business”).
- Description – A short line describing what’s included.
- Price – Monthly or annual amount (in USD).
- Billing Interval –
monthoryear. - Features – Optional bullet list of included features.
- Toggle Active to ON to make the plan available.
- Optionally check Display on Customer Landing Page to control visibility (see below).
- Click Create.

How plan visibility works
Plans shown in Step 9 of onboarding
When a customer prospect reaches Step 9 (Summary & Deploy), the onboarding flow shows them every plan you’ve marked as active so they can pick one. Every plan you’ve set to Active is shown here. Turning a plan on or off is the main way to control what customers see.”Display on Customer Landing Page” checkbox
The Display on Customer Landing Page checkbox controls whether a plan appears on your whitelabel portal’s public-facing landing page (the page visitors see before they start onboarding). This is separate from plan visibility in Step 9.For subscription-billing partners, at least one plan must remain both active and marked as “Display on Customer Landing Page” at all times. If you try to uncheck this box, deactivate, or delete the last such plan, the system will block the action with an error. This prevents your customer portal from having no plans to display, which would break the self-service onboarding flow.
Manage existing plans
Edit a plan
- Find the plan in the Subscription Plans list.
- Click Edit (pencil icon).
- Update name, description, price, or features.
- Click Save.
Activate or deactivate a plan
If you use subscription billing: you can’t hide your last remaining plan. If a plan is both your only active plan and the only one shown on your landing page, the portal won’t let you turn it off — activate or display another plan first, so your customer portal always has something to show.
Delete a plan
- Click the Delete button (trash icon) on the plan.
- Confirm the deletion.
Troubleshooting
You can’t hide or delete a plan
Cause: You’re trying to hide, deactivate, or delete the last plan that’s both active and shown on your landing page, while your account uses subscription billing. Fix:- Create a new plan (or reactivate an existing one).
- Check Display on Customer Landing Page on that other plan.
- Then deactivate or delete the original plan.
No plans appear in Step 9 for customers
Cause: Every plan is turned off. Fix: Set at least one plan to Active. Any active plan is automatically shown in Step 9.Plan not visible on the landing page
Cause: The Display on Customer Landing Page checkbox is unchecked for that plan. Fix: Edit the plan and check Display on Customer Landing Page.Cannot edit price on an existing plan
Stripe doesn’t allow changing the price of an existing plan. To change a plan’s price:- Create a new plan with the updated price.
- Deactivate the old plan.
- Customers already subscribed at the old price aren’t moved over automatically — handle that from your Stripe dashboard.
Related pages
- SaaS Portal Mode – Enable the whitelabel onboarding funnel
- Stripe Connect – Set up Stripe for recurring billing
- Customer Credit Plans – Credit packages for pay-as-you-go customers
- Prospects – Tracking prospects through the onboarding funnel