What email domain setup does
Email domain setup lets you send emails from your own domain (instead of a generic sender). This is important for:- Brand trust (customers recognize your domain)
- Better deliverability (fewer spam issues)
- Consistent “From” name and address
Before you start
- Make sure Domain Email Service is enabled for your account.
- Make sure you (or your customer) can edit DNS records for the domain.
- Decide what you want your sender to look like:
- From name (example:
Acme AI Agency) - From email (example:
noreplyto@yourdomain.com)
- From name (example:
Email Domain Management carries a Premium Feature badge in the Partner Portal sidebar.
Set up your email domain
- In the Partner Portal, open Settings.
- Go to Email Domain Management (sidebar link under Settings).
- In Setup Your Domain:
- Enter Domain Name (example:
yourdomain.com). - Enter From Email (example:
noreplyto@yourdomain.com). - Enter From Name (example:
Acme AI Agency).
- Enter Domain Name (example:
- Click Setup Domain.
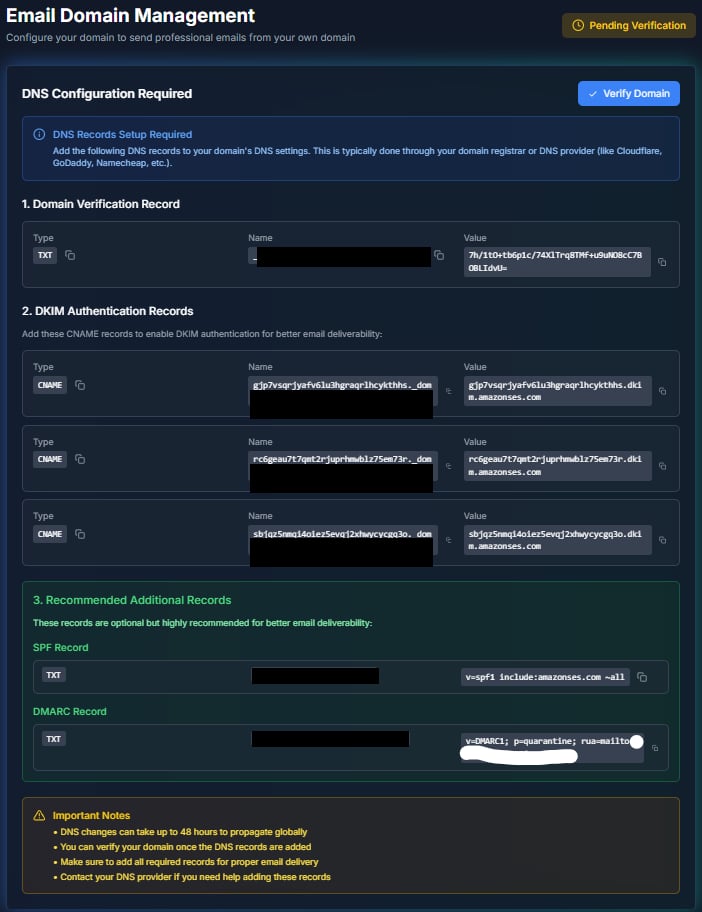
Add DNS records (the “copy/paste” part)
- Open the DNS provider for the domain (Cloudflare, GoDaddy, Namecheap, etc.).
- Add each DNS record exactly as shown in Knotie AI.
- Save the changes.
@ for the root domain.
Verify your domain
- Back in Email Domain Management, click Verify Domain.
- If the status shows pending, wait a bit and try again.
- Once verified, you’ll see a verified status in the header.
Post-verification state
After a domain is verified, the Setup fields and DNS copy-paste UI are hidden. Instead, you see:- Verified domain name
- Active status badge
- Send Test Email section
Send a test email
After your domain is verified:- Enter a test email address in the textbox
- The Send Test Email button becomes enabled once you type an email address
- Click Send Test Email
- Check your inbox and confirm the sender shows your domain
Using custom domains for email accounts
Once your email domain is verified, you can use it for:Notification emails
All system notifications will be sent from your custom domain:- Invitation emails
- Password reset emails
- Low credit alerts
- Billing notifications
White-label email experience
Combining email domains with your white-label portal creates a fully branded experience:- Portal URL:
portal.yourcompany.com - Email sender:
noreplyto@yourcompany.com - Brand consistency across all touchpoints
Troubleshooting
- Domain verification stays pending
- DNS changes can take time to propagate (up to 48 hours, typically 15-30 minutes).
- Re-check that you copied values exactly (extra spaces can break verification).
- You see “Domain Email Service Not Enabled”
- Go to Settings and enable Domain Email Service first.
- Test email fails
- Verification must be completed before test emails can be sent.
- Emails going to spam
- Verify SPF, DKIM, and DMARC records are properly configured.
- Check your domain reputation with email testing tools.