

What this feature does
Per-experience dashboards let you assign a distinct visual dashboard to each AI experience you offer. A customer who signed up through your AI Receptionist experience gets a call-centric dashboard showing agents, call volume, outcomes, and recent calls. A customer who signed up for Resell AI Gateway gets an API-usage dashboard showing request volume, top models, and credit balance. All six dashboard templates are automatically branded with your portal’s primary and secondary colors — no design work required.Prerequisites
- At least one AI Experience must be enabled on your account.
- The new dashboard UI is opt-in per partner. Enable it with the Dashboard Experience V2 toggle described below.
The six dashboard experiences
Widgets that require a feature the customer doesn’t have (e.g. the API Keys widget when Show API Keys is off) are automatically hidden. The dashboard adapts to each customer’s enabled features.
Enable the new dashboard
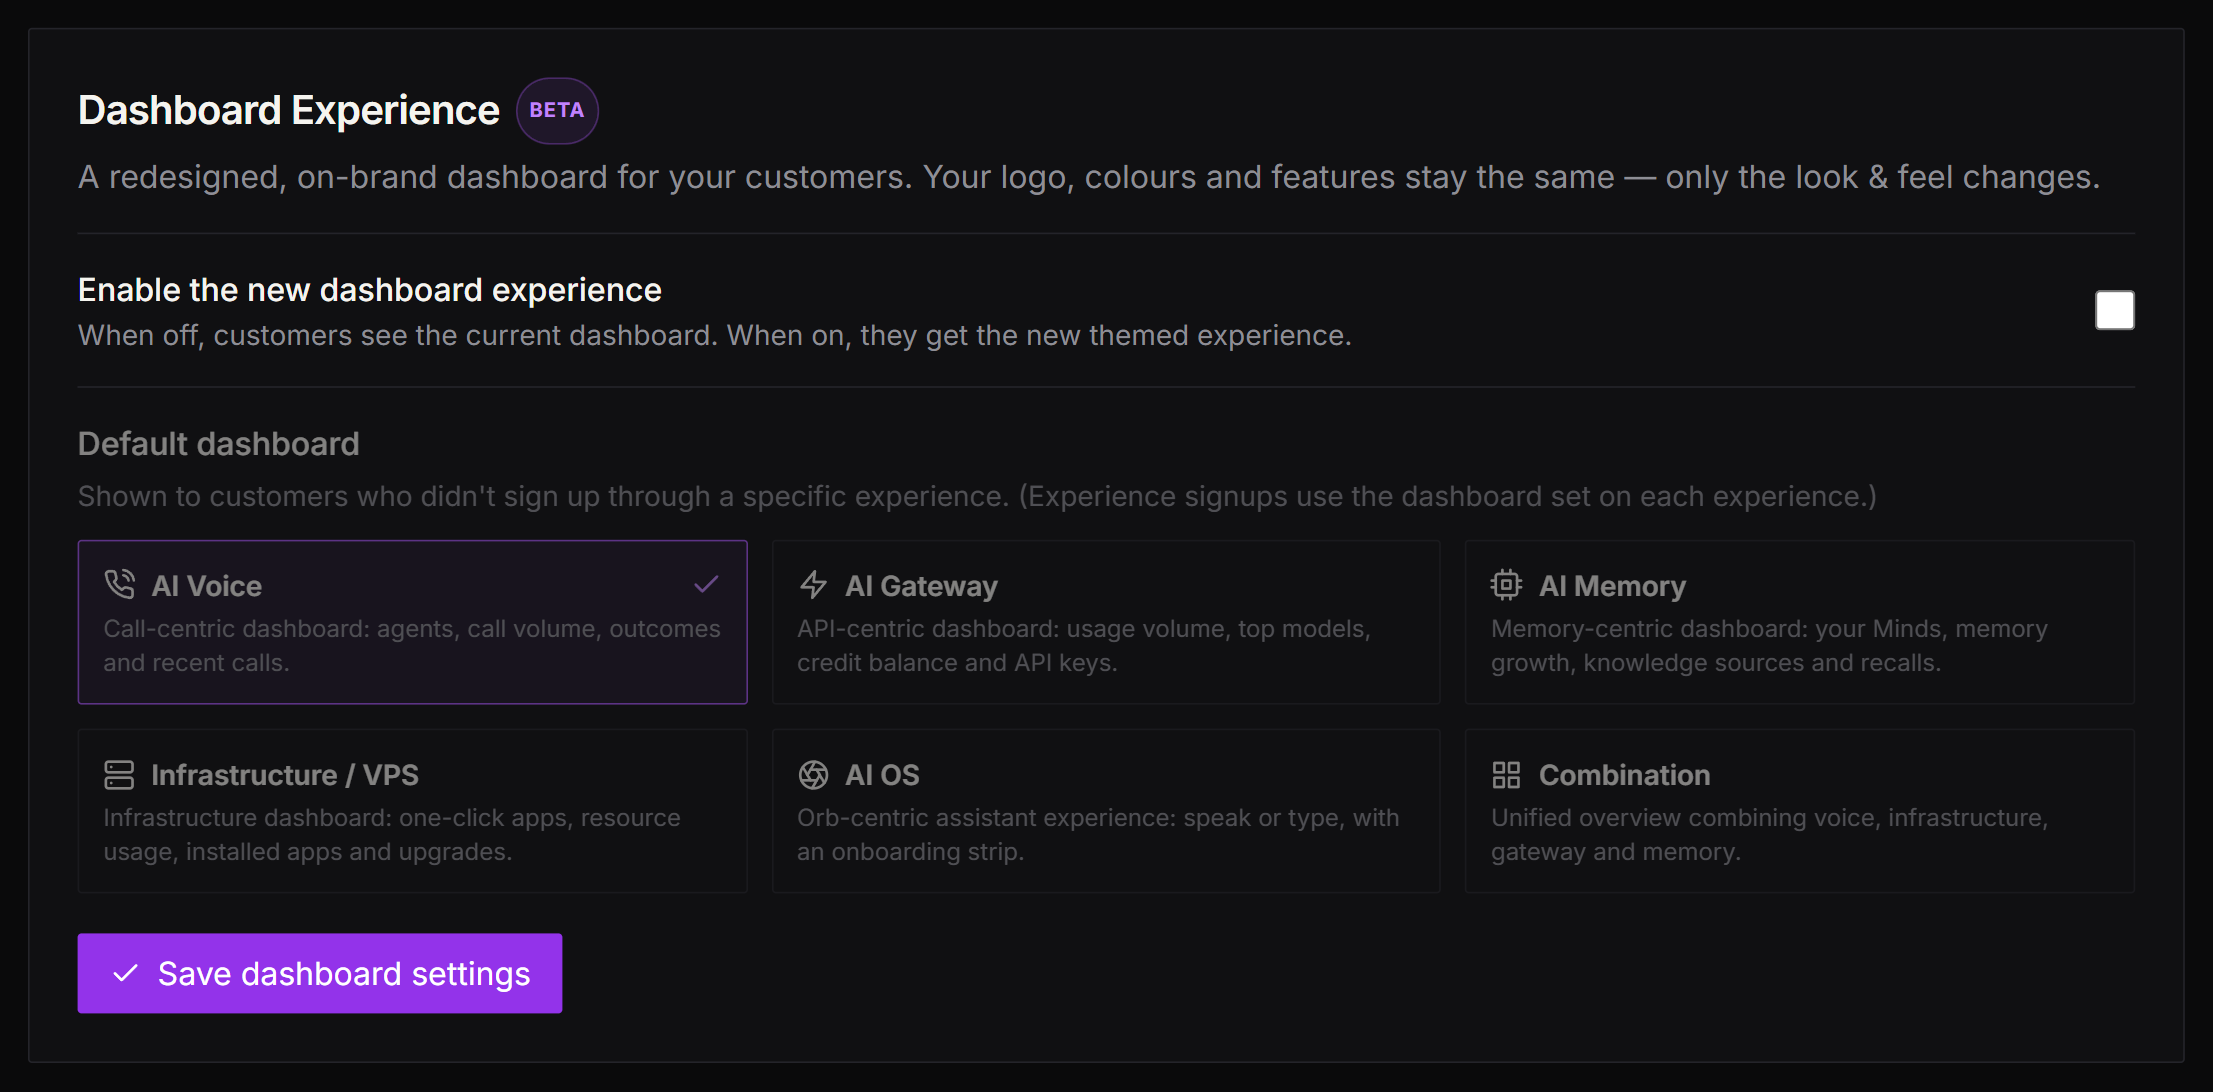
The new dashboard UI is controlled by a per-partner Dashboard Experience V2 flag. It is off by default — existing customers are not affected until you turn it on.- Open Settings → Whitelabel in the Partner Portal.
- Find the Dashboard Experience (Beta) section.
- Toggle Enable the new dashboard experience to on.
- Optionally choose a Default dashboard from the six templates — this is the fallback used when a customer’s experience type doesn’t have a code default.
- Click Save dashboard settings.
Configure a template per experience
You can override the default template for any individual experience. For example, you can send all AI Business Audit customers to thecombination dashboard, or route AI Memory opt-in customers to the ai_memory template.
- Go to One-Click Experiences in the Partner Portal sidebar.
- Click the Settings (gear) icon on the experience card you want to configure.
- On the experience settings page, expand the Dashboard Experience (Beta) section.
- Pick a template card — Default, AI Voice, AI Gateway, AI Memory, Infrastructure / VPS, AI OS, or Combination. Leave it on Default to fall back to your global default dashboard.
- Click Save.
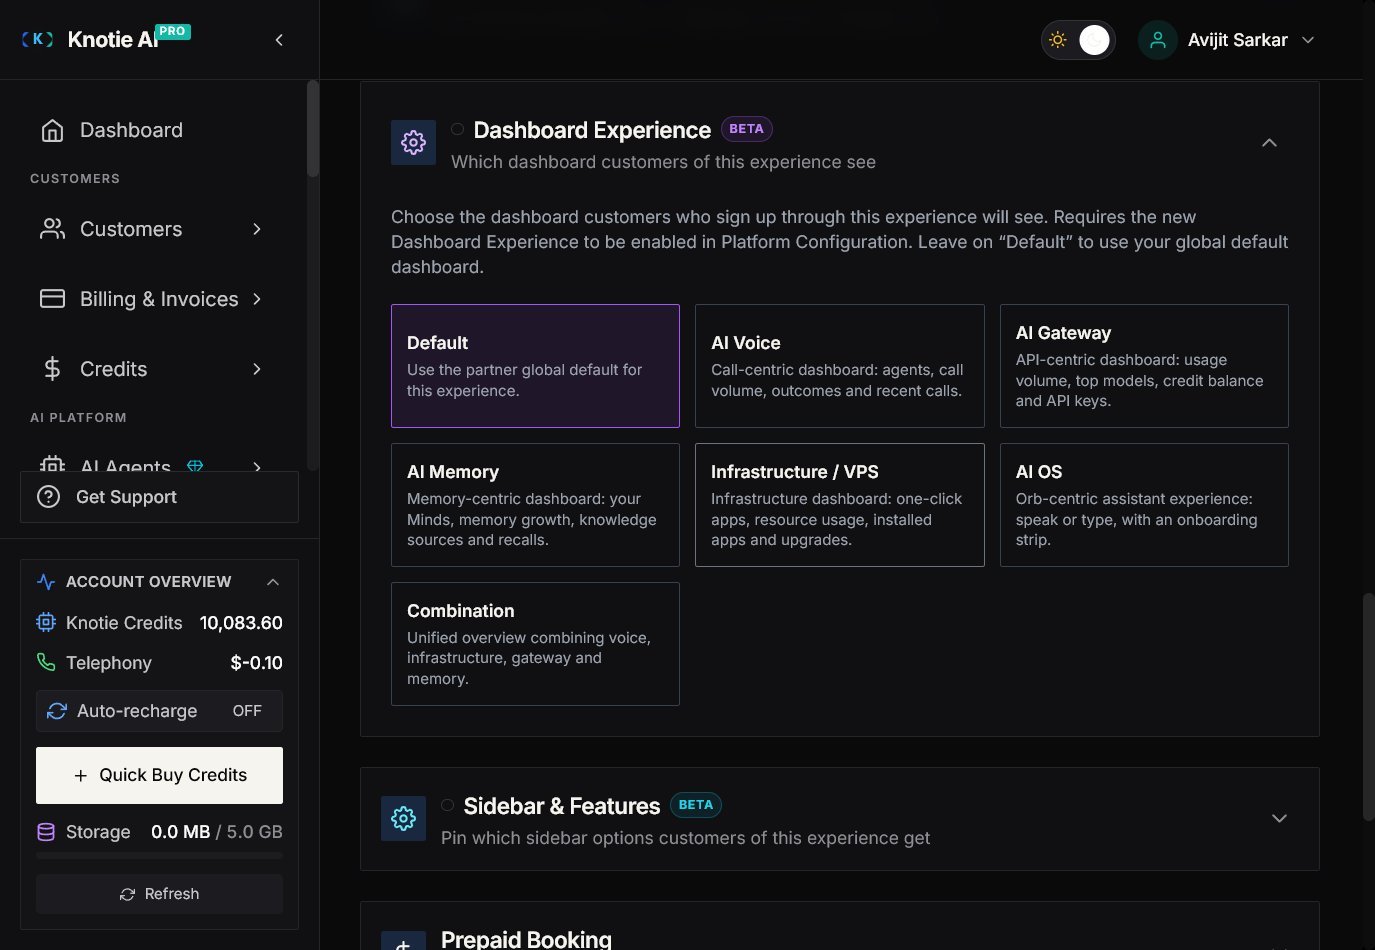
The section header notes this requires the new Dashboard Experience to be enabled in Platform Configuration. Selecting a card here sets the per-experience template; the global enable toggle and default live in Platform Configuration / Whitelabel settings.
How templates are resolved
Every new customer is assigned one template. The system picks from the first match in this order:See Dashboard Experience Templates for a full reference on how templates are chosen, the built-in default per experience type, and the enable setting.
The branded dashboard shell
All six templates share the same shell:- Left sidebar — your logo, filtered navigation links (only features the customer has access to), and brand-colored active states.
- Sticky glassmorphic topbar — customer name, credit balance, notifications, and account menu.
- Accent color — automatically derived from your portal’s Primary Color, with your secondary color used for highlights and hover states.
- Dark theme — the default palette is dark. Light-mode is planned.
- Brand font — uses your configured brand font if set; falls back to Plus Jakarta Sans.
- Right-to-left layout — the shell automatically flips to right-to-left for Arabic, Hebrew, Farsi, and Urdu portals.
The AI OS experience (orb-centric dashboard)
Theai_os template is unique: instead of a grid of metric widgets, customers see an animated full-screen Orb that acts as a conversational AI interface. Customers can speak (with microphone permission) or type into the prompt bar at the bottom.
- The Orb defaults to the Aurora visual style (soft animated glow).
- An onboarding strip above the orb guides new users through first steps: connect apps, run a first action, explore capabilities.
- Used by default for OpenClaw Auto-Install, Hermes Auto-Install, OpenClaw Setup, and OpenClaw Whitelabel customers.
Experience setup progress tracker
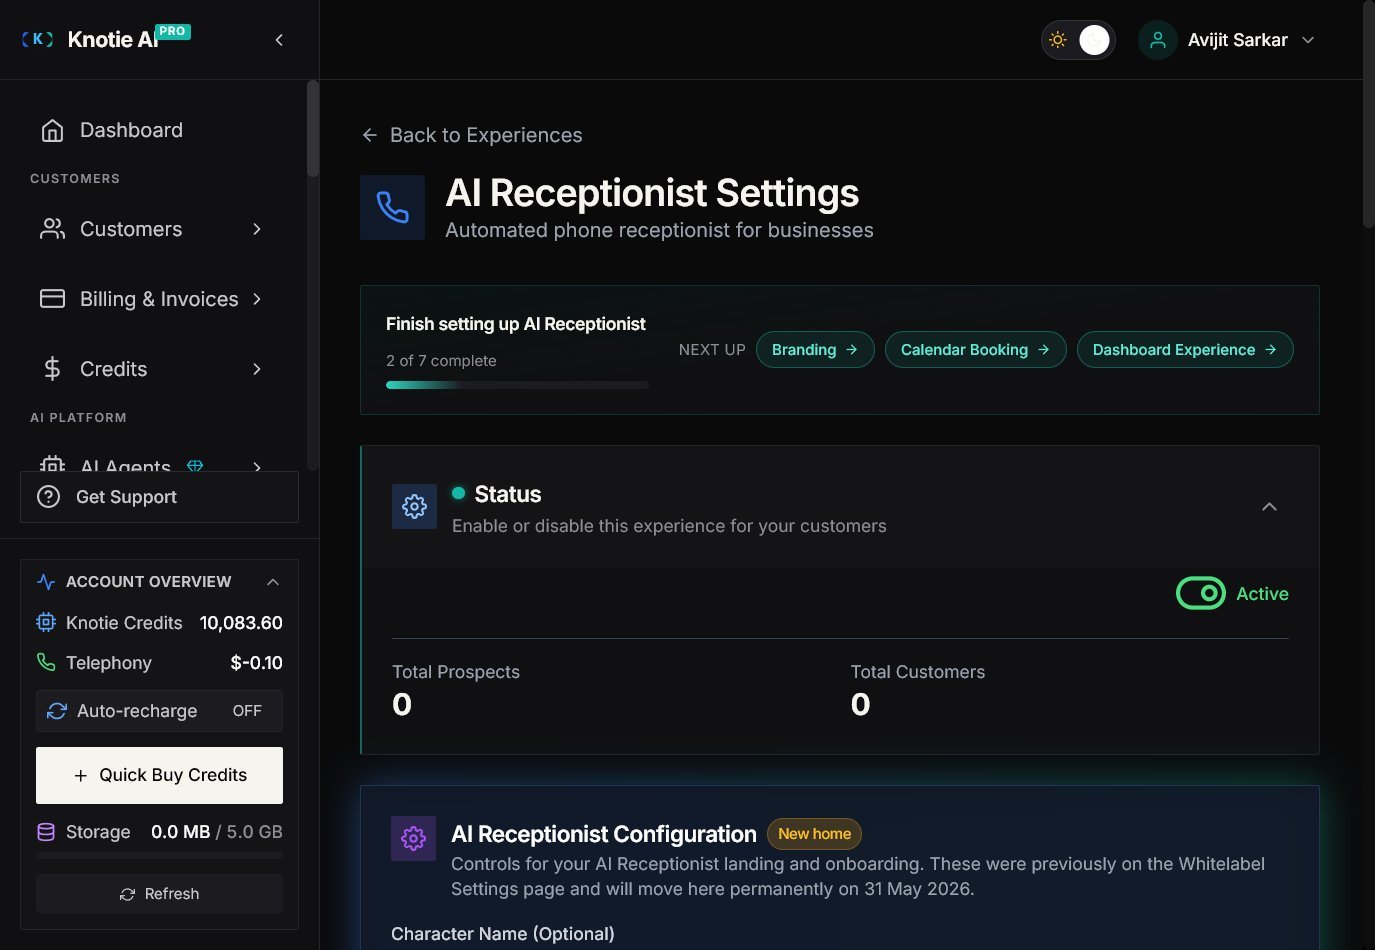
The Experience Settings page includes a Setup Progress checklist — a step-by-step tracker that guides you through completing the experience’s configuration. Steps vary by experience type and may include:- Connect a phone number
- Choose or import an AI agent
- Set the customer dashboard template
- Configure subscription pricing tiers (auto-install experiences)
- Configure the landing page alias and branding
Frequently asked questions
Will enabling V2 change my existing customers' dashboards?
Will enabling V2 change my existing customers' dashboards?
No. The V2 flag only applies to new customers provisioned after you enable it. Existing customers keep the current dashboard. A backfill to opt existing customers in is planned for a future release.
Can I choose different dashboards for different customers within the same experience?
Can I choose different dashboards for different customers within the same experience?
Not from the partner UI yet — the template is set per experience, not per individual customer. A per-customer override can be set by contacting support. A customer-level override UI is planned.
What happens if a customer's template setting is missing or unrecognized?
What happens if a customer's template setting is missing or unrecognized?
The system skips it and falls through to the next level in the order above (experience default → partner global default → mode fallback). The customer always sees a valid dashboard.
Does this affect billing or credit consumption?
Does this affect billing or credit consumption?
No. Dashboard templates are purely a visual change. Credit costs, agent tiers, and billing are unaffected.
Related pages
- Dashboard Experience Templates — concept reference: the six templates, how they’re chosen, the enable setting, and auto-branding details
- AI Experiences — enable and manage your experiences
- Whitelabel Settings — where to find the global default template and V2 toggle
- Platform Configuration — Dashboard Mode (sidebar menu defaults) — separate from experience templates
- Auto-Install Experiences — setup guide for OpenClaw and Hermes (these default to the AI OS dashboard)