> ## Documentation Index
> Fetch the complete documentation index at: https://docs.knotie-ai.pro/llms.txt
> Use this file to discover all available pages before exploring further.
# Warm-lead outbound calls from GoHighLevel (native webhook)
> Call leads within minutes of form submission using Knotie’s native GoHighLevel webhook support — no n8n middleware required.
## Who this is for
Use this playbook if you:
* Run lead-gen campaigns (Facebook Lead Ads, TikTok lead forms, landing-page forms)
* Manage a GoHighLevel (GHL) CRM for yourself or your clients
* Want an AI voice agent to call leads *immediately* while they are still warm
## Business goal
Outbound AI calling fails when you dial cold lists.
This playbook is designed around a simple principle:
* **Call within 5–10 minutes** of the lead submitting a form.
That timing increases pickup rates and reduces the chance your numbers get flagged as spam.
## What you'll build
A GHL Workflow that:
* Triggers when a lead is created / form submitted
* Sends a **Webhook** action directly to Knotie
* Passes structured variables into your voice agent via a `metadata` object
## Prerequisites
* A customer created in your Partner Portal
* A phone number imported (Twilio or **Retell**) and assigned to that customer
* An outbound-capable voice agent assigned to that phone number
* An **Outbound Webhook Key** generated for that phone number (starts with `owk_`)
If you're onboarding a single client, the fastest path is Twilio for the number plus a **Retell** agent — Retell is currently the most reliable provider for the native outbound webhook flow.
 ## Step 1 — Prepare the phone number in Knotie
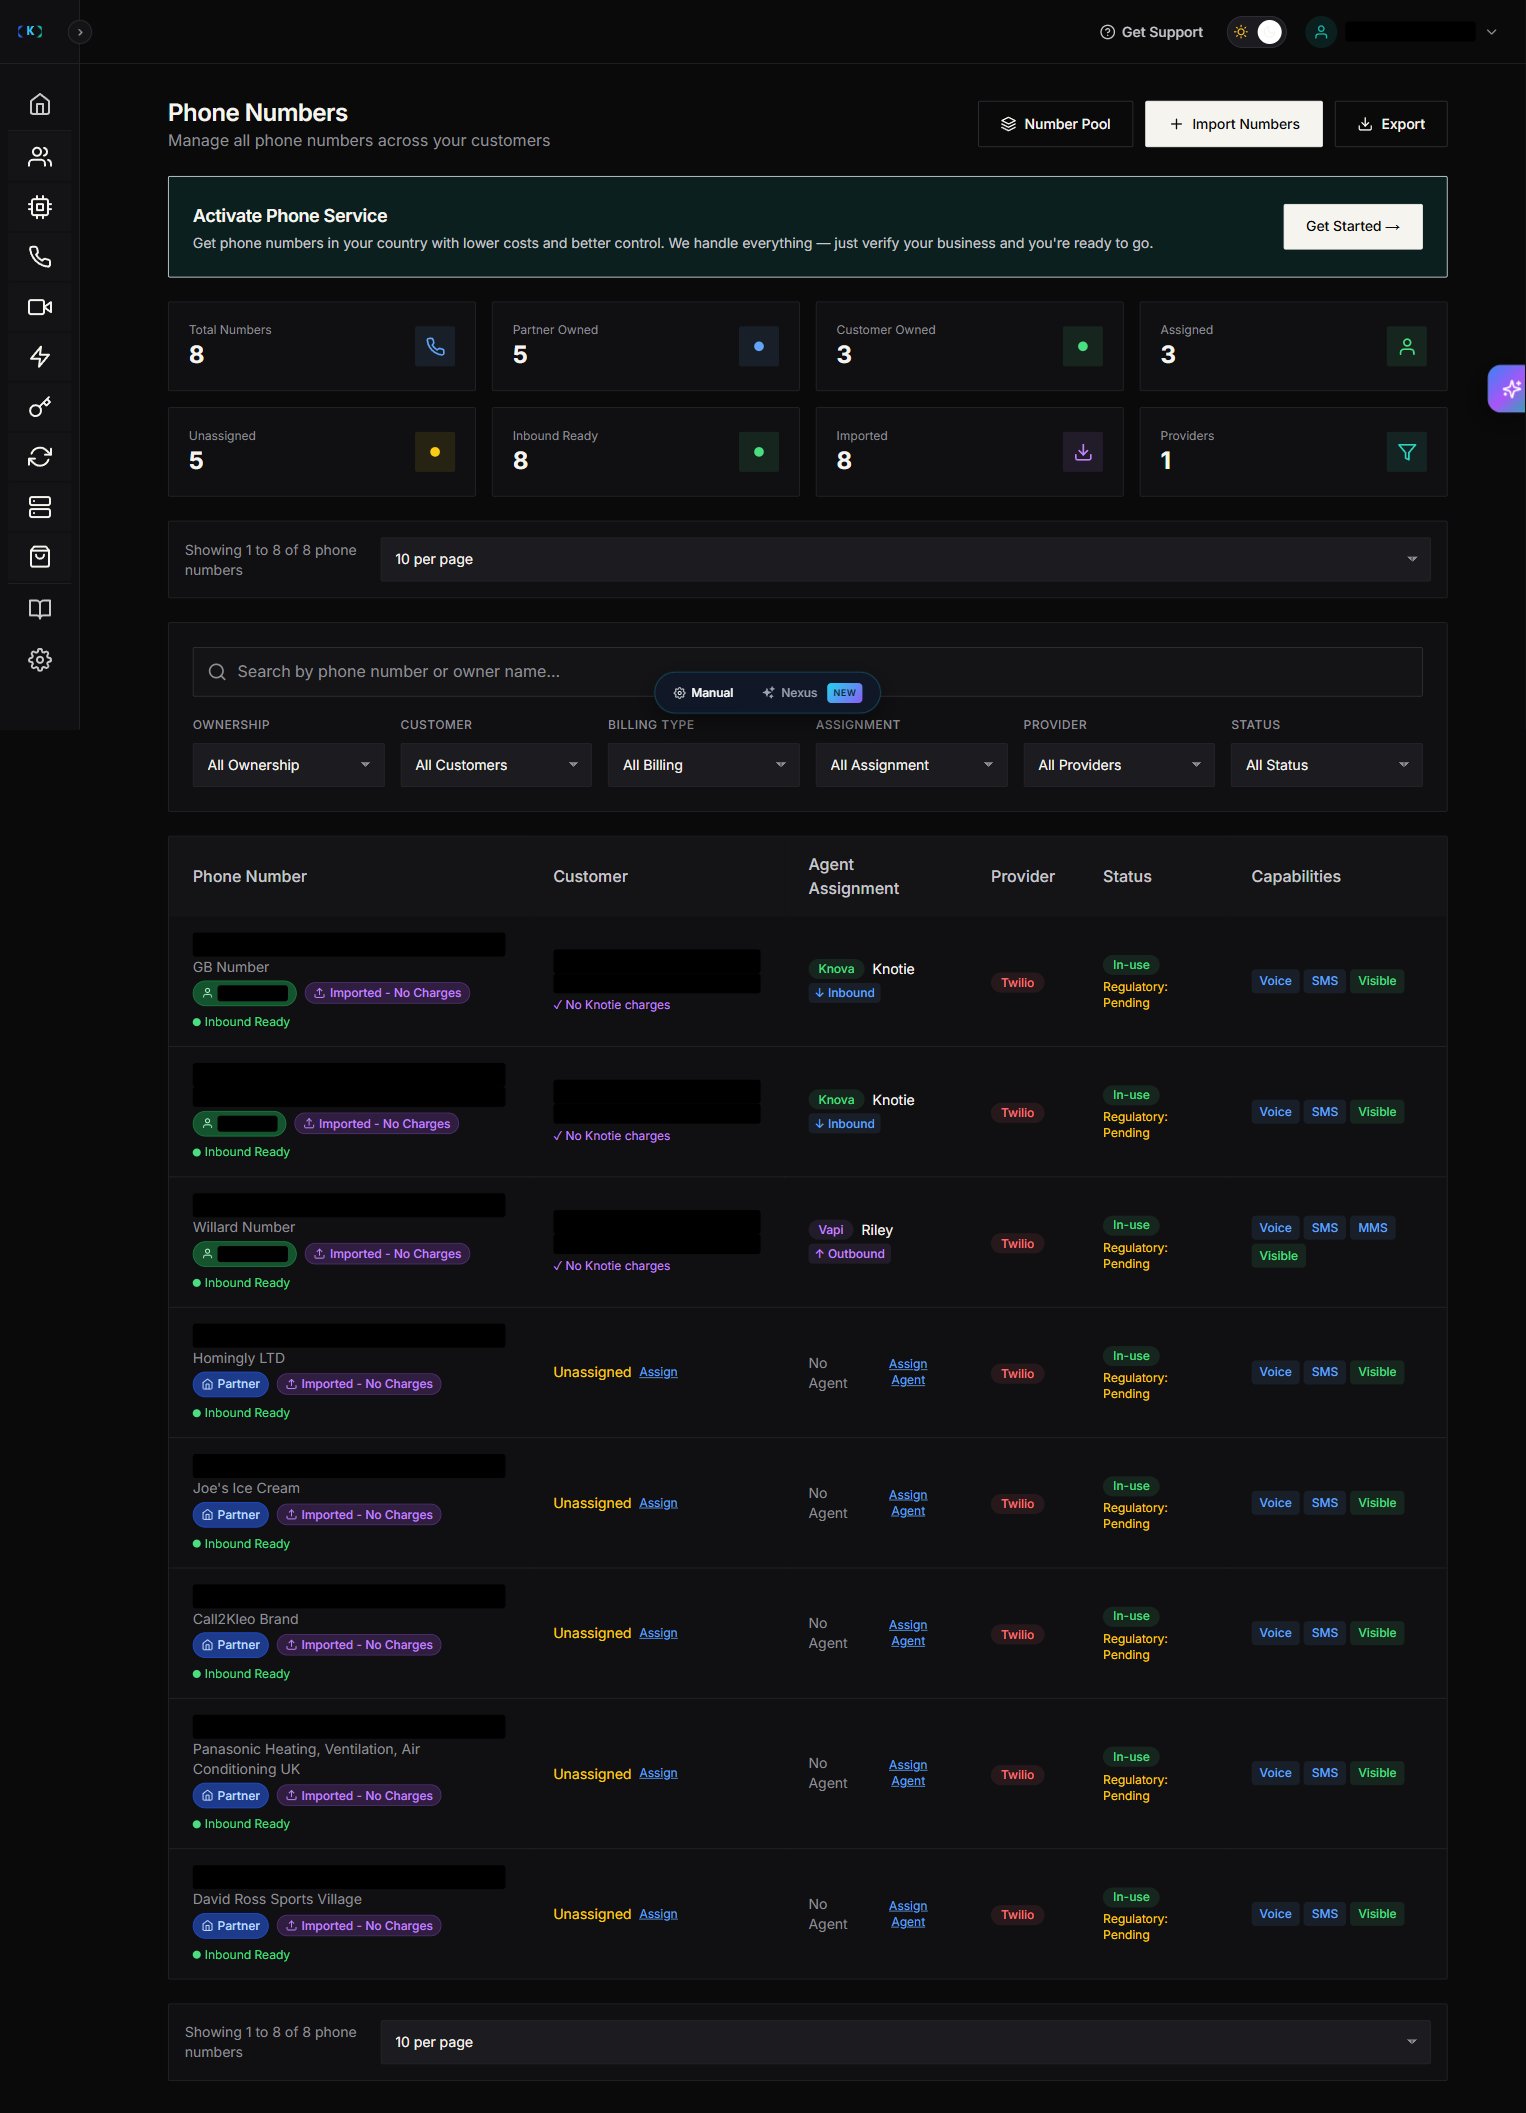
1. Partner Portal → **Phone Numbers**
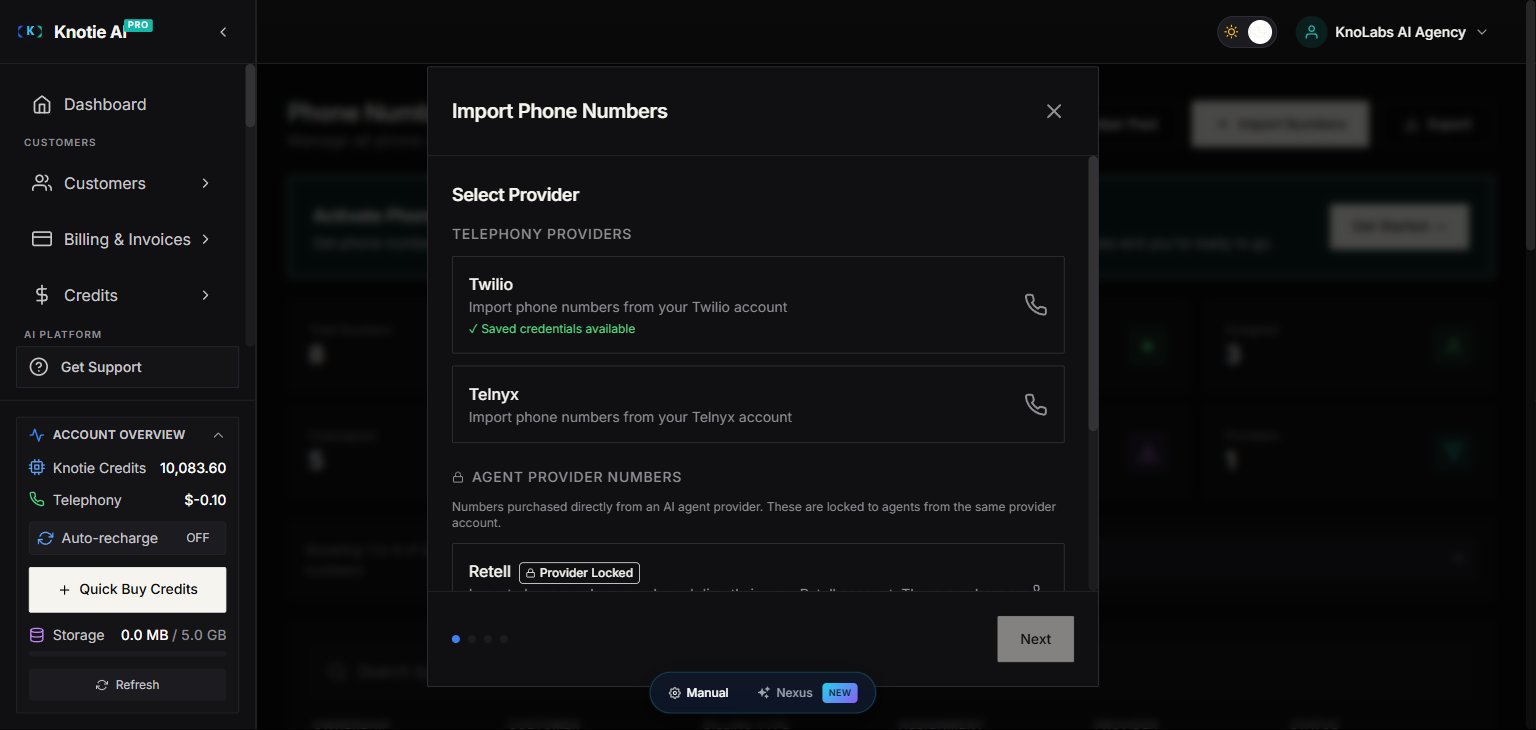
2. Import a phone number (Twilio or Retell)
3. Assign the phone number to the correct customer
4. Assign an outbound-capable agent to the phone number
The Assign Customer picker is a typeahead — start typing the customer's first name, last name, or email. The customer shown in the Phone Numbers list will be the **contact name** (e.g. "Soham Maiti"), not the brand name from your Customers list.
In the **Assign Agent** modal, switch the **Direction** toggle from **Inbound Only** (the default) to **Outbound Only**. If you leave it on Inbound Only, the next step (generating the outbound webhook key) will not be available.
The list of agents you can pick from is scoped to the customer you just assigned. If you onboard multiple clients, each one needs its own outbound-capable agent.
## Step 1 — Prepare the phone number in Knotie
1. Partner Portal → **Phone Numbers**
2. Import a phone number (Twilio or Retell)
3. Assign the phone number to the correct customer
4. Assign an outbound-capable agent to the phone number
The Assign Customer picker is a typeahead — start typing the customer's first name, last name, or email. The customer shown in the Phone Numbers list will be the **contact name** (e.g. "Soham Maiti"), not the brand name from your Customers list.
In the **Assign Agent** modal, switch the **Direction** toggle from **Inbound Only** (the default) to **Outbound Only**. If you leave it on Inbound Only, the next step (generating the outbound webhook key) will not be available.
The list of agents you can pick from is scoped to the customer you just assigned. If you onboard multiple clients, each one needs its own outbound-capable agent.
 ## Step 2 — Generate an outbound webhook key
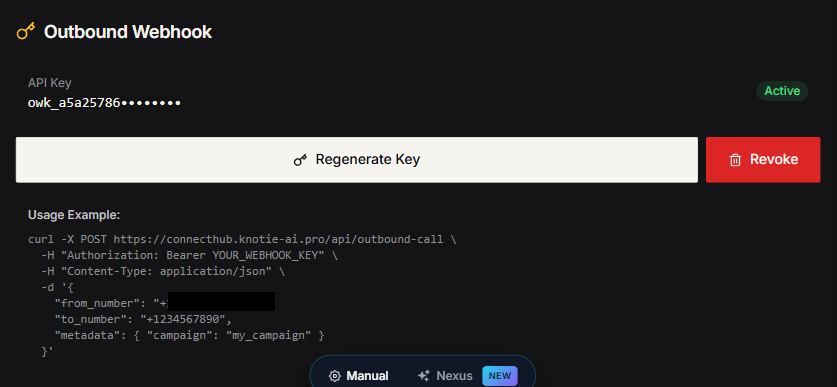
1. Open the phone number details panel
2. Find **Outbound Webhook**
3. Click **Generate Key**
4. Copy the key immediately (shown once)
## Step 2 — Generate an outbound webhook key
1. Open the phone number details panel
2. Find **Outbound Webhook**
3. Click **Generate Key**
4. Copy the key immediately (shown once)
 ## Step 3 — Create the GHL Workflow
1. In GHL: **Automation → Workflows → New Workflow**
2. Choose a trigger that guarantees a phone number exists, for example:
* Facebook Lead Form
* TikTok Lead Gen
* Form Submitted
* Contact Created
> ℹ️ This step happens inside GoHighLevel, not the Knotie portal. In the GHL workflow builder, the trigger picker lists options like **Facebook Lead Form**, **TikTok Lead Gen**, **Form Submitted**, and **Contact Created** — pick the one that guarantees a phone number is present.
## Step 4 — Add a Webhook action (native)
Add an action:
* **Action type**: `Webhook`
* **Method**: `POST`
* **URL**: `https://connecthub.knotie-ai.pro/api/outbound-call`
> ℹ️ In the GHL workflow, add a **Webhook** action and set Method to **POST** and the URL to `https://connecthub.knotie-ai.pro/api/outbound-call`. This configuration lives in the GoHighLevel action panel.
## Step 5 — Add required custom data fields
In the webhook's body, include:
* `from_number`: your registered Knotie phone number (E.164)
* `to_number`: lead phone number (GHL merge field)
Example:
| Key | Value |
| ------------- | ----------------------- |
| `from_number` | `+1XXXXXXXXXX` |
| `to_number` | `{{contact.phone_raw}}` |
## Step 6 — Add dynamic conversation variables
To pass variables into your agent, group them under a `metadata` object in the body.
Example payload:
```json theme={null}
{
"from_number": "+1XXXXXXXXXX",
"to_number": "{{contact.phone_raw}}",
"metadata": {
"campaign": "fb_lead_ads_june",
"customer_name": "{{contact.name}}",
"lead_source": "Facebook Lead Ad",
"service_type": "{{contact.service_type}}"
}
}
```
The keys inside `metadata` become available to your agent as variables — name them whatever your agent prompt expects.
> ℹ️ In the GHL webhook action's **Custom Data** / body editor, add the `from_number` and `to_number` fields plus a nested `metadata` object with your conversation variables, matching the JSON example above.
## Step 7 — Add the Authorization header
In webhook **Headers**:
| Key | Value |
| --------------- | -------------------------- |
| `Authorization` | `Bearer owk_YOUR_KEY_HERE` |
> ℹ️ In the GHL webhook action's **Headers** section, add an `Authorization` header with the value `Bearer owk_YOUR_KEY_HERE`, using the outbound webhook key you generated in Step 2.
## Step 8 — Test
1. Use a test submission (or GHL test tool)
2. Confirm the webhook step shows `200 OK`
3. Confirm an outbound call appears in Knotie call logs
### Common failure modes
* **401 Unauthorized**
* Wrong `Authorization` header or wrong key
* **404 Phone not found**
* `from_number` does not match the imported/registered number
* **402 Insufficient credits**
* Customer needs credits
* **400 UNSUPPORTED\_PROVIDER**
* The agent assigned to the number is not compatible with the outbound webhook endpoint. Use a Retell agent for the most reliable path.
## Recommended agent behavior (anti-spam)
In your agent script/prompt:
* Acknowledge the lead action (“You just submitted our form…”) to reduce hang-ups
* Ask 1–2 qualifying questions
* Move to a single CTA (book a call, send a link, confirm availability)
> ℹ️ In your agent's system prompt, reference each `metadata` key with the `{{key}}` syntax (e.g. `Hi {{customer_name}}, you just submitted our {{service_type}} form…`). The exact prompt is specific to your agent, so capture it from your own agent builder.
## Step 3 — Create the GHL Workflow
1. In GHL: **Automation → Workflows → New Workflow**
2. Choose a trigger that guarantees a phone number exists, for example:
* Facebook Lead Form
* TikTok Lead Gen
* Form Submitted
* Contact Created
> ℹ️ This step happens inside GoHighLevel, not the Knotie portal. In the GHL workflow builder, the trigger picker lists options like **Facebook Lead Form**, **TikTok Lead Gen**, **Form Submitted**, and **Contact Created** — pick the one that guarantees a phone number is present.
## Step 4 — Add a Webhook action (native)
Add an action:
* **Action type**: `Webhook`
* **Method**: `POST`
* **URL**: `https://connecthub.knotie-ai.pro/api/outbound-call`
> ℹ️ In the GHL workflow, add a **Webhook** action and set Method to **POST** and the URL to `https://connecthub.knotie-ai.pro/api/outbound-call`. This configuration lives in the GoHighLevel action panel.
## Step 5 — Add required custom data fields
In the webhook's body, include:
* `from_number`: your registered Knotie phone number (E.164)
* `to_number`: lead phone number (GHL merge field)
Example:
| Key | Value |
| ------------- | ----------------------- |
| `from_number` | `+1XXXXXXXXXX` |
| `to_number` | `{{contact.phone_raw}}` |
## Step 6 — Add dynamic conversation variables
To pass variables into your agent, group them under a `metadata` object in the body.
Example payload:
```json theme={null}
{
"from_number": "+1XXXXXXXXXX",
"to_number": "{{contact.phone_raw}}",
"metadata": {
"campaign": "fb_lead_ads_june",
"customer_name": "{{contact.name}}",
"lead_source": "Facebook Lead Ad",
"service_type": "{{contact.service_type}}"
}
}
```
The keys inside `metadata` become available to your agent as variables — name them whatever your agent prompt expects.
> ℹ️ In the GHL webhook action's **Custom Data** / body editor, add the `from_number` and `to_number` fields plus a nested `metadata` object with your conversation variables, matching the JSON example above.
## Step 7 — Add the Authorization header
In webhook **Headers**:
| Key | Value |
| --------------- | -------------------------- |
| `Authorization` | `Bearer owk_YOUR_KEY_HERE` |
> ℹ️ In the GHL webhook action's **Headers** section, add an `Authorization` header with the value `Bearer owk_YOUR_KEY_HERE`, using the outbound webhook key you generated in Step 2.
## Step 8 — Test
1. Use a test submission (or GHL test tool)
2. Confirm the webhook step shows `200 OK`
3. Confirm an outbound call appears in Knotie call logs
### Common failure modes
* **401 Unauthorized**
* Wrong `Authorization` header or wrong key
* **404 Phone not found**
* `from_number` does not match the imported/registered number
* **402 Insufficient credits**
* Customer needs credits
* **400 UNSUPPORTED\_PROVIDER**
* The agent assigned to the number is not compatible with the outbound webhook endpoint. Use a Retell agent for the most reliable path.
## Recommended agent behavior (anti-spam)
In your agent script/prompt:
* Acknowledge the lead action (“You just submitted our form…”) to reduce hang-ups
* Ask 1–2 qualifying questions
* Move to a single CTA (book a call, send a link, confirm availability)
> ℹ️ In your agent's system prompt, reference each `metadata` key with the `{{key}}` syntax (e.g. `Hi {{customer_name}}, you just submitted our {{service_type}} form…`). The exact prompt is specific to your agent, so capture it from your own agent builder.