> ## Documentation Index
> Fetch the complete documentation index at: https://docs.knotie-ai.pro/llms.txt
> Use this file to discover all available pages before exploring further.
# VAPI end-to-end: import, assign, deploy, and analyze a voice agent
> Walk through the full VAPI integration — from the Partner Portal's AI Agents page to a live, tracked, customer-assigned voice agent.
## Why this use case exists
VAPI is the most-used third-party voice agent provider among Knotie partners, and the **AI Agents** page is the single entry point for every provider card. This playbook documents the **end-to-end** VAPI journey — not just the import step, but the full chain that gets a customer's call on the bill:
1. Import VAPI agents into Knotie
2. Assign an imported agent to a customer
3. Attach a phone number to the agent
4. Place a test call (or trigger an inbound)
5. Verify the call lands in **Agent Analytics** with a cost breakdown
6. Confirm the cost flows through **AI Gateway** and **Credits**
 ## What you'll achieve
* A VAPI agent imported into the Partner Portal and ready to take calls
* The agent assigned to a customer with a profit multiplier set
* A phone number attached so the agent can be reached
* A test call recorded in **Agent Analytics** within seconds of the call ending
* A clear understanding of where the cost lands (Knotie Credits, AI Gateway, customer bill)
## Prerequisites
* An active VAPI account with at least one agent already created in the VAPI dashboard
* A VAPI **API key** (from VAPI dashboard → Settings → API Keys)
* At least one customer already onboarded in the Knotie Partner Portal (see [Onboard a customer](/customer-management/onboard-customer))
* A phone number available in Knotie — either imported from VAPI/Twilio/Telnyx or purchased directly (see [Phone Numbers](/partner-portal/phone-numbers) and the [Retell phone number import use case](/use-cases/retell-phone-number-import-and-outbound))
* Sufficient Knotie Credits to cover the test call (typically \< \$0.10 for a short test)
***
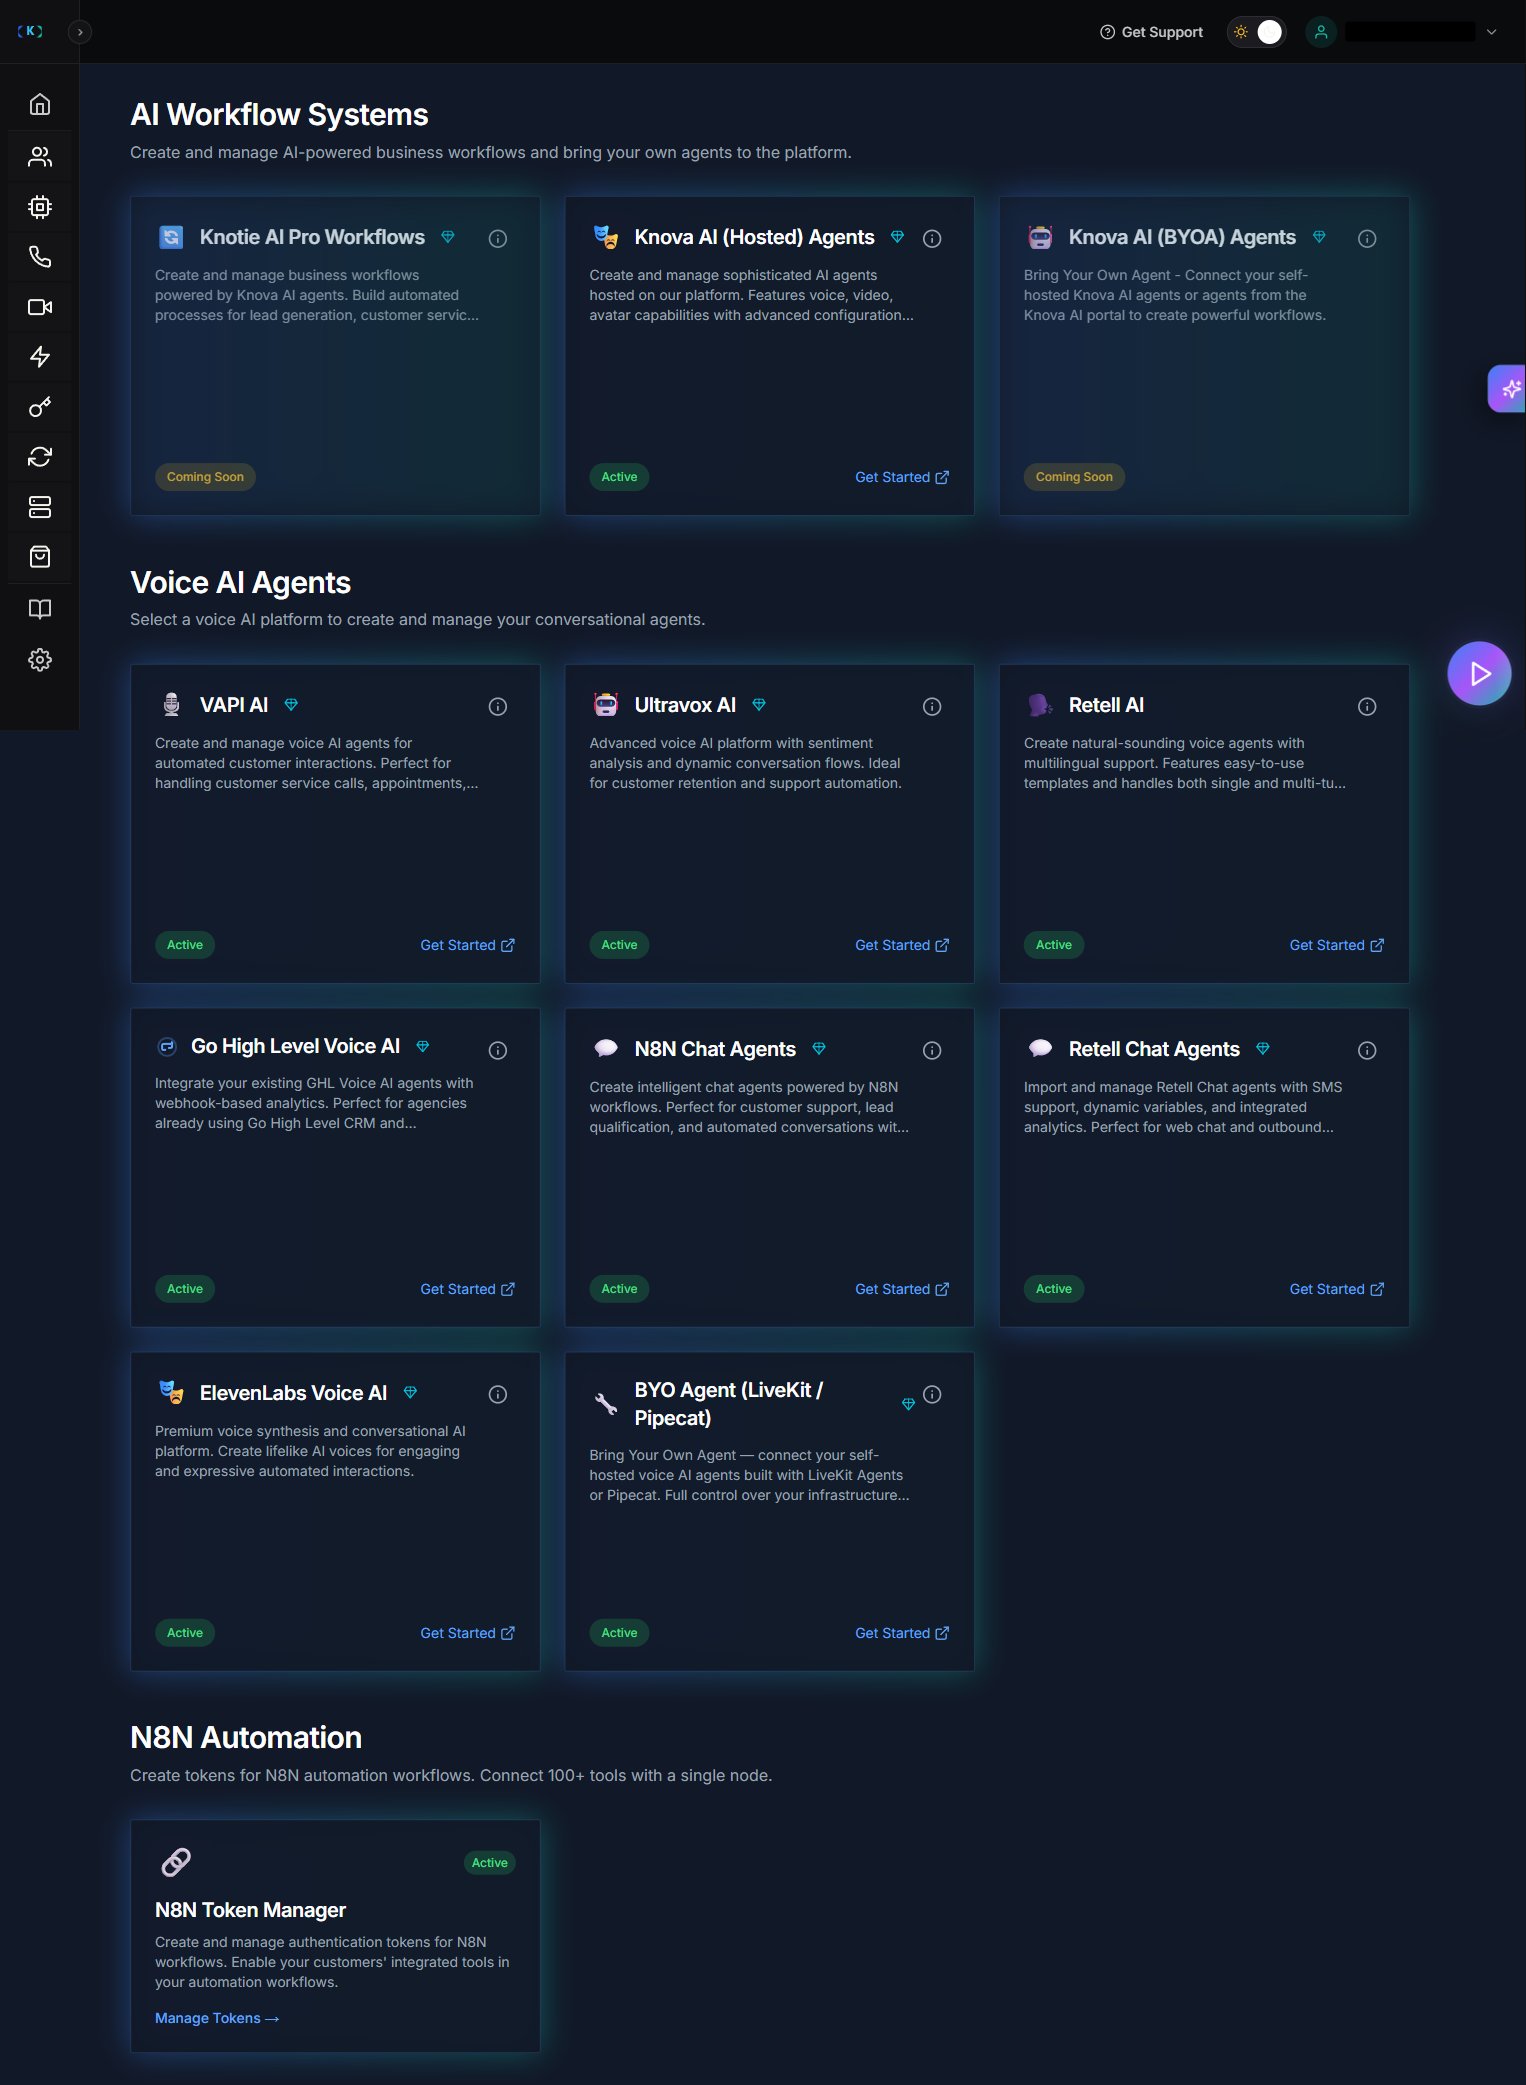
## Step 1 — Open the VAPI card on the AI Agents panel
1. Sign in to the **Partner Portal** at `https://knotie-ai.pro/partners`
2. In the main sidebar, expand **AI Agents** (an expandable button under **AI PLATFORM** — click to reveal its sub-groups)
3. The AI Agents panel organises providers into three sub-groups:
* **Voice Agents** — VAPI, Ultravox, Retell, ElevenLabs, GHL, Knova
* **Chat Agents** — Retell Chat, N8N Chat Agents
* **Automation & Tokens** — N8N Automation, N8N Tokens *(MCP Tokens is now a top-level link, not nested here)*
4. Under **Voice Agents**, click **VAPI Agents**
## What you'll achieve
* A VAPI agent imported into the Partner Portal and ready to take calls
* The agent assigned to a customer with a profit multiplier set
* A phone number attached so the agent can be reached
* A test call recorded in **Agent Analytics** within seconds of the call ending
* A clear understanding of where the cost lands (Knotie Credits, AI Gateway, customer bill)
## Prerequisites
* An active VAPI account with at least one agent already created in the VAPI dashboard
* A VAPI **API key** (from VAPI dashboard → Settings → API Keys)
* At least one customer already onboarded in the Knotie Partner Portal (see [Onboard a customer](/customer-management/onboard-customer))
* A phone number available in Knotie — either imported from VAPI/Twilio/Telnyx or purchased directly (see [Phone Numbers](/partner-portal/phone-numbers) and the [Retell phone number import use case](/use-cases/retell-phone-number-import-and-outbound))
* Sufficient Knotie Credits to cover the test call (typically \< \$0.10 for a short test)
***
## Step 1 — Open the VAPI card on the AI Agents panel
1. Sign in to the **Partner Portal** at `https://knotie-ai.pro/partners`
2. In the main sidebar, expand **AI Agents** (an expandable button under **AI PLATFORM** — click to reveal its sub-groups)
3. The AI Agents panel organises providers into three sub-groups:
* **Voice Agents** — VAPI, Ultravox, Retell, ElevenLabs, GHL, Knova
* **Chat Agents** — Retell Chat, N8N Chat Agents
* **Automation & Tokens** — N8N Automation, N8N Tokens *(MCP Tokens is now a top-level link, not nested here)*
4. Under **Voice Agents**, click **VAPI Agents**
 If you don't see VAPI Agents in the Voice Agents list:
* Your plan may not include VAPI integrations — VAPI is a **Premium Feature** on some tiers and the import action will be gated.
* Check **Settings → Partner API Keys** to confirm your API keys are valid. The live Settings sidebar has 5 items: Profile Settings / Partner API Keys / Email Domain Management / Plans & Billing / White-Label Portal. There is no "Integration Settings" entry.
***
## Step 2 — Start the VAPI import
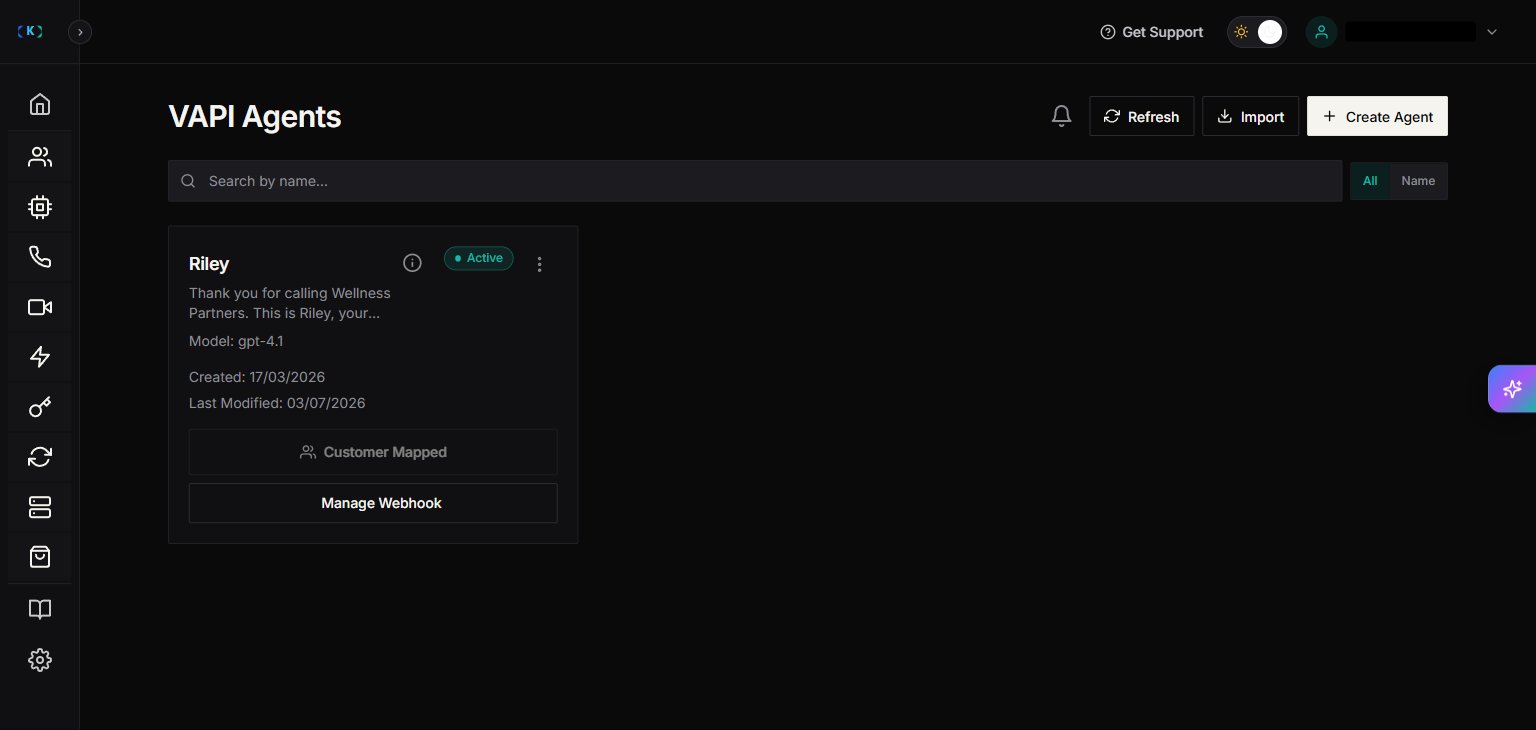
1. Click the **VAPI AI** card. You should land on the VAPI sub-page (path is roughly `/partner/ai-agents/vapi`).
2. On the VAPI agents page, click the **Import Agents** button (typically top-right).
If you don't see VAPI Agents in the Voice Agents list:
* Your plan may not include VAPI integrations — VAPI is a **Premium Feature** on some tiers and the import action will be gated.
* Check **Settings → Partner API Keys** to confirm your API keys are valid. The live Settings sidebar has 5 items: Profile Settings / Partner API Keys / Email Domain Management / Plans & Billing / White-Label Portal. There is no "Integration Settings" entry.
***
## Step 2 — Start the VAPI import
1. Click the **VAPI AI** card. You should land on the VAPI sub-page (path is roughly `/partner/ai-agents/vapi`).
2. On the VAPI agents page, click the **Import Agents** button (typically top-right).
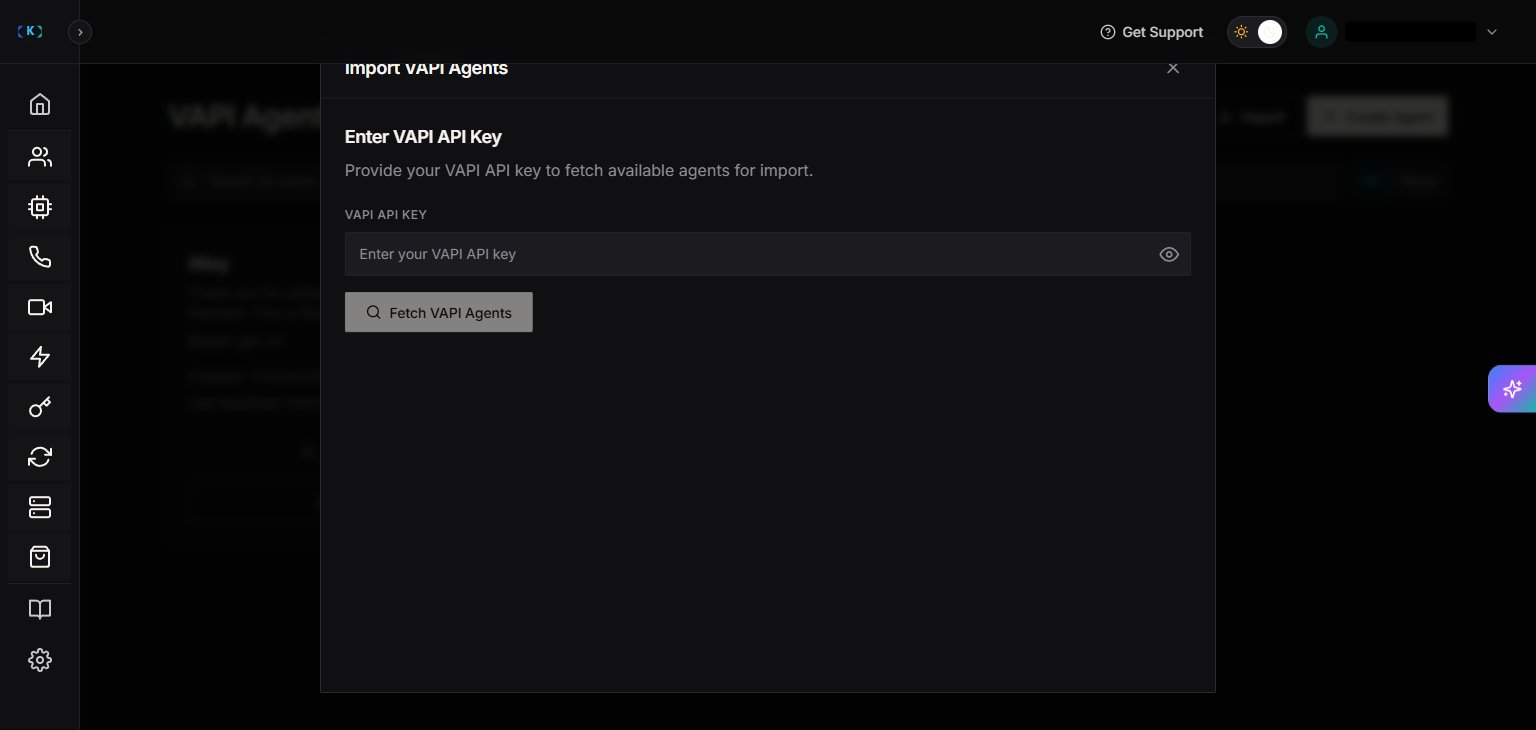
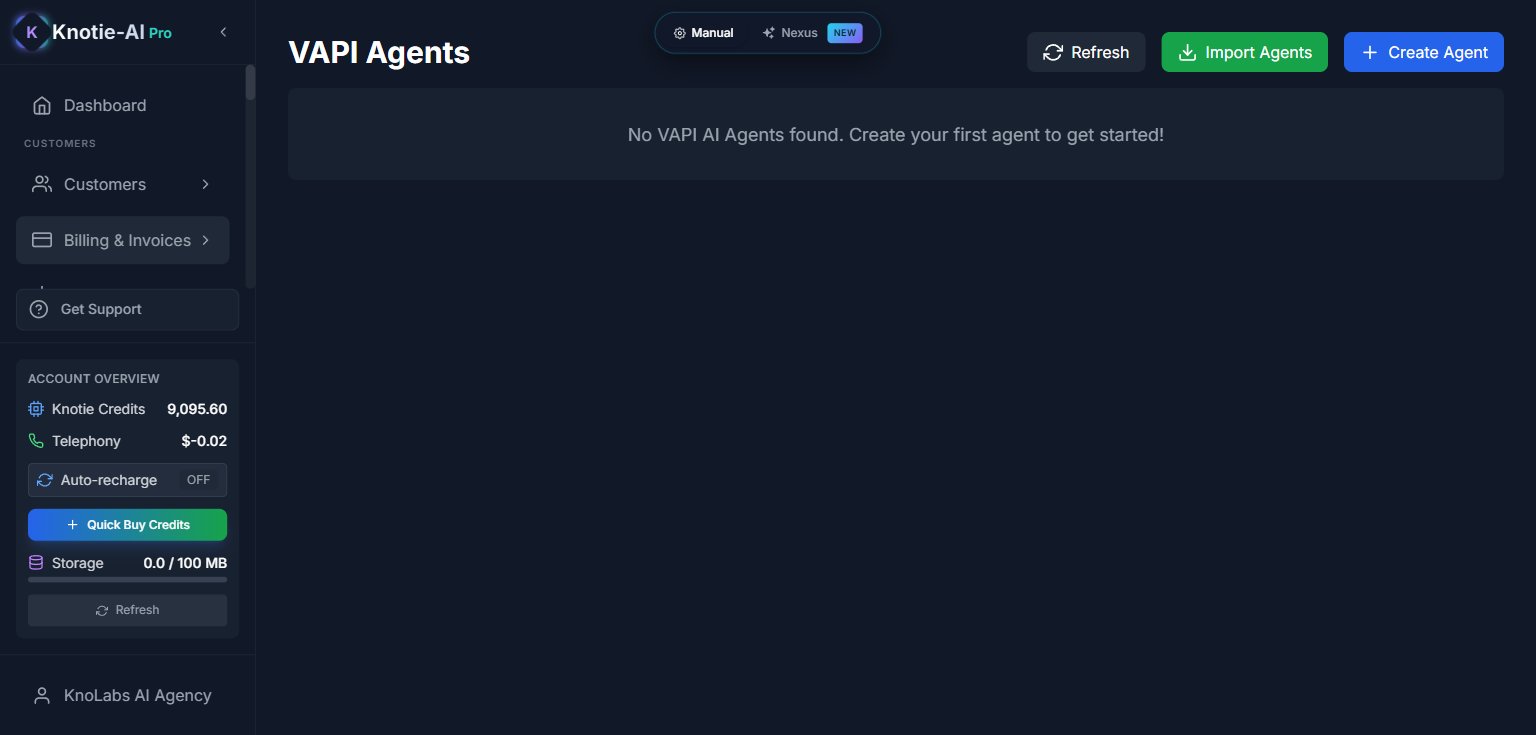 3. The import modal opens. It will prompt you for:
* **VAPI API Key** — paste the key from your VAPI dashboard. Knotie uses this once to fetch your agent list; the key is stored for analytics + webhook plumbing.
4. Click **Fetch VAPI Agents**.
3. The import modal opens. It will prompt you for:
* **VAPI API Key** — paste the key from your VAPI dashboard. Knotie uses this once to fetch your agent list; the key is stored for analytics + webhook plumbing.
4. Click **Fetch VAPI Agents**.
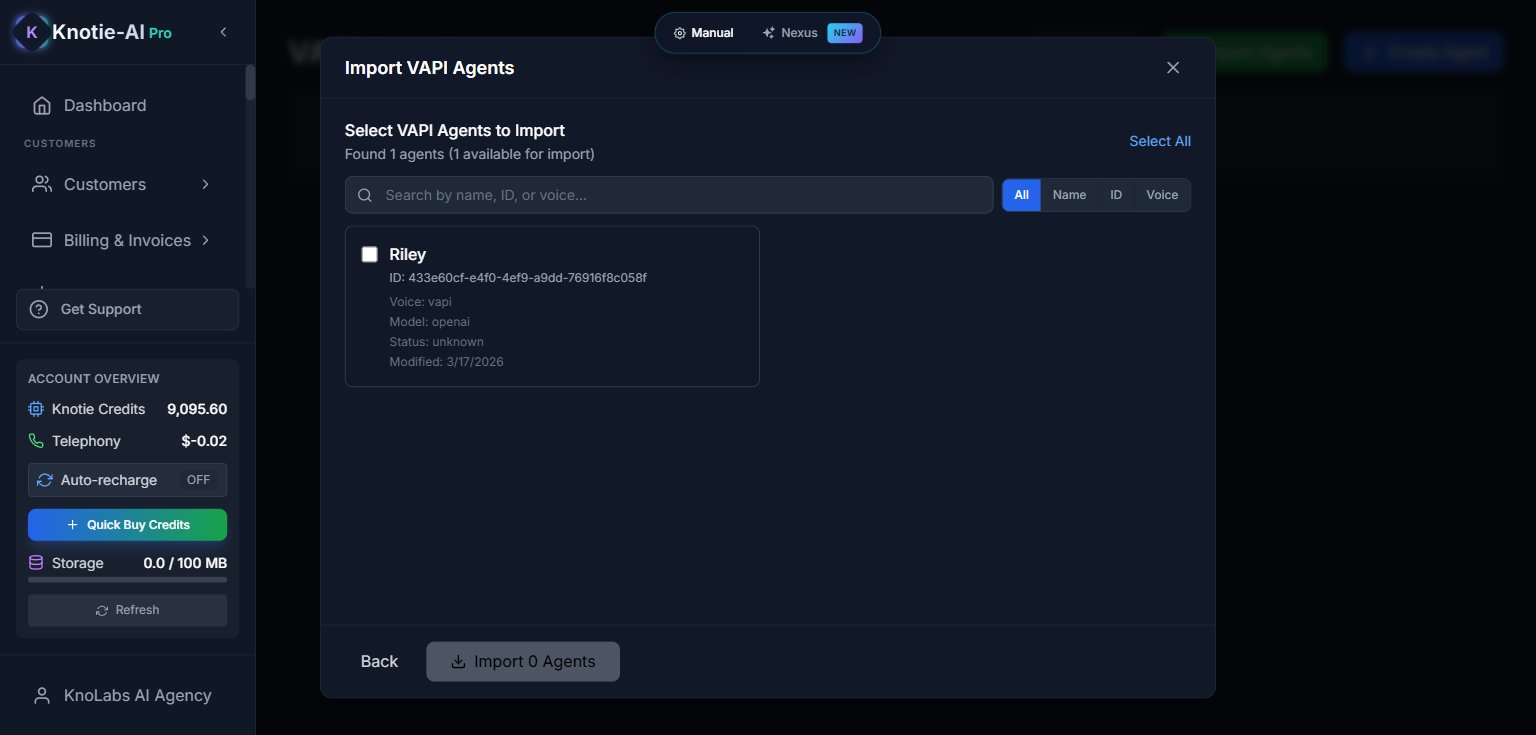
 5. Knotie calls VAPI and lists the agents available in your account.
6. Each agent shows:
* **Agent name** and **agent ID** (read-only)
* **Import status** — `Available` for new agents, `Imported` for agents already in Knotie
* A checkbox to select it for this import batch
7. Select the agent(s) you want to import. To bring them all in one shot, use **Select All**.
8. Click **Import**.
5. Knotie calls VAPI and lists the agents available in your account.
6. Each agent shows:
* **Agent name** and **agent ID** (read-only)
* **Import status** — `Available` for new agents, `Imported` for agents already in Knotie
* A checkbox to select it for this import batch
7. Select the agent(s) you want to import. To bring them all in one shot, use **Select All**.
8. Click **Import**.
 9. The modal closes and the page shows a success state. Knotie automatically:
* Registers each agent with **Agent Analytics**
* Sets up the **webhook configuration** with VAPI so call events are forwarded to Knotie
9. The modal closes and the page shows a success state. Knotie automatically:
* Registers each agent with **Agent Analytics**
* Sets up the **webhook configuration** with VAPI so call events are forwarded to Knotie
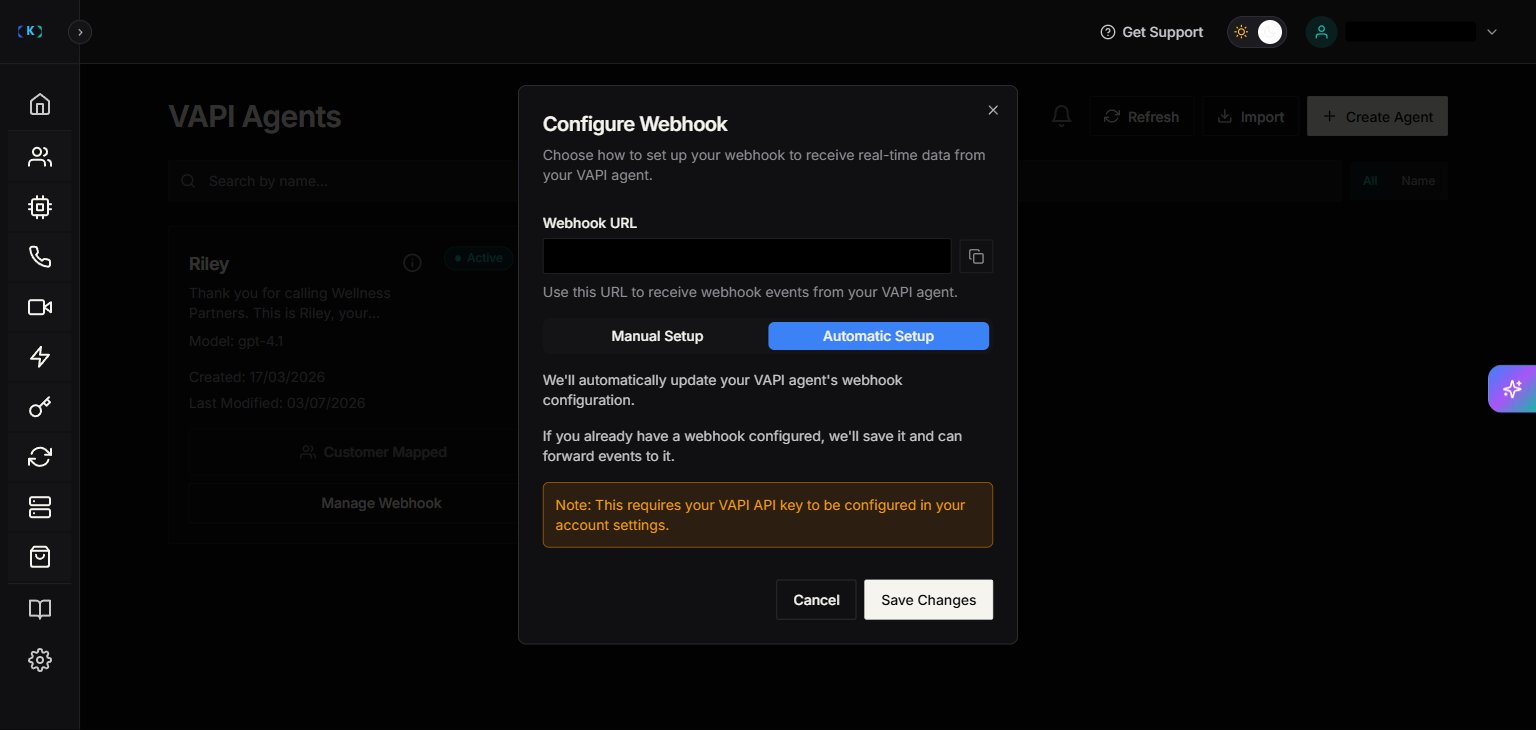 This step is documented in detail in [Import a VAPI agent](/agents/vapi/import-vapi-agent).
**"Please update your VAPI API key in settings"**
The API key stored on your account is invalid or missing. Go to **Settings → Partner API Keys** and confirm your keys are valid, then return to **AI Agents → Voice Agents → VAPI Agents** and retry.
**No agents available for import**
All your VAPI agents are already imported. To verify, check the VAPI dashboard — the count there should match what you see in Knotie.
**You hit a plan limit**
VAPI imports may be gated by plan tier. The UI will show an upgrade message if so.
***
## Step 3 — Assign the imported agent to a customer
Imported agents are unassigned by default — they exist in the Partner Portal but no customer is paying for them yet.
1. On the VAPI agents page, find the newly imported agent.
2. Open the agent's **action menu** (three-dot menu or row-level actions).
3. Click **Assign Customer** (or **Map to Customer**, depending on the UI version).
4. The assignment modal opens. Fill in:
* **Customer** — select from the dropdown of onboarded customers
* **Profit multiplier** — the markup you charge the customer above Knotie's cost. Default is `1.2x` (i.e. 20% margin).
5. Click **Save / Assign**.
This step is documented in detail in [Import a VAPI agent](/agents/vapi/import-vapi-agent).
**"Please update your VAPI API key in settings"**
The API key stored on your account is invalid or missing. Go to **Settings → Partner API Keys** and confirm your keys are valid, then return to **AI Agents → Voice Agents → VAPI Agents** and retry.
**No agents available for import**
All your VAPI agents are already imported. To verify, check the VAPI dashboard — the count there should match what you see in Knotie.
**You hit a plan limit**
VAPI imports may be gated by plan tier. The UI will show an upgrade message if so.
***
## Step 3 — Assign the imported agent to a customer
Imported agents are unassigned by default — they exist in the Partner Portal but no customer is paying for them yet.
1. On the VAPI agents page, find the newly imported agent.
2. Open the agent's **action menu** (three-dot menu or row-level actions).
3. Click **Assign Customer** (or **Map to Customer**, depending on the UI version).
4. The assignment modal opens. Fill in:
* **Customer** — select from the dropdown of onboarded customers
* **Profit multiplier** — the markup you charge the customer above Knotie's cost. Default is `1.2x` (i.e. 20% margin).
5. Click **Save / Assign**.
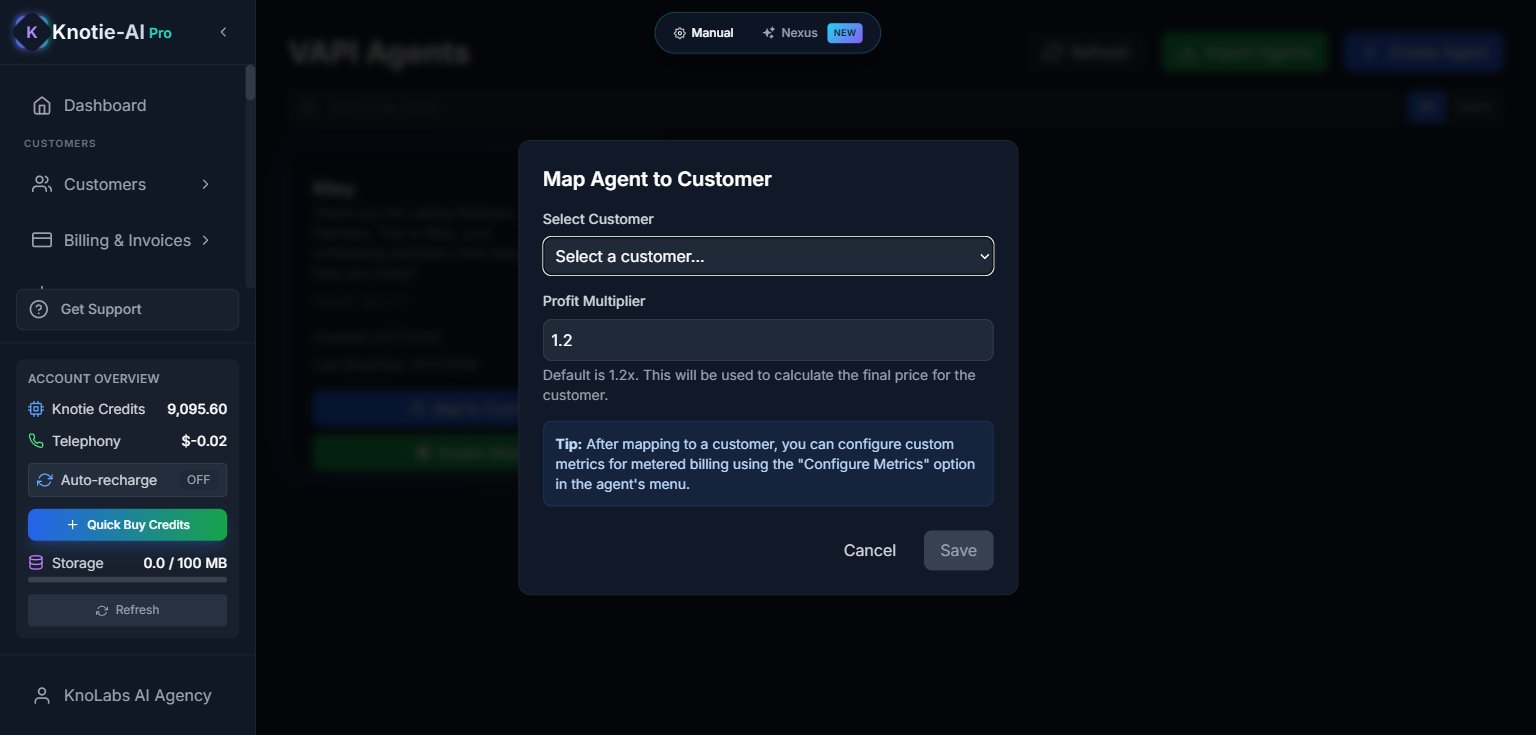 The agent is now tied to that customer for billing and analytics purposes. The customer will see the agent in their own whitelabel portal under **Conversations**.
**Profit multiplier** is the partner's markup on the upstream VAPI cost. If VAPI charges you $0.10/minute for LLM+STT+TTS combined, and you set the multiplier to `1.2x`, the customer is billed $0.12/minute. You can change the multiplier per customer without re-importing the agent.
***
## Step 4 — Attach a phone number to the agent
The agent can run, but no one can reach it until a phone number is mapped to it.
1. In the main sidebar, click **Phone Numbers**.
2. Find or import a phone number. If you don't have one:
* Click **Import Numbers** and pull one from VAPI/Twilio/Telnyx
* Or click **Buy Number** to purchase one through Knotie
The agent is now tied to that customer for billing and analytics purposes. The customer will see the agent in their own whitelabel portal under **Conversations**.
**Profit multiplier** is the partner's markup on the upstream VAPI cost. If VAPI charges you $0.10/minute for LLM+STT+TTS combined, and you set the multiplier to `1.2x`, the customer is billed $0.12/minute. You can change the multiplier per customer without re-importing the agent.
***
## Step 4 — Attach a phone number to the agent
The agent can run, but no one can reach it until a phone number is mapped to it.
1. In the main sidebar, click **Phone Numbers**.
2. Find or import a phone number. If you don't have one:
* Click **Import Numbers** and pull one from VAPI/Twilio/Telnyx
* Or click **Buy Number** to purchase one through Knotie
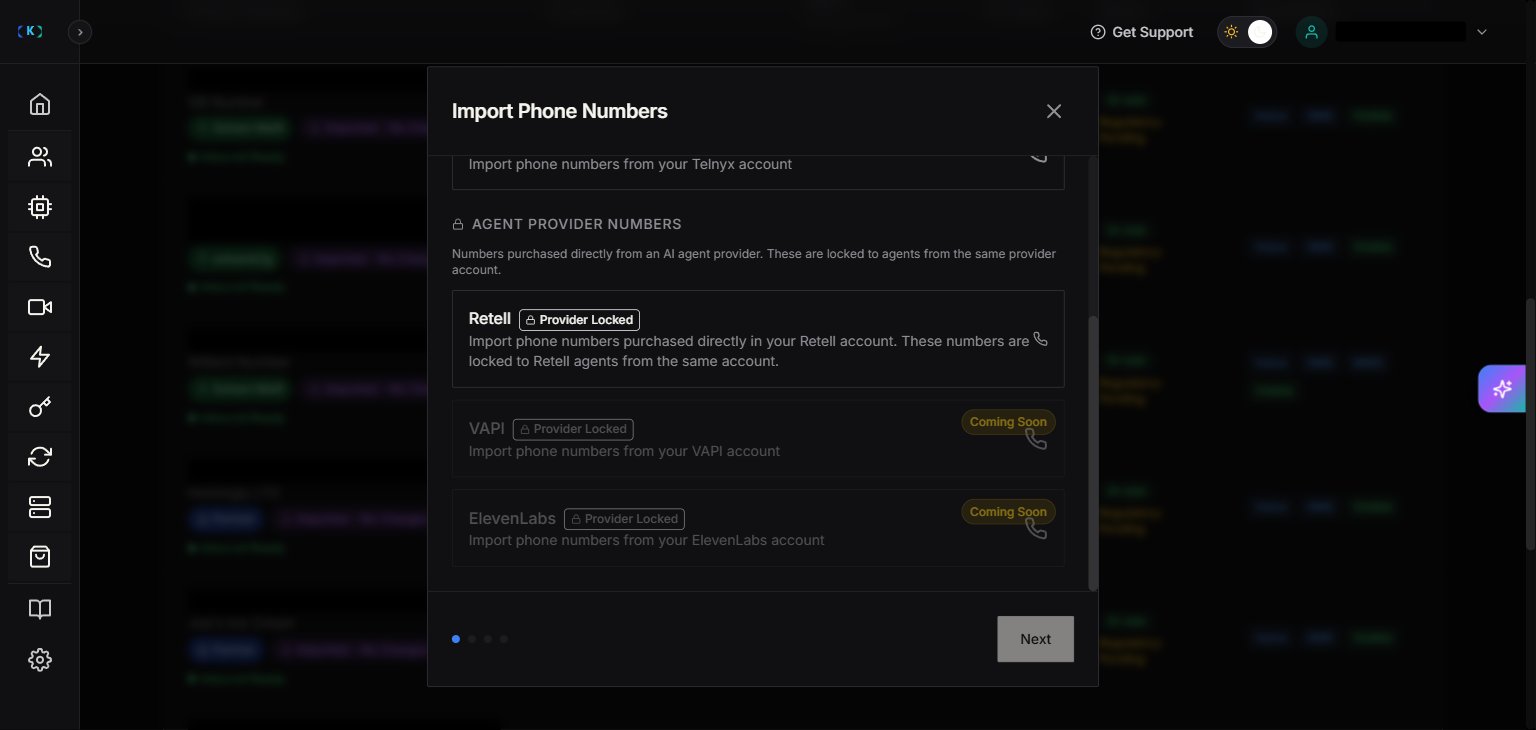 3. For the number you want to use, open its **action menu** and click **Assign Agent**.
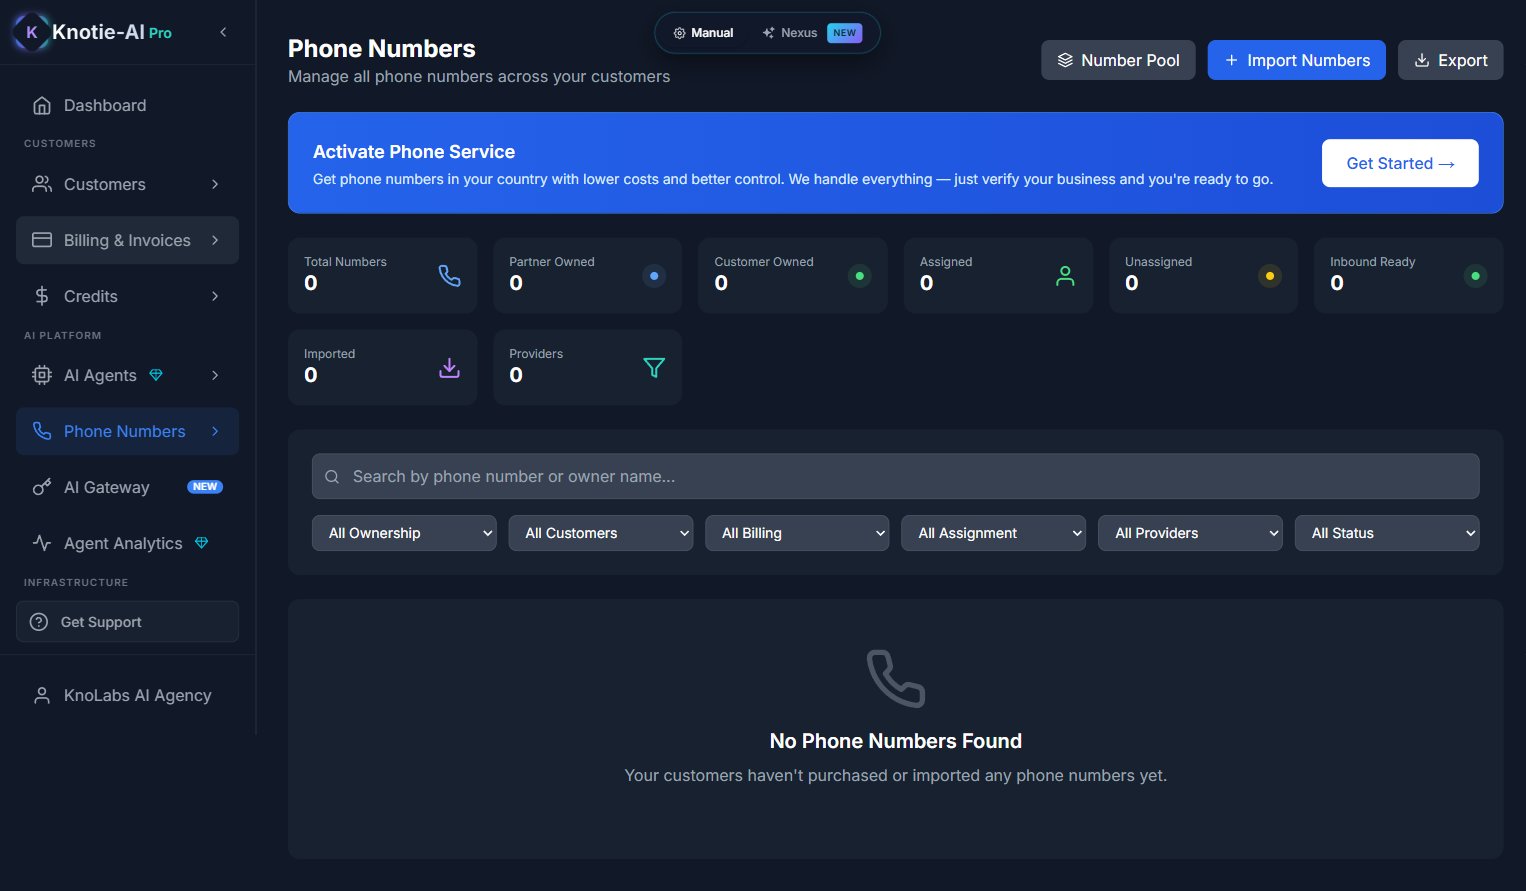 The Phone Numbers page above shows the empty state for a partner that has not yet imported or purchased any numbers. Once at least one number exists, the row-level **Assign Agent** action becomes available — see [Phone Numbers](/partner-portal/phone-numbers) for the import/purchase flow and the [Retell phone number import use case](/use-cases/retell-phone-number-import-and-outbound) for a worked example of the assignment action.
4. In the assignment modal:
* **Agent** — select the VAPI agent you imported
* **Direction** — choose **Inbound**, **Outbound**, or **Both** depending on the use case
5. Save.
If you imported a number from VAPI specifically, the number is owned by your VAPI account. Knotie still tracks the customer assignment and credit usage, but the telephony bill may remain with VAPI. See [Retell phone number import](/use-cases/retell-phone-number-import-and-outbound) for the same pattern with Retell.
***
## Step 5 — Place a test call
You have three options for the test, in increasing order of realism:
### Option A — VAPI's test panel (fastest, no phone number needed)
1. Open the VAPI dashboard at [dashboard.vapi.ai](https://dashboard.vapi.ai)
2. Navigate to the imported agent
3. Click the **Test** button in VAPI's UI
4. Speak with the agent in your browser
The Phone Numbers page above shows the empty state for a partner that has not yet imported or purchased any numbers. Once at least one number exists, the row-level **Assign Agent** action becomes available — see [Phone Numbers](/partner-portal/phone-numbers) for the import/purchase flow and the [Retell phone number import use case](/use-cases/retell-phone-number-import-and-outbound) for a worked example of the assignment action.
4. In the assignment modal:
* **Agent** — select the VAPI agent you imported
* **Direction** — choose **Inbound**, **Outbound**, or **Both** depending on the use case
5. Save.
If you imported a number from VAPI specifically, the number is owned by your VAPI account. Knotie still tracks the customer assignment and credit usage, but the telephony bill may remain with VAPI. See [Retell phone number import](/use-cases/retell-phone-number-import-and-outbound) for the same pattern with Retell.
***
## Step 5 — Place a test call
You have three options for the test, in increasing order of realism:
### Option A — VAPI's test panel (fastest, no phone number needed)
1. Open the VAPI dashboard at [dashboard.vapi.ai](https://dashboard.vapi.ai)
2. Navigate to the imported agent
3. Click the **Test** button in VAPI's UI
4. Speak with the agent in your browser
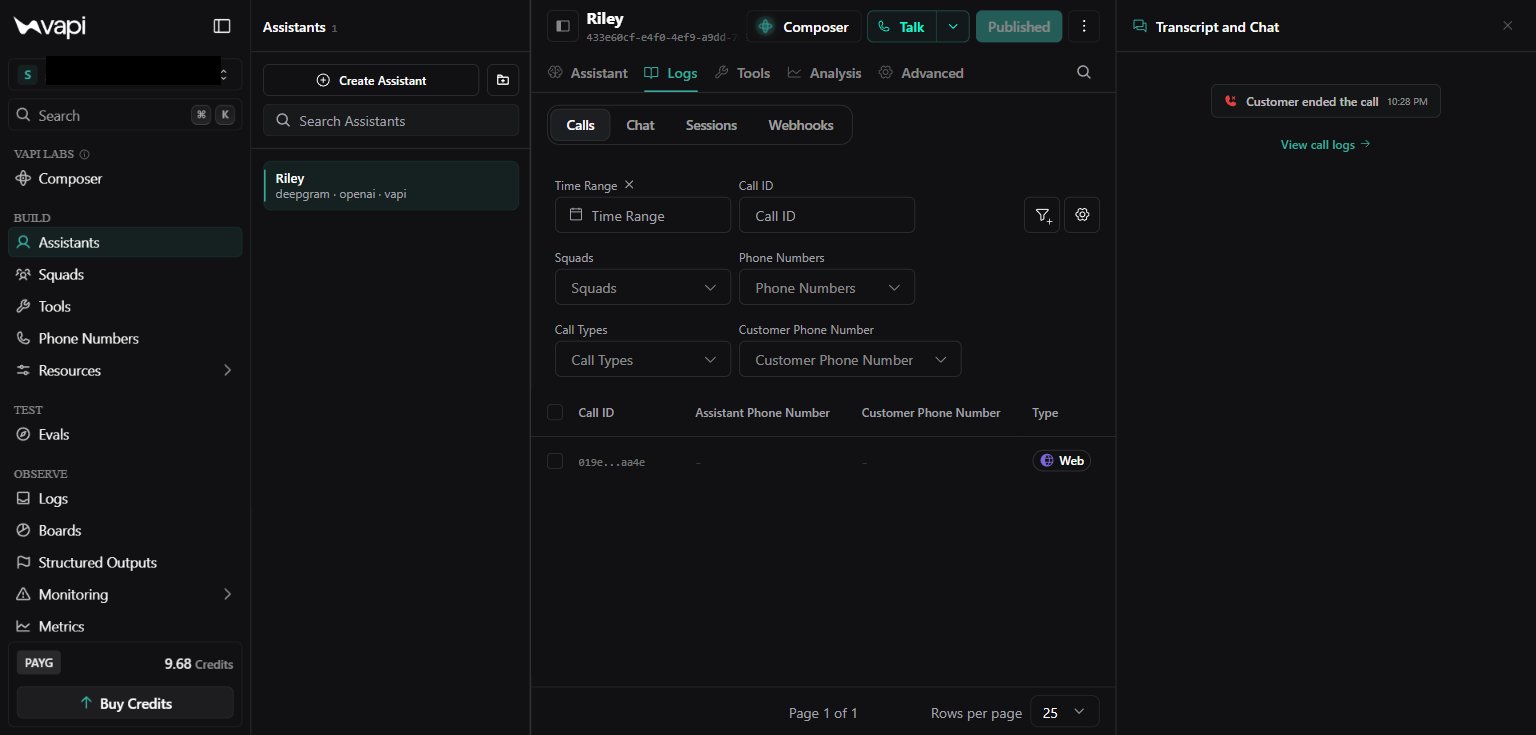 This validates the agent's prompt, voice, and tools — but it does **not** generate a Knotie-side record of the call. Skip to Step 6 only if you do an Option B or C call.
### Option B — Inbound test call
1. Call the phone number you attached in Step 4 from your mobile
2. Let the VAPI agent pick up and have a short conversation (15–30 seconds is enough)
3. Hang up
### Option C — Outbound test call
1. In the Knotie partner portal, find the imported agent
2. Open the action menu and look for a **Test Call** / **Make Outbound Call** option (if available)
3. Enter your mobile number and trigger the call
***
## Step 6 — Verify the call lands in Agent Analytics
Within \~30 seconds of the call ending:
1. In the main sidebar, click **Agent Analytics**.
2. Set the time period to **Day** to see today's calls.
3. The agent should appear in the call list with:
* **Call duration** matching the test call
* **Status** = `Completed` (not `Failed`)
* **Cost** broken down into LLM / STT / TTS / provider fees
4. Click into the call for a transcript and per-component cost detail.
This validates the agent's prompt, voice, and tools — but it does **not** generate a Knotie-side record of the call. Skip to Step 6 only if you do an Option B or C call.
### Option B — Inbound test call
1. Call the phone number you attached in Step 4 from your mobile
2. Let the VAPI agent pick up and have a short conversation (15–30 seconds is enough)
3. Hang up
### Option C — Outbound test call
1. In the Knotie partner portal, find the imported agent
2. Open the action menu and look for a **Test Call** / **Make Outbound Call** option (if available)
3. Enter your mobile number and trigger the call
***
## Step 6 — Verify the call lands in Agent Analytics
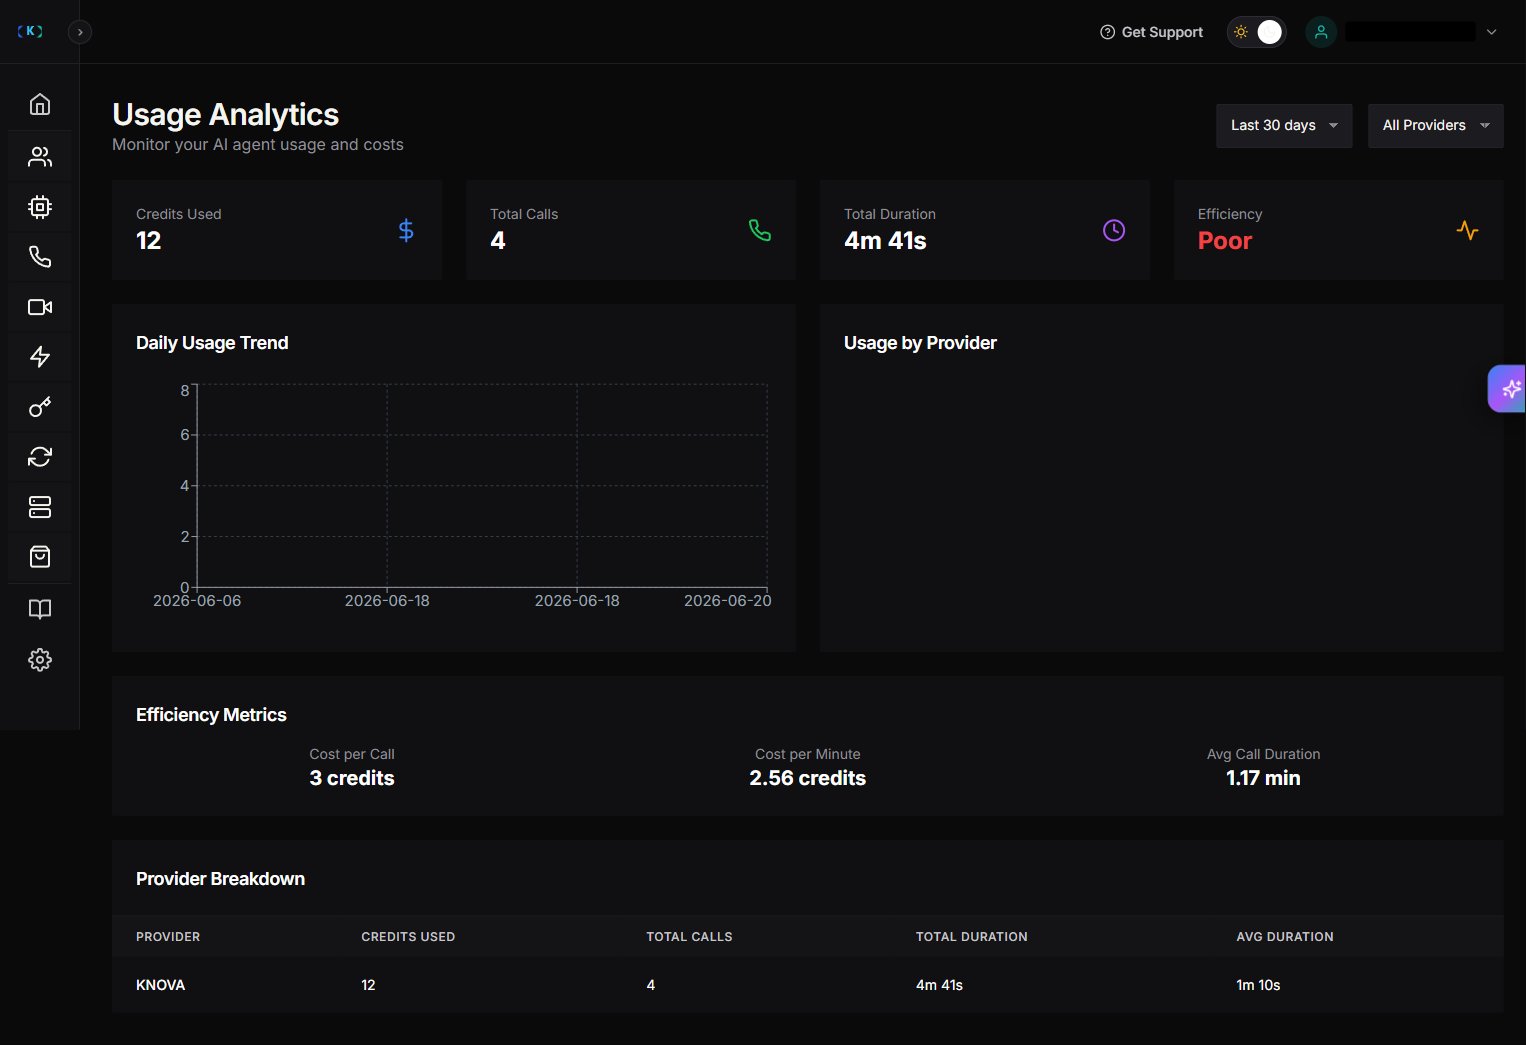
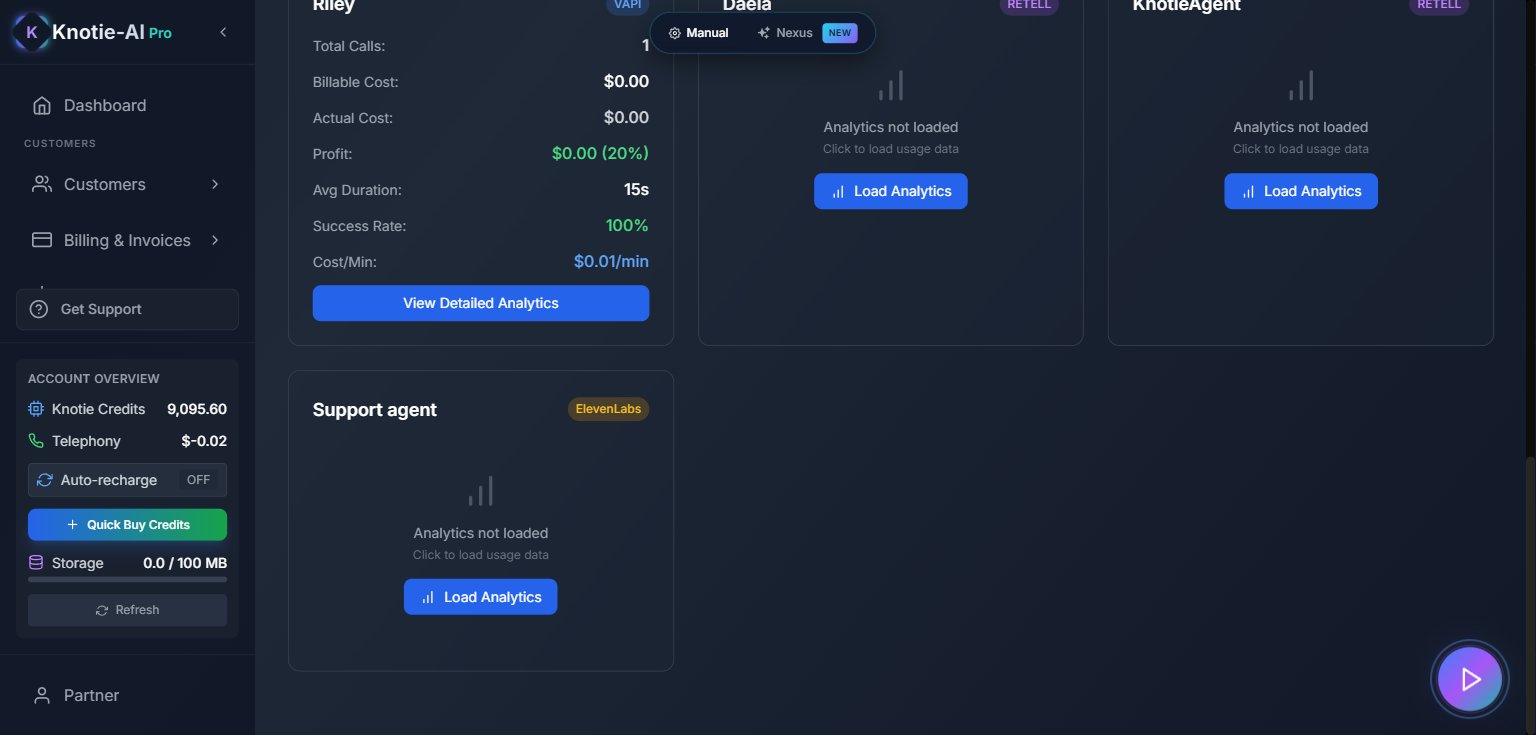
Within \~30 seconds of the call ending:
1. In the main sidebar, click **Agent Analytics**.
2. Set the time period to **Day** to see today's calls.
3. The agent should appear in the call list with:
* **Call duration** matching the test call
* **Status** = `Completed` (not `Failed`)
* **Cost** broken down into LLM / STT / TTS / provider fees
4. Click into the call for a transcript and per-component cost detail.
 **The call doesn't show up.**
* Wait 30–60 seconds — analytics are not real-time.
* Confirm the VAPI webhook is configured. Go back to **AI Agents → VAPI AI → \[agent name]** and look for a webhook URL or a "Refresh from VAPI" / "Sync" action.
* Check the VAPI dashboard under **Logs** — if VAPI shows the call ended successfully but Knotie doesn't, the webhook forwarding is broken. Re-importing the agent usually fixes it.
***
## Step 7 — Verify the cost flows through Credits and AI Gateway
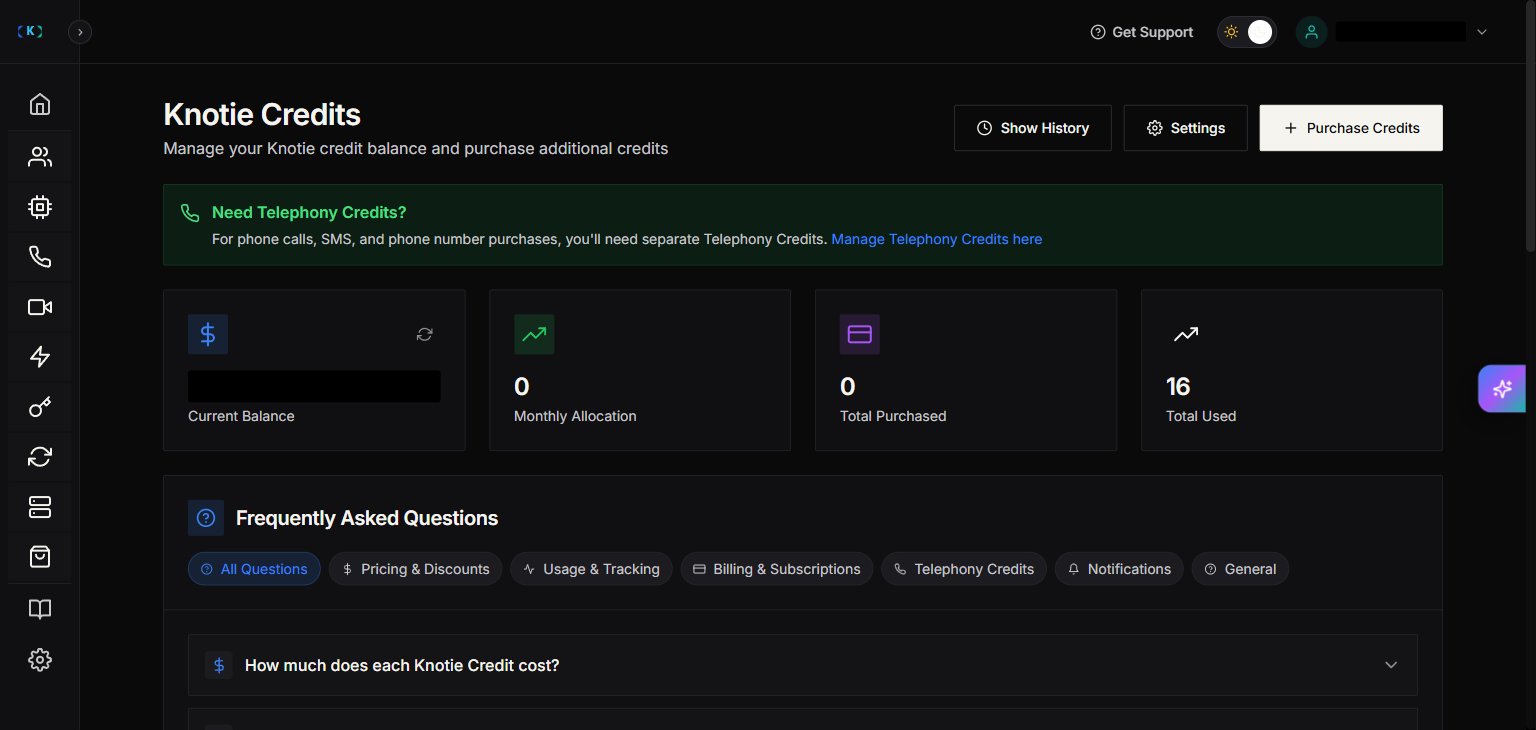
1. In the main sidebar, click **Credits**. Your Knotie Credit balance should have decreased by the test call's actual cost.
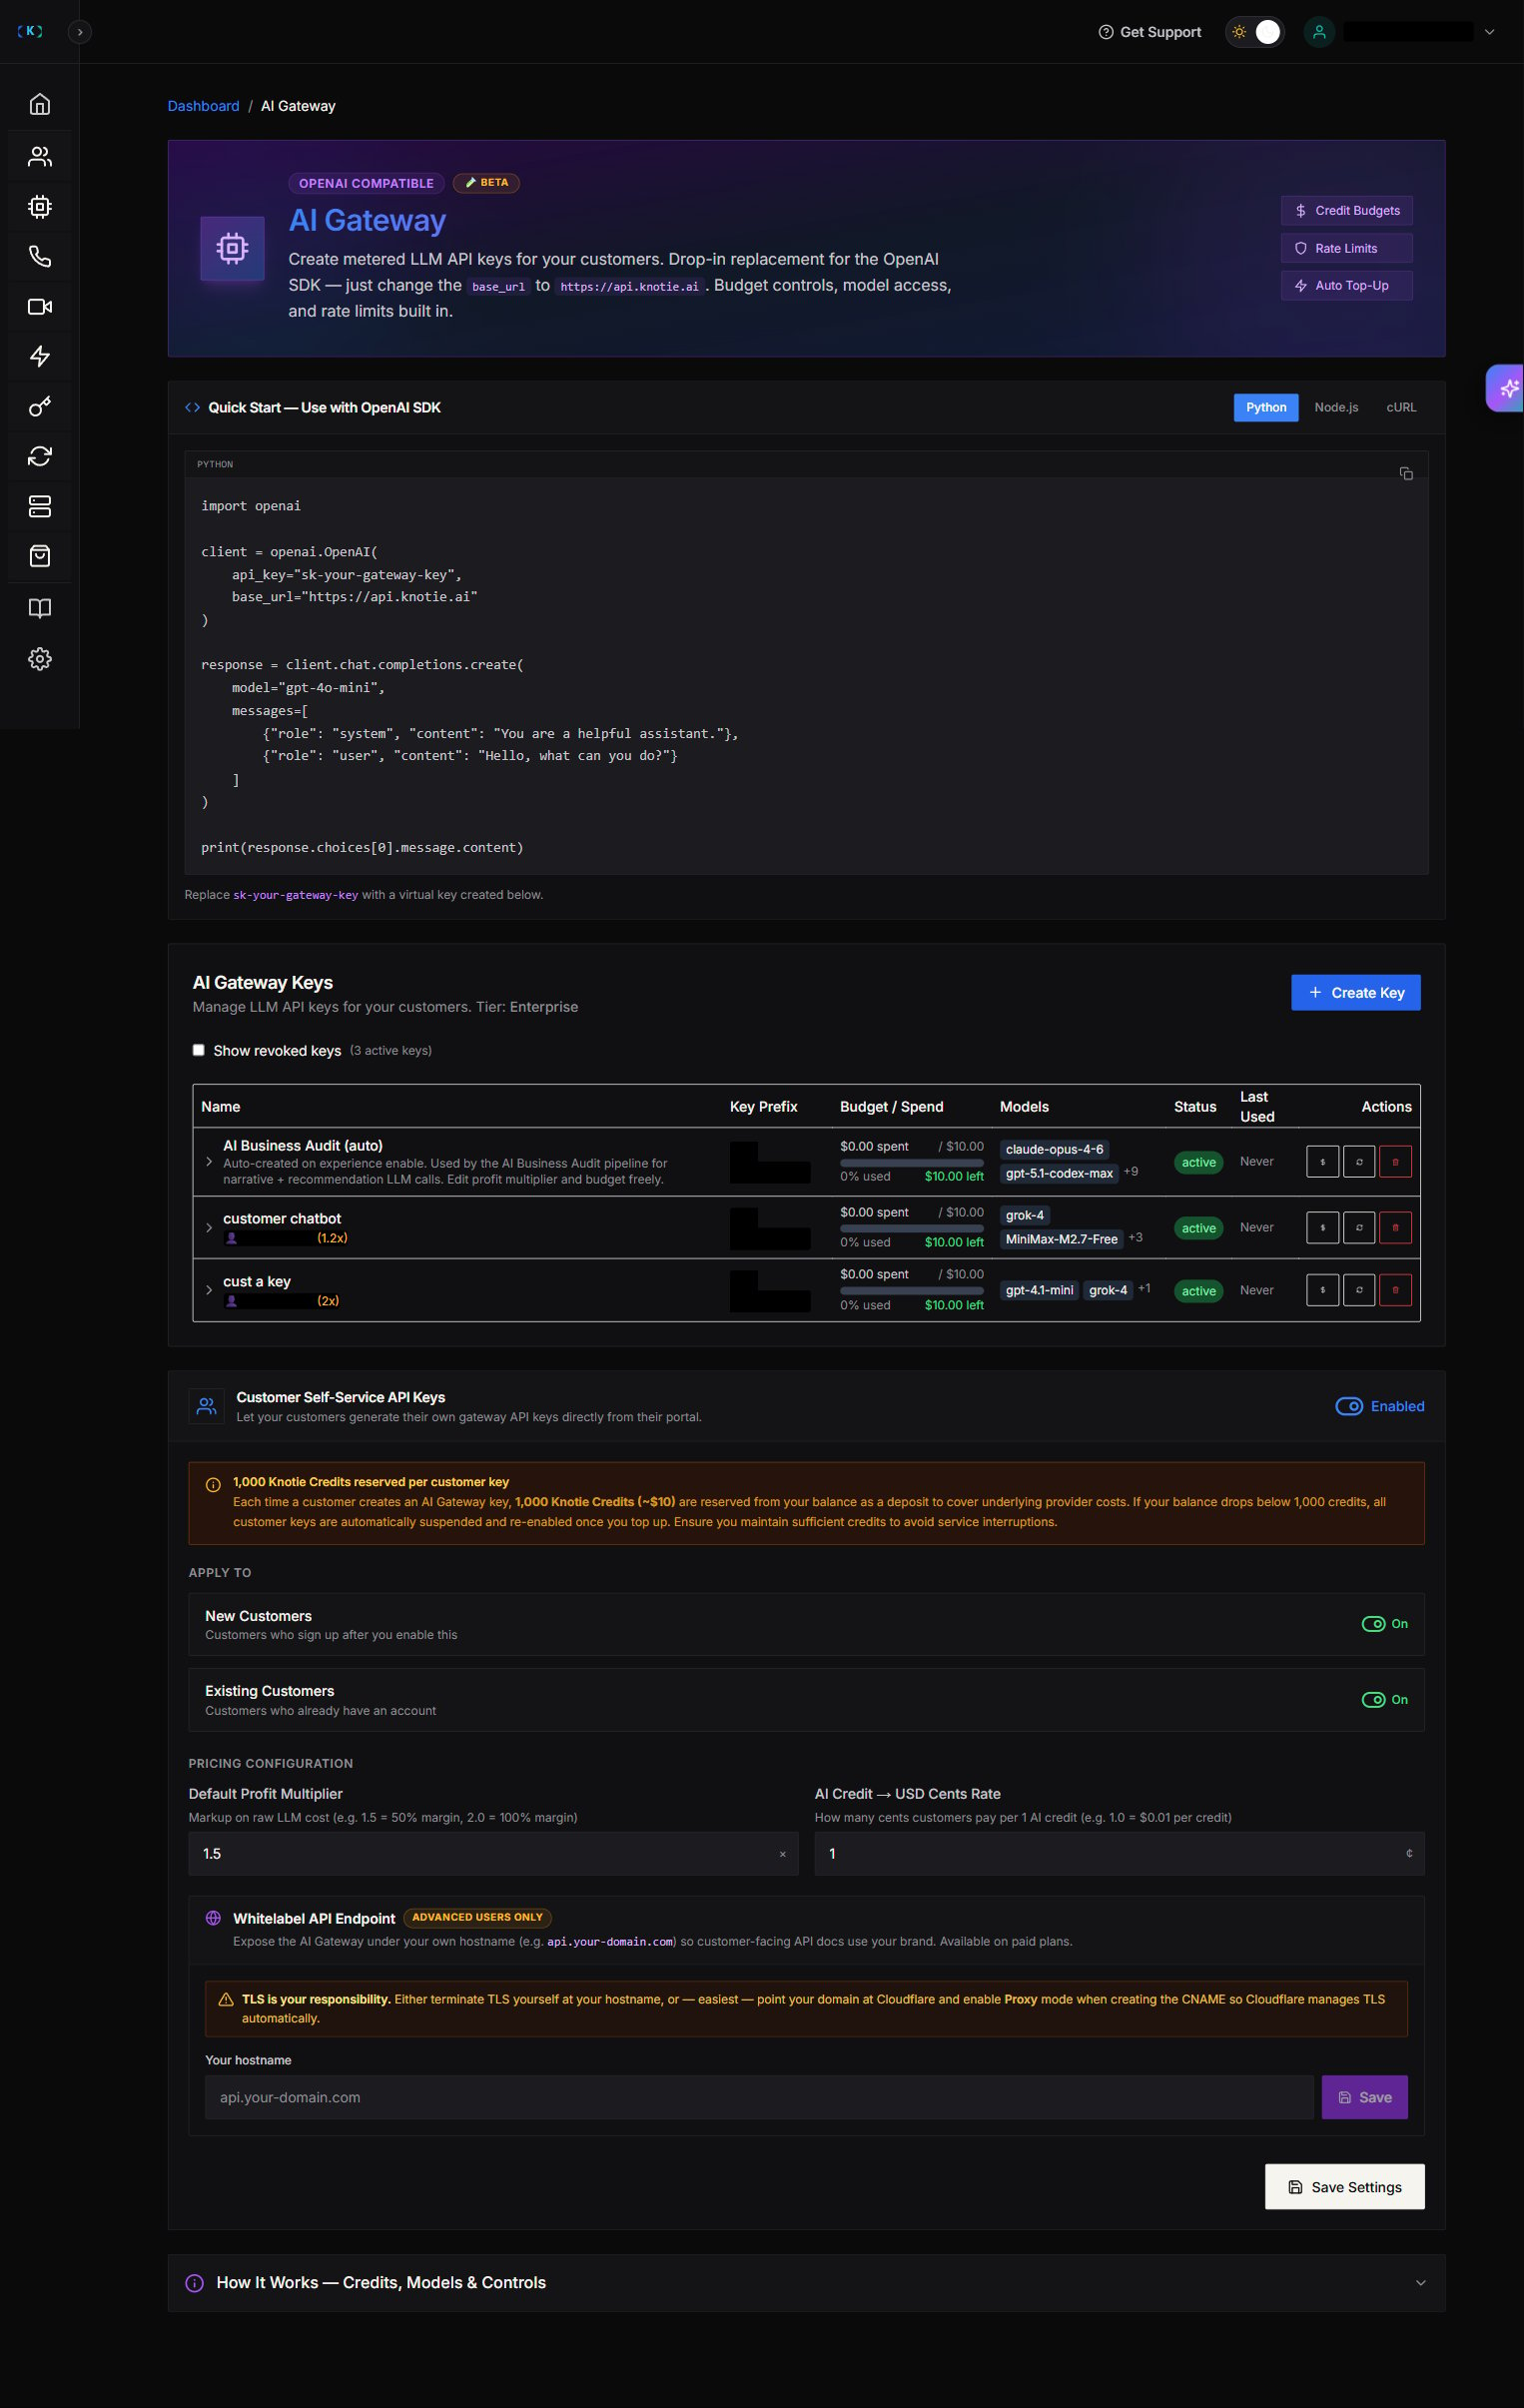
2. Click **AI Gateway**. The VAPI agent's LLM calls are routed through the AI Gateway, so they should also appear in the AI Gateway spend if you have an active partner-level gateway key.
3. (If you assigned the customer with a profit multiplier) Open the customer's profile → **Billing** to confirm the per-customer cost ledger reflects `cost × multiplier`.
**The call doesn't show up.**
* Wait 30–60 seconds — analytics are not real-time.
* Confirm the VAPI webhook is configured. Go back to **AI Agents → VAPI AI → \[agent name]** and look for a webhook URL or a "Refresh from VAPI" / "Sync" action.
* Check the VAPI dashboard under **Logs** — if VAPI shows the call ended successfully but Knotie doesn't, the webhook forwarding is broken. Re-importing the agent usually fixes it.
***
## Step 7 — Verify the cost flows through Credits and AI Gateway
1. In the main sidebar, click **Credits**. Your Knotie Credit balance should have decreased by the test call's actual cost.
2. Click **AI Gateway**. The VAPI agent's LLM calls are routed through the AI Gateway, so they should also appear in the AI Gateway spend if you have an active partner-level gateway key.
3. (If you assigned the customer with a profit multiplier) Open the customer's profile → **Billing** to confirm the per-customer cost ledger reflects `cost × multiplier`.
 ***
## Operational notes
* **Multi-customer scenarios:** A single VAPI agent can be assigned to multiple customers with different profit multipliers per customer. Each customer's calls are billed independently.
* **Re-importing an agent is safe.** The agent ID is the source of truth; re-importing refreshes the agent's config from VAPI without losing customer mappings.
* **If the agent fails:** Check the VAPI logs first, then the Knotie webhook log. The failure is almost always upstream (VAPI rate limit, model timeout) — Knotie's layer is passive plumbing.
* **Cost drift:** VAPI's per-minute rate can change. Review the agent's `cost/min` in Agent Analytics monthly and adjust the customer's profit multiplier if needed.
## Related pages
* [Import a VAPI agent](/agents/vapi/import-vapi-agent) — focused, step-by-step on the import modal only
* [Phone Numbers](/partner-portal/phone-numbers) — number inventory, import, and purchase
* [Agent Analytics](/partner-portal/agent-analytics) — cost breakdown and per-agent drill-down
* [AI Gateway](/partner-portal/ai-gateway) — the metering layer that all LLM traffic routes through
* [Credits](/partner-portal/credits) — your Knotie Credit balance and top-up flow
* [Customer onboarding](/customer-management/onboard-customer) — how to create the customer record before assigning the agent
***
## Operational notes
* **Multi-customer scenarios:** A single VAPI agent can be assigned to multiple customers with different profit multipliers per customer. Each customer's calls are billed independently.
* **Re-importing an agent is safe.** The agent ID is the source of truth; re-importing refreshes the agent's config from VAPI without losing customer mappings.
* **If the agent fails:** Check the VAPI logs first, then the Knotie webhook log. The failure is almost always upstream (VAPI rate limit, model timeout) — Knotie's layer is passive plumbing.
* **Cost drift:** VAPI's per-minute rate can change. Review the agent's `cost/min` in Agent Analytics monthly and adjust the customer's profit multiplier if needed.
## Related pages
* [Import a VAPI agent](/agents/vapi/import-vapi-agent) — focused, step-by-step on the import modal only
* [Phone Numbers](/partner-portal/phone-numbers) — number inventory, import, and purchase
* [Agent Analytics](/partner-portal/agent-analytics) — cost breakdown and per-agent drill-down
* [AI Gateway](/partner-portal/ai-gateway) — the metering layer that all LLM traffic routes through
* [Credits](/partner-portal/credits) — your Knotie Credit balance and top-up flow
* [Customer onboarding](/customer-management/onboard-customer) — how to create the customer record before assigning the agent