> ## Documentation Index
> Fetch the complete documentation index at: https://docs.knotie-ai.pro/llms.txt
> Use this file to discover all available pages before exploring further.
# SaaS portal mode
> Configure and enable SaaS portal mode for enterprise funnel experiences with advanced conversion features.
## What SaaS Portal Mode is for
**SaaS Portal Mode** transforms your whitelabel portal into an enterprise-grade funnel experience with:
* Automated prospect onboarding
* Self-service customer signup
* Built-in AI Receptionist landing pages
* Free trial capabilities
* Advanced conversion tracking
This mode is ideal for agencies running a "productized" SaaS offering instead of traditional done-for-you services.
## Portal modes explained
Knotie AI Pro offers three portal modes:
### Basic Mode (Default)
* Traditional customer management portal
* Manual customer onboarding
* Simple, straightforward interface
* Available on all plans
### Professional Mode
* Enhanced portal with premium branding
* Advanced customization options
* Professional theme templates
* Available on Starter and above
### SaaS Mode (Enterprise)
* Full funnel automation
* Self-service signup flows
* AI Receptionist landing pages
* Prospect management system
* Available on Starter, Pro, Enterprise, Ultimate tiers
 ## Prerequisites
To use SaaS Portal Mode, you need:
1. **Paid plan** – Starter, Pro, Enterprise, or Ultimate tier
2. **Whitelabel portal configured** – Subdomain or custom domain set up
3. **Stripe Connect** – For processing customer payments (optional but recommended)
4. **Manual enablement** – Special offers may provide SaaS mode access on lower tiers
## Enable SaaS Portal Mode
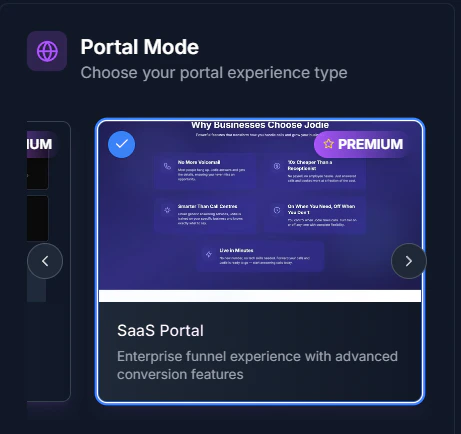
### Step 1: Select SaaS mode
1. Go to **Settings → Whitelabel**.
2. Find the **Portal Mode** section.
3. Click on **SaaS Portal**.
4. If you don't have access, you'll see an upgrade prompt.
### Step 2: Configure SaaS settings
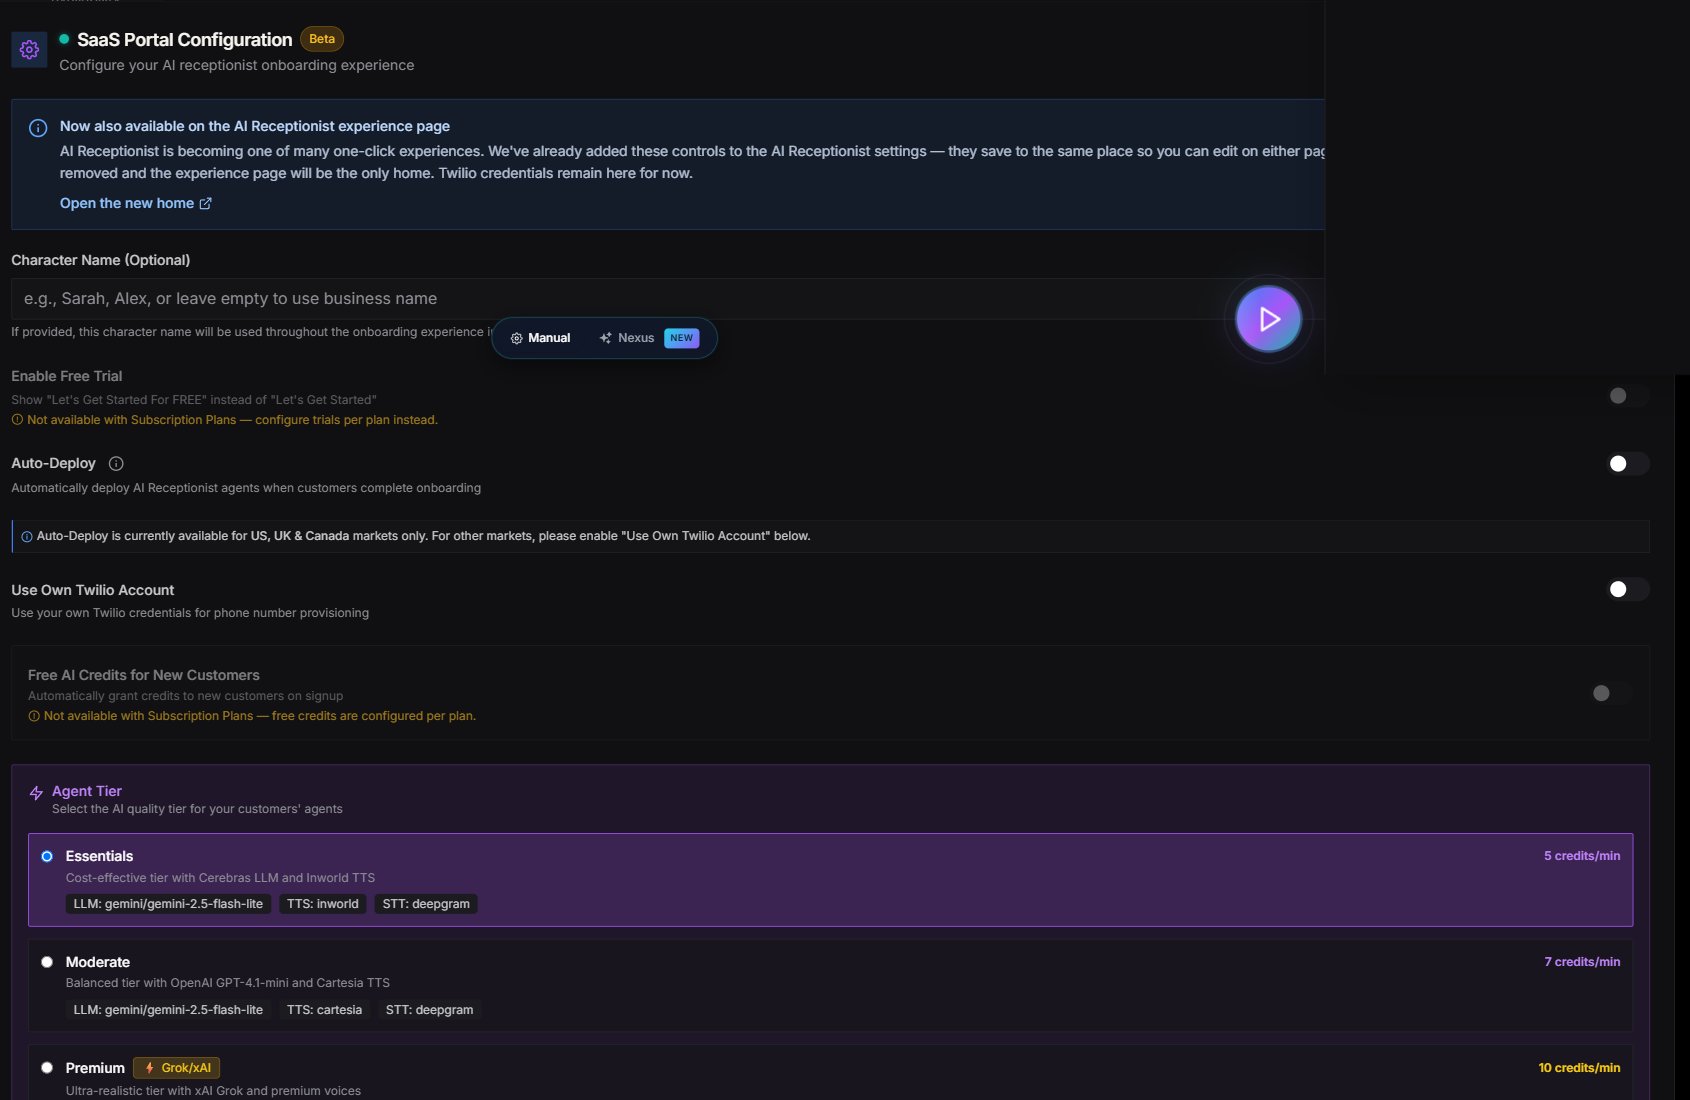
Once SaaS mode is selected, the **SaaS Portal Configuration** section appears:
1. **Character Name** (Optional)
* Add a character name for personalized branding (e.g., "Sarah", "Alex")
* If left empty, uses your business name
* This appears in the AI Receptionist onboarding flow
2. **Free Trial Enabled**
* Toggle ON to show "Start Free Trial" button on landing page
* Allows prospects to try before buying
* Default: Enabled
3. **SaaS Onboarding Enabled**
* Toggle ON to enable the 10-step onboarding flow
* Prospects fill out business info, connect knowledge base, complete payment, and then deploy the agent
* Step 10 deploys the AI agent — only after Step 9 (Pricing & Payment) has cleared
4. **Free AI Credits**
* Set initial credits for new signups (e.g., 50, 100, 500)
* Helps prospects test without payment
* Default: 50 credits
5. **Pricing Model**
* **Subscription** – Monthly/annual plans
* **Pay-as-you-go** – Usage-based billing
* **Fixed Price** – One-time setup fee
6. **Pay-as-you-go Rate**
* Set rate per minute if using pay-as-you-go model
* Example: \$0.10 per minute
* Only applies if pricing model is "Pay-as-you-go"
## Prerequisites
To use SaaS Portal Mode, you need:
1. **Paid plan** – Starter, Pro, Enterprise, or Ultimate tier
2. **Whitelabel portal configured** – Subdomain or custom domain set up
3. **Stripe Connect** – For processing customer payments (optional but recommended)
4. **Manual enablement** – Special offers may provide SaaS mode access on lower tiers
## Enable SaaS Portal Mode
### Step 1: Select SaaS mode
1. Go to **Settings → Whitelabel**.
2. Find the **Portal Mode** section.
3. Click on **SaaS Portal**.
4. If you don't have access, you'll see an upgrade prompt.
### Step 2: Configure SaaS settings
Once SaaS mode is selected, the **SaaS Portal Configuration** section appears:
1. **Character Name** (Optional)
* Add a character name for personalized branding (e.g., "Sarah", "Alex")
* If left empty, uses your business name
* This appears in the AI Receptionist onboarding flow
2. **Free Trial Enabled**
* Toggle ON to show "Start Free Trial" button on landing page
* Allows prospects to try before buying
* Default: Enabled
3. **SaaS Onboarding Enabled**
* Toggle ON to enable the 10-step onboarding flow
* Prospects fill out business info, connect knowledge base, complete payment, and then deploy the agent
* Step 10 deploys the AI agent — only after Step 9 (Pricing & Payment) has cleared
4. **Free AI Credits**
* Set initial credits for new signups (e.g., 50, 100, 500)
* Helps prospects test without payment
* Default: 50 credits
5. **Pricing Model**
* **Subscription** – Monthly/annual plans
* **Pay-as-you-go** – Usage-based billing
* **Fixed Price** – One-time setup fee
6. **Pay-as-you-go Rate**
* Set rate per minute if using pay-as-you-go model
* Example: \$0.10 per minute
* Only applies if pricing model is "Pay-as-you-go"
 ### Step 3: Configure agent tier
Choose which AI agent tier prospects get:
* **Essentials** – Basic AI capabilities
* **Professional** – Enhanced features
* **Enterprise** – Full capabilities
This determines what's available to customers who sign up through your SaaS portal.
### Step 4: Save configuration
1. Scroll to the bottom.
2. Click **Save Settings**.
3. SaaS mode is now active on your whitelabel portal.
## SaaS portal features
### AI Receptionist landing page
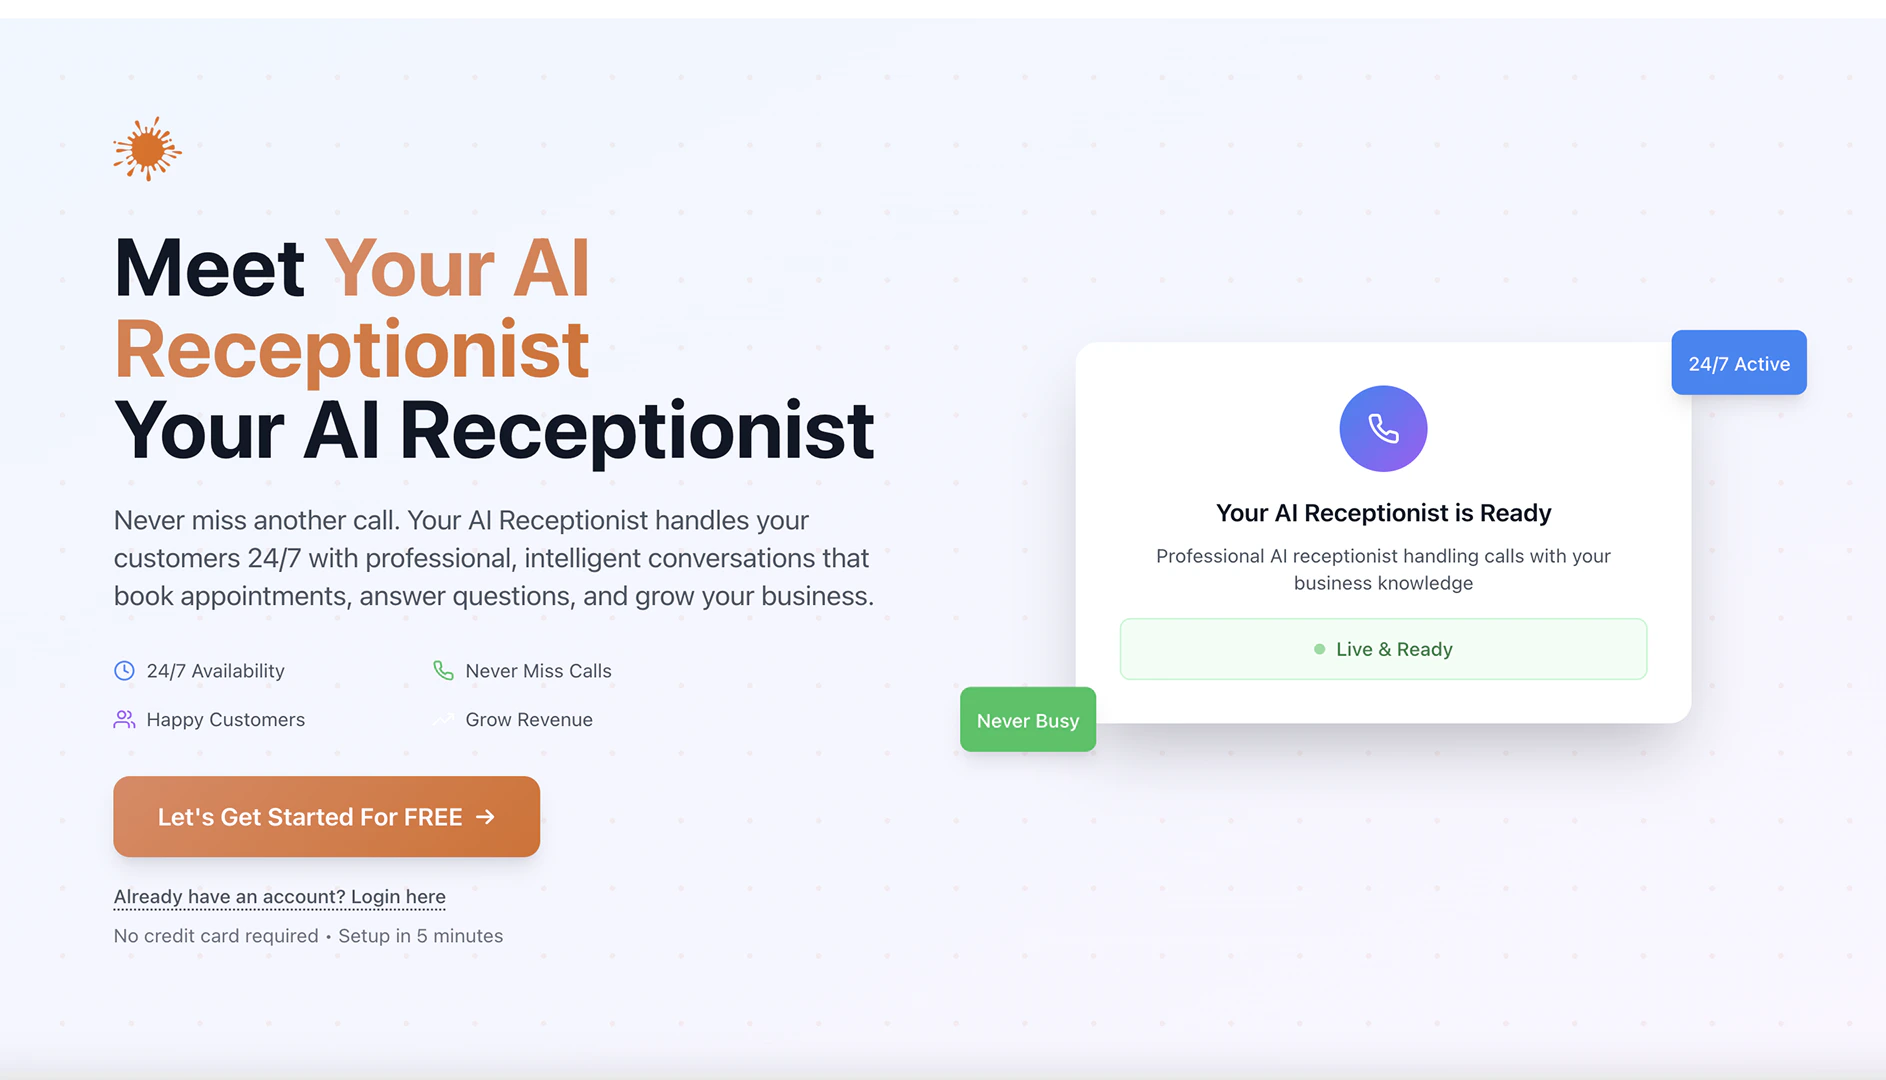
When SaaS mode is enabled, your portal includes a landing page at:
* `https://yoursubdomain.knotie-ai.pro/`
* `https://portal.yourdomain.com/`
Features:
* Hero section with your branding
* "Start Free Trial" button
* Feature highlights
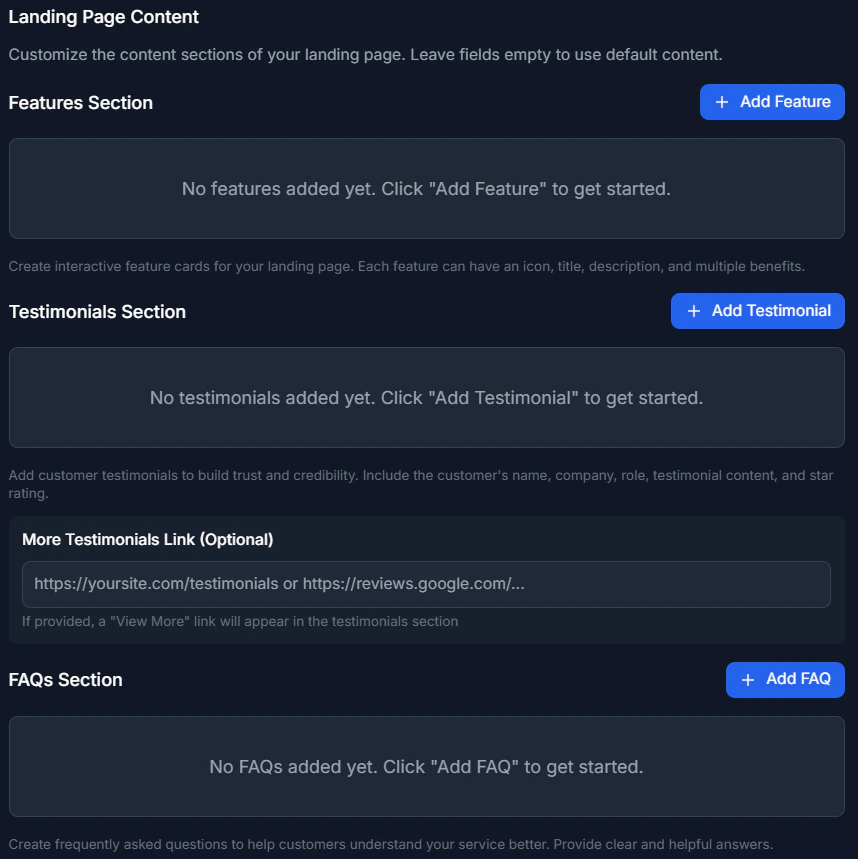
* Testimonials (if configured)
* Pricing information
### Step 3: Configure agent tier
Choose which AI agent tier prospects get:
* **Essentials** – Basic AI capabilities
* **Professional** – Enhanced features
* **Enterprise** – Full capabilities
This determines what's available to customers who sign up through your SaaS portal.
### Step 4: Save configuration
1. Scroll to the bottom.
2. Click **Save Settings**.
3. SaaS mode is now active on your whitelabel portal.
## SaaS portal features
### AI Receptionist landing page
When SaaS mode is enabled, your portal includes a landing page at:
* `https://yoursubdomain.knotie-ai.pro/`
* `https://portal.yourdomain.com/`
Features:
* Hero section with your branding
* "Start Free Trial" button
* Feature highlights
* Testimonials (if configured)
* Pricing information
 ### 10-step onboarding flow
> The 10-step onboarding flow is available **only in SaaS portal mode**.
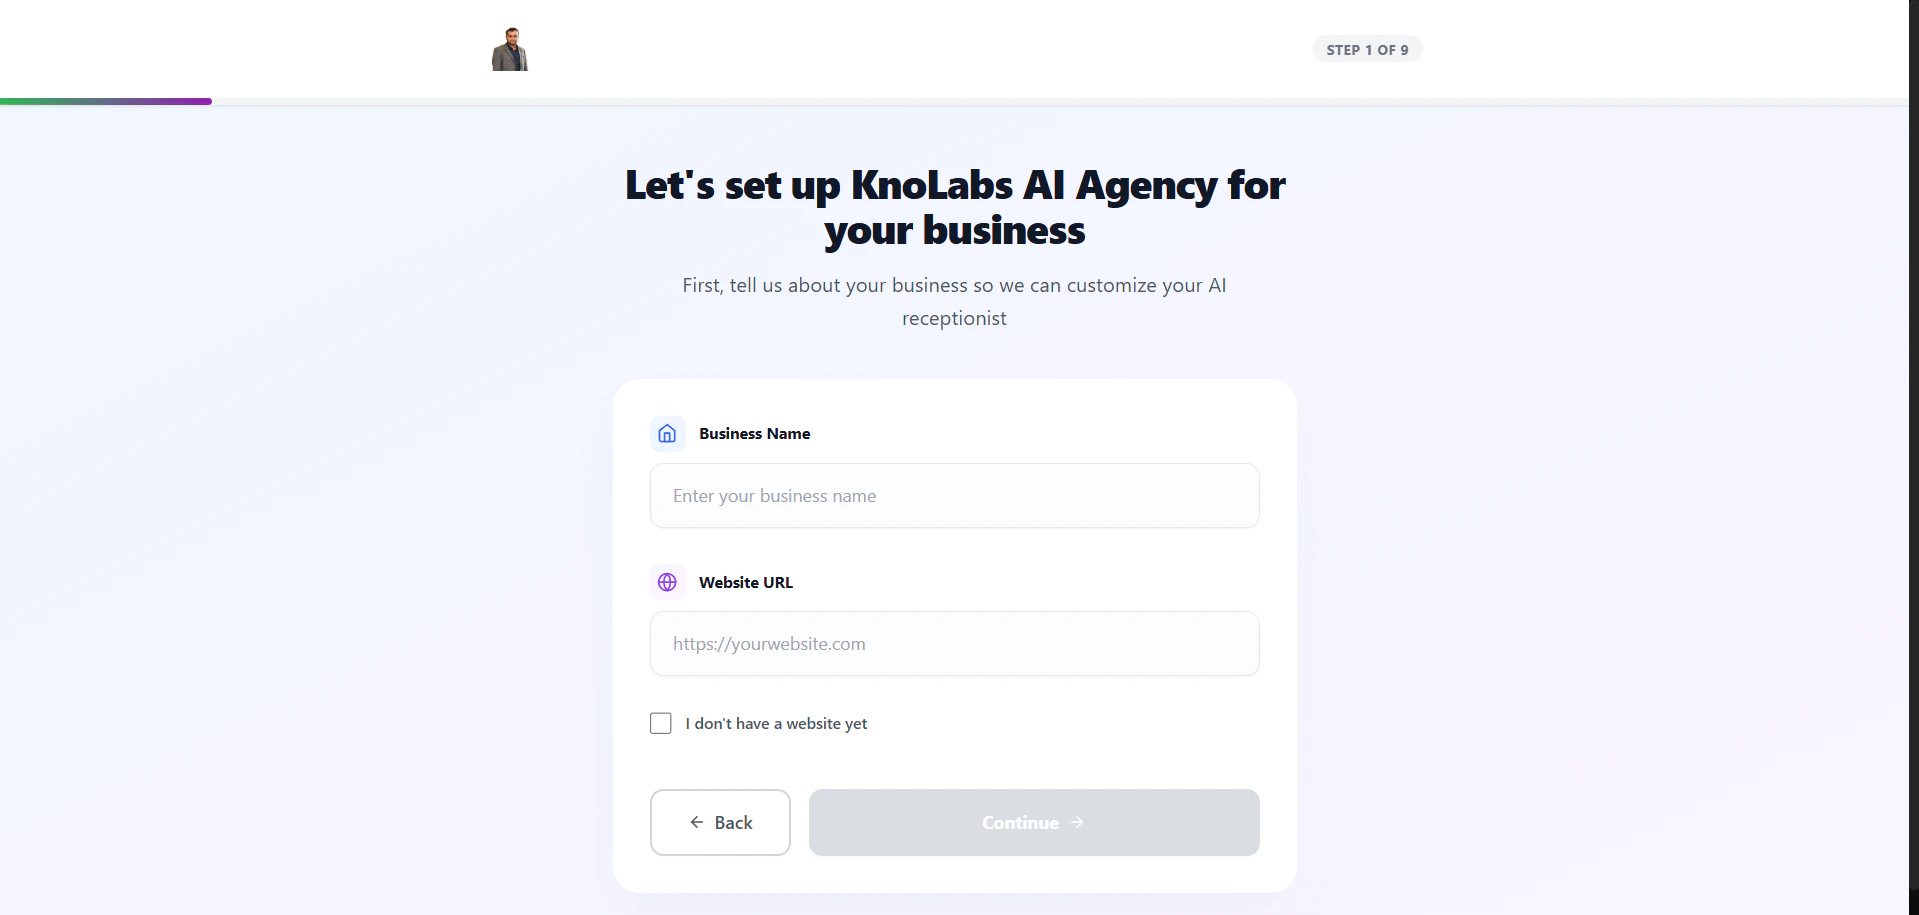
Prospects who click "Start Free Trial" go through a guided onboarding:
1. **Business Info** – Company name, website
### 10-step onboarding flow
> The 10-step onboarding flow is available **only in SaaS portal mode**.
Prospects who click "Start Free Trial" go through a guided onboarding:
1. **Business Info** – Company name, website
 2. **Website Verification** – Validate business website
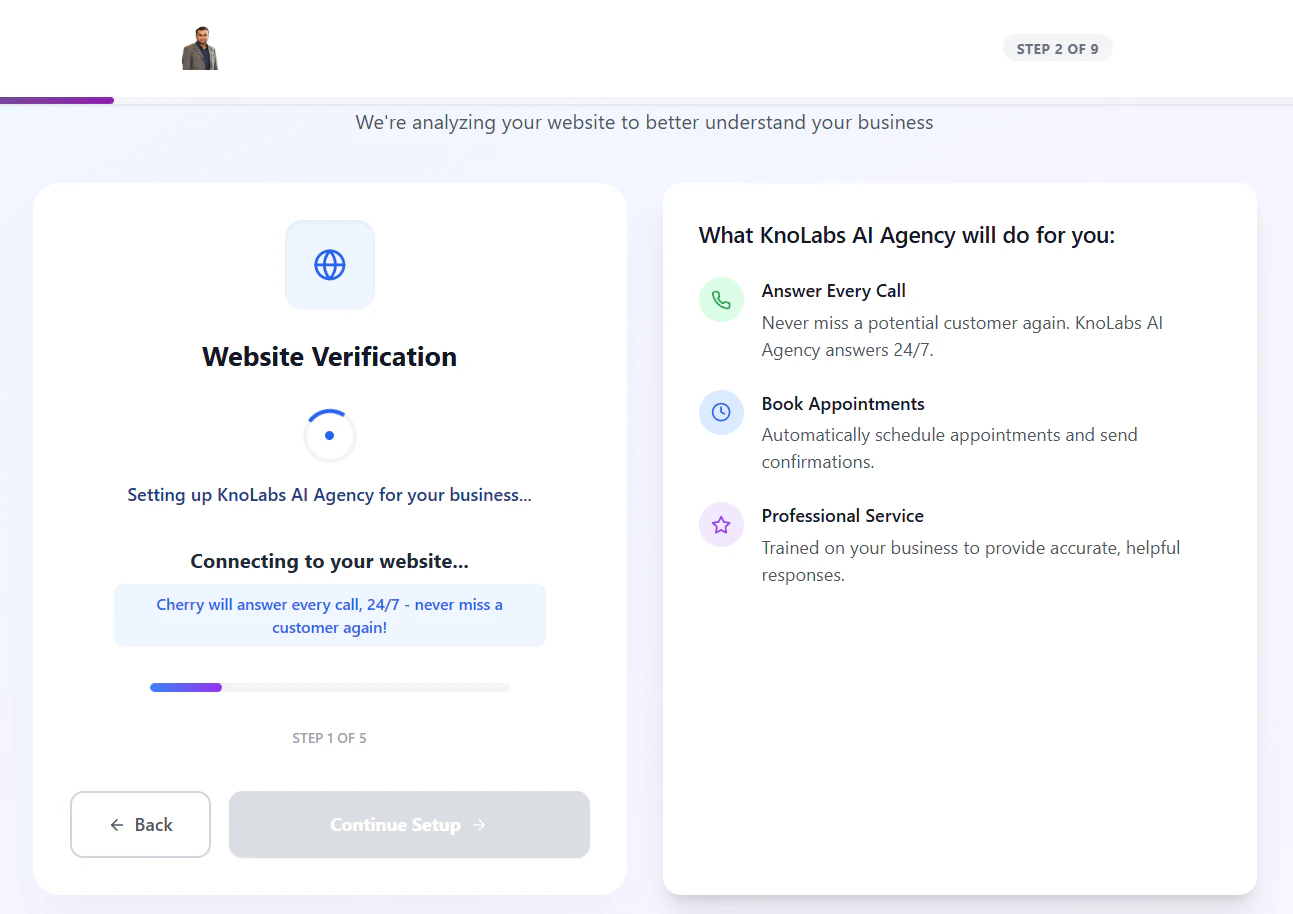 3. **Contact Details** – Email, phone
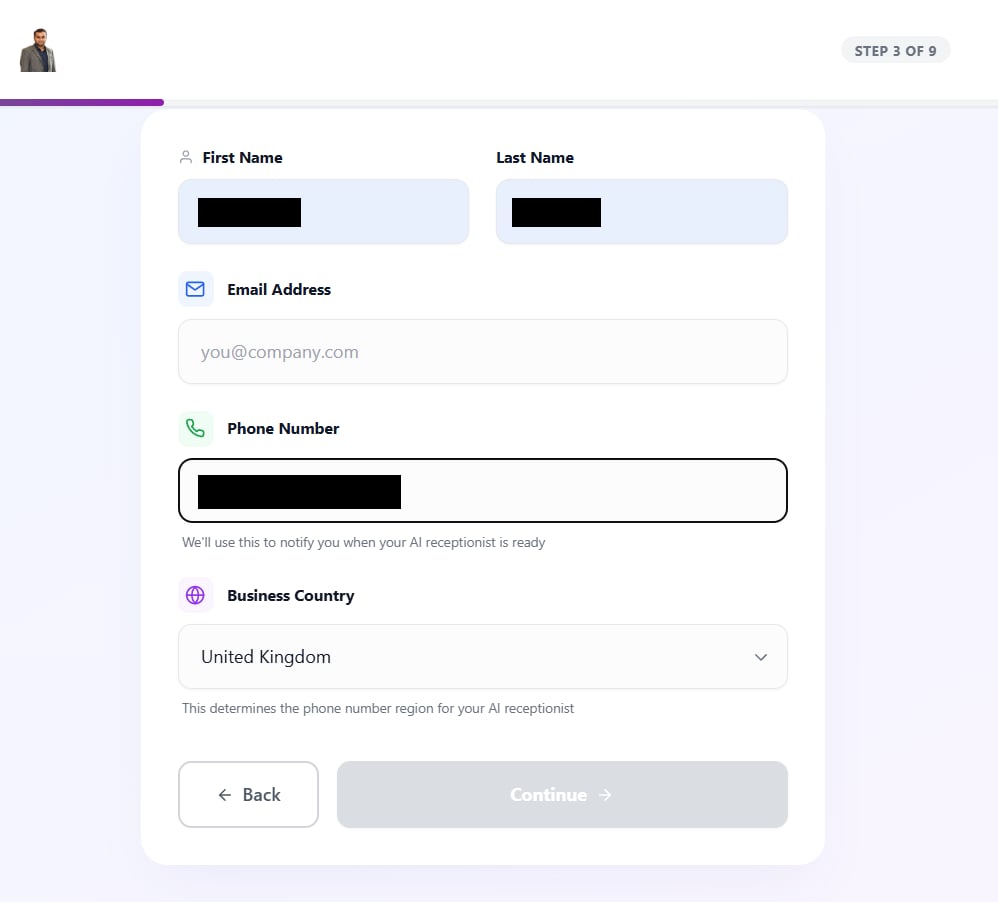 4. **Service Categories** – What the business offers
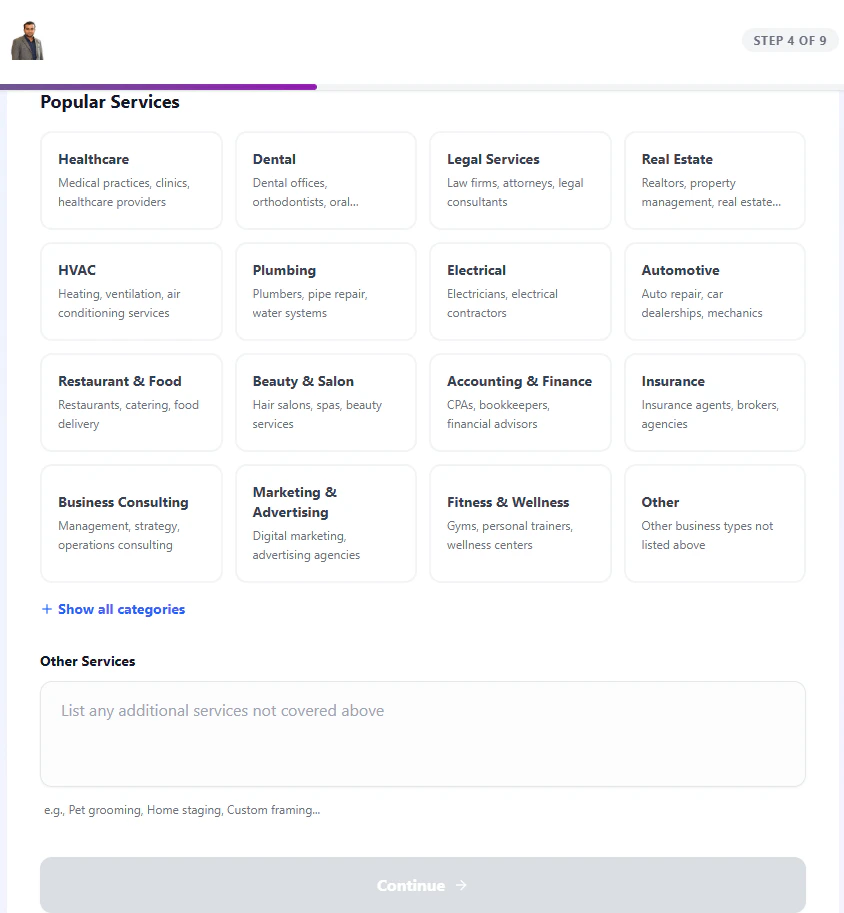 5. **Knowledge Base** – Upload FAQs, documents
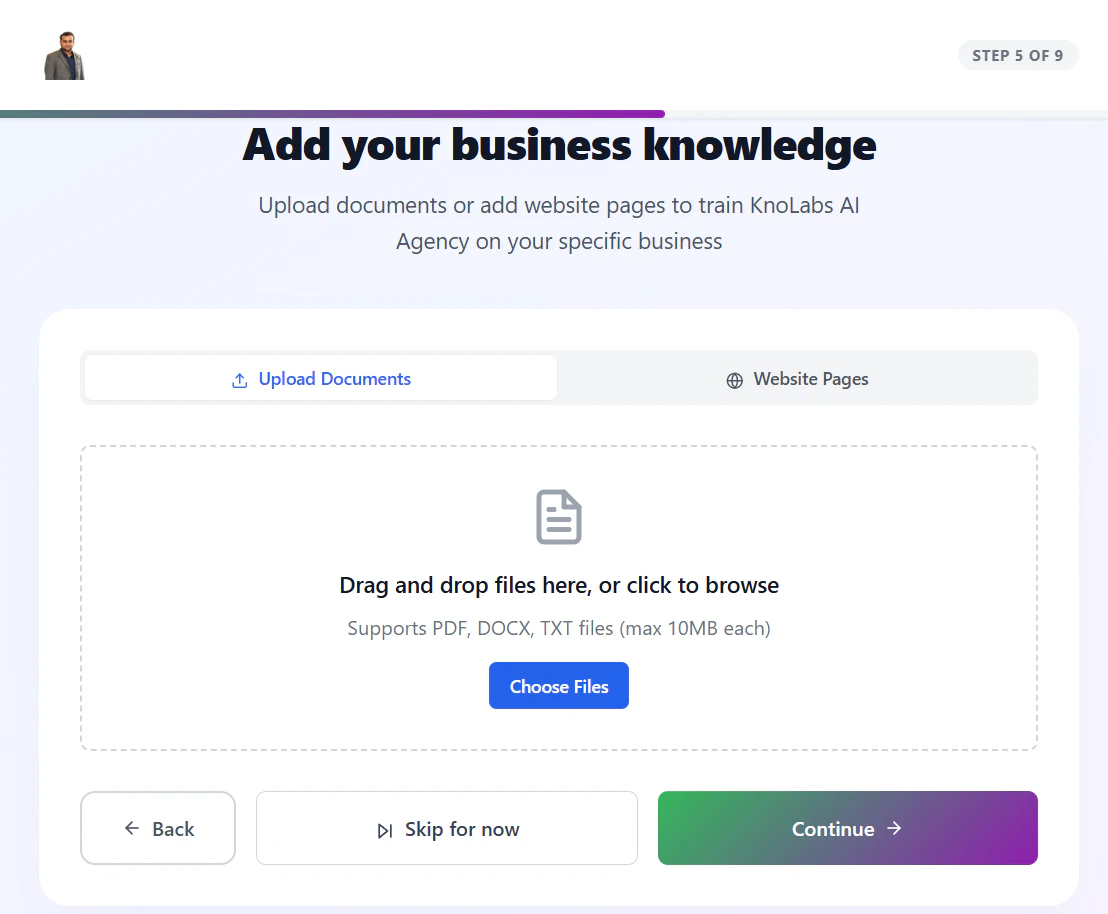 6. **Greeting Setup** – Configure AI greeting message
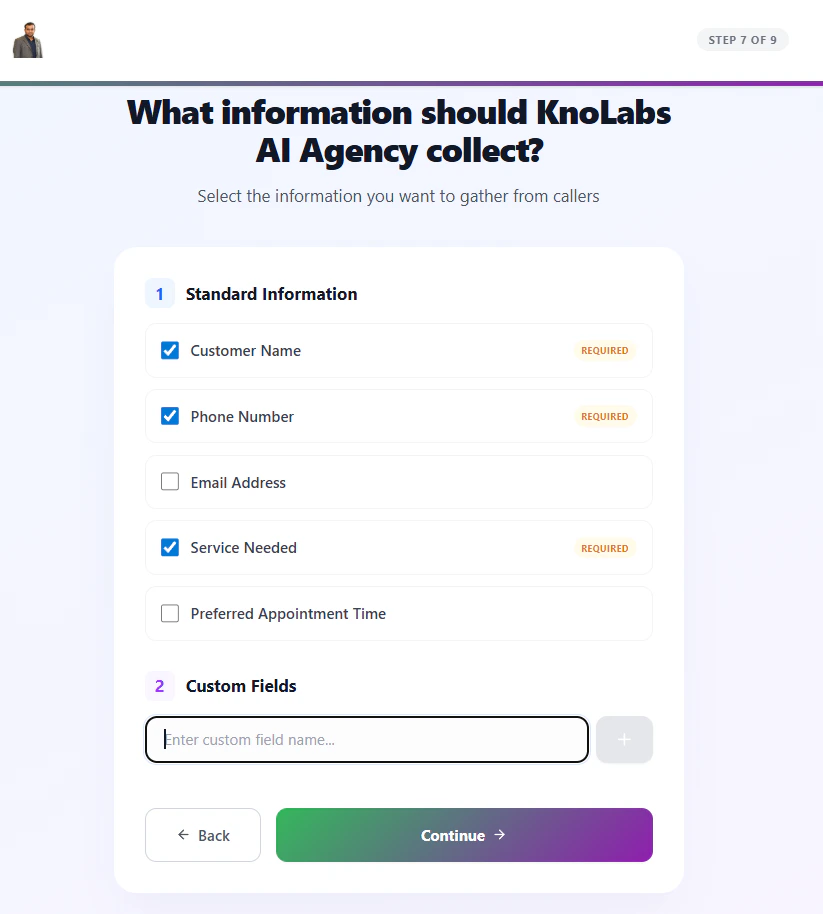
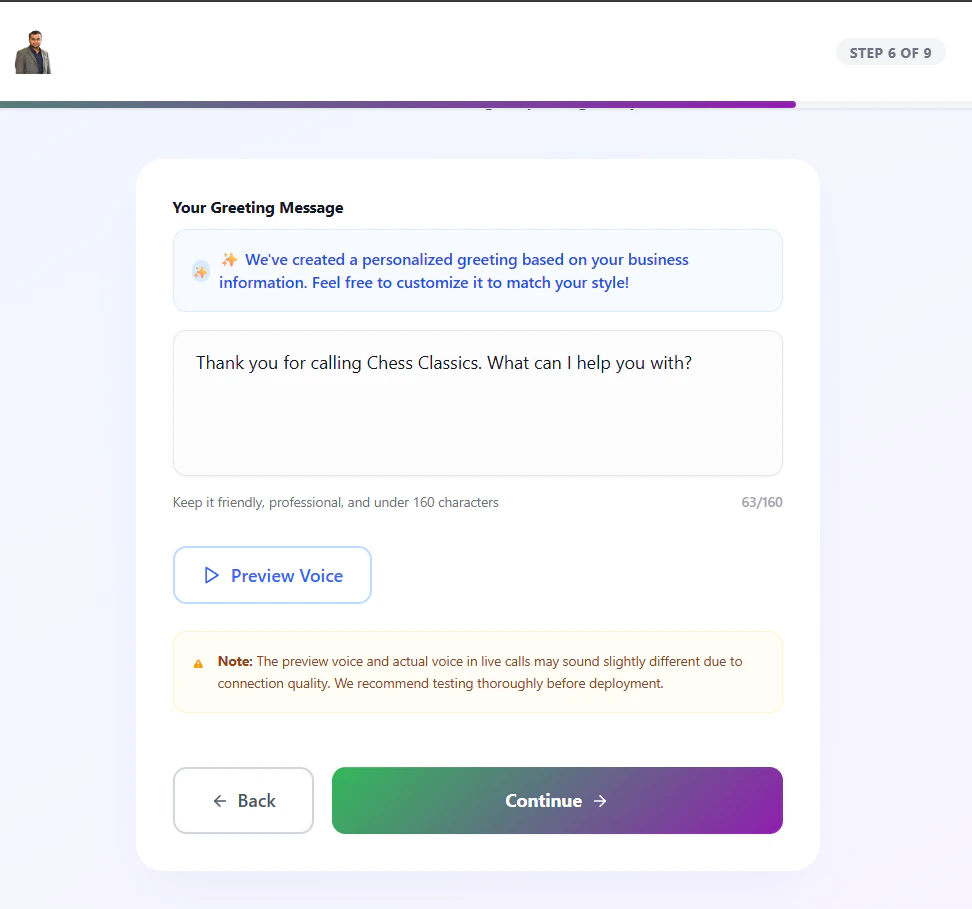 7. **Information Collection** – What data to collect from callers
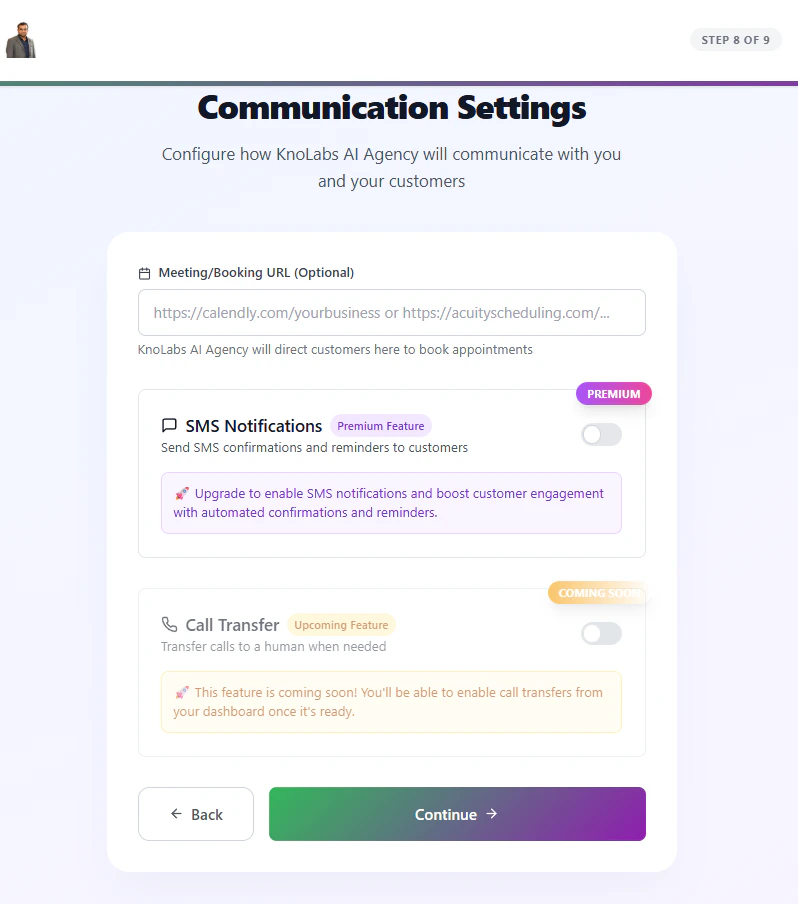
 8. **Communication Settings** – Email/SMS preferences
 9. **Pricing & Payment** – Review the plan summary and complete payment via Stripe Checkout (subscription, fixed price, or pay-as-you-go). Free / pay-as-you-go prospects are forwarded straight through.
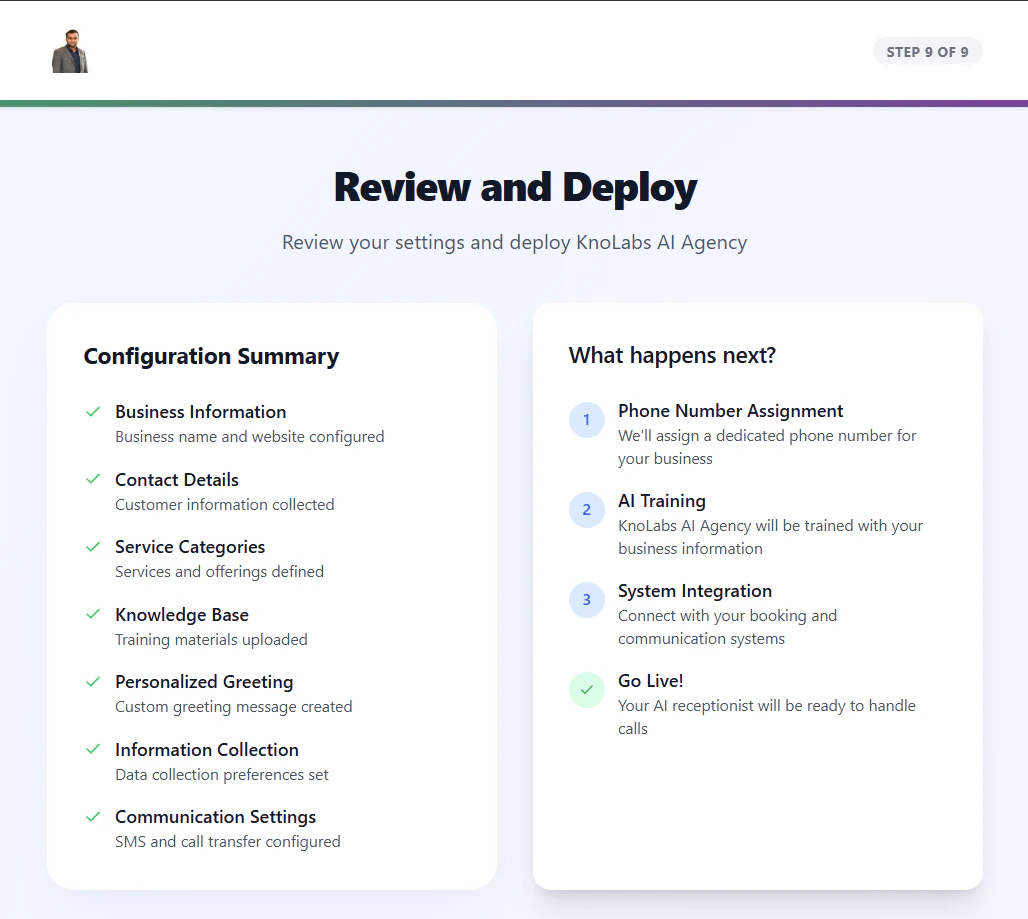
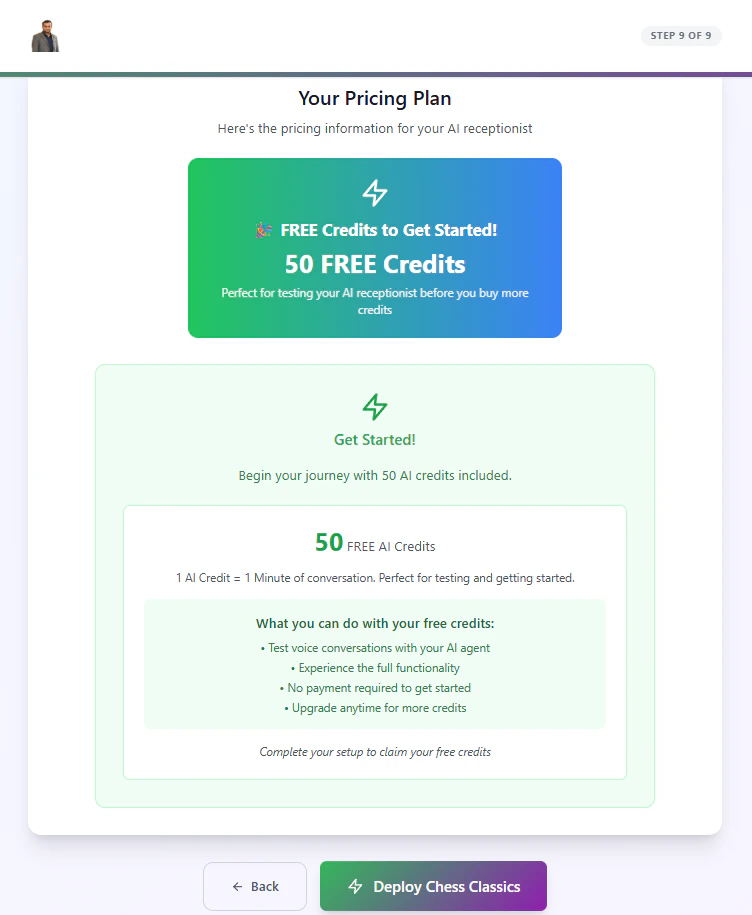 10. **Deploy Agent** – Final activation. Once payment has cleared, the AI Receptionist is set up: its phone number, training, integrations, and AI Credits are all put in place.
**At Step 3:** The prospect becomes a Customer (they move from the Prospects tab to the Customers tab).
**At Step 9:** The customer's account is created but held inactive until payment goes through. Stripe Checkout opens using your connected Stripe account. Once payment succeeds, the account is activated and the prospect moves on to Step 10. Free Forever and pay-as-you-go portals skip the payment step.
**At Step 10:** The Deploy Agent screen confirms that payment has cleared. If payment is still pending or was cancelled, the prospect is sent back to Step 9. Otherwise the **Deploy** button becomes available, and one click sets up the AI Receptionist from start to finish.
#### What each pricing model does at Step 9
| Pricing model | Step 9 behavior | When Step 10 deploy unlocks |
| ---------------------------------------- | --------------------------------------------------------------------- | ----------------------------------------------- |
| **Subscription** | Opens a recurring Stripe Checkout using your connected Stripe account | Once Stripe confirms the subscription is active |
| **Fixed Price (one-time)** | Opens a one-time Stripe Checkout | Once the payment is confirmed |
| **Fixed Price (recurring — month/year)** | Opens a recurring Stripe Checkout at your chosen interval | Once the payment is confirmed |
| **Pay-as-you-go** | Skips checkout — the prospect goes straight to Step 10 | Right away |
| **Free / no model configured** | Skips checkout — the prospect goes straight to Step 10 | Right away |
> If something goes wrong on the payment page, or the prospect closes their browser before payment is confirmed, Step 10 sends them back to Step 9 so they can try again without losing any of their onboarding progress.
### Prospect management
Track prospects through the funnel:
1. Go to **Customer List → Prospects** (Enterprise feature).
2. View all prospects and their current step.
3. See which prospects are stuck or need help.
4. Follow up to increase conversion rates.
### Experience aliases
SaaS mode supports multiple "experiences" with different configurations:
* `/` – Default AI Receptionist
* `/assistant` – Custom assistant experience
* `/chatbot` – Chat-focused experience
Each experience can have its own:
* Landing page
* Onboarding flow
* Pricing
* Feature set
10. **Deploy Agent** – Final activation. Once payment has cleared, the AI Receptionist is set up: its phone number, training, integrations, and AI Credits are all put in place.
**At Step 3:** The prospect becomes a Customer (they move from the Prospects tab to the Customers tab).
**At Step 9:** The customer's account is created but held inactive until payment goes through. Stripe Checkout opens using your connected Stripe account. Once payment succeeds, the account is activated and the prospect moves on to Step 10. Free Forever and pay-as-you-go portals skip the payment step.
**At Step 10:** The Deploy Agent screen confirms that payment has cleared. If payment is still pending or was cancelled, the prospect is sent back to Step 9. Otherwise the **Deploy** button becomes available, and one click sets up the AI Receptionist from start to finish.
#### What each pricing model does at Step 9
| Pricing model | Step 9 behavior | When Step 10 deploy unlocks |
| ---------------------------------------- | --------------------------------------------------------------------- | ----------------------------------------------- |
| **Subscription** | Opens a recurring Stripe Checkout using your connected Stripe account | Once Stripe confirms the subscription is active |
| **Fixed Price (one-time)** | Opens a one-time Stripe Checkout | Once the payment is confirmed |
| **Fixed Price (recurring — month/year)** | Opens a recurring Stripe Checkout at your chosen interval | Once the payment is confirmed |
| **Pay-as-you-go** | Skips checkout — the prospect goes straight to Step 10 | Right away |
| **Free / no model configured** | Skips checkout — the prospect goes straight to Step 10 | Right away |
> If something goes wrong on the payment page, or the prospect closes their browser before payment is confirmed, Step 10 sends them back to Step 9 so they can try again without losing any of their onboarding progress.
### Prospect management
Track prospects through the funnel:
1. Go to **Customer List → Prospects** (Enterprise feature).
2. View all prospects and their current step.
3. See which prospects are stuck or need help.
4. Follow up to increase conversion rates.
### Experience aliases
SaaS mode supports multiple "experiences" with different configurations:
* `/` – Default AI Receptionist
* `/assistant` – Custom assistant experience
* `/chatbot` – Chat-focused experience
Each experience can have its own:
* Landing page
* Onboarding flow
* Pricing
* Feature set
 ## SaaS mode vs Basic mode
| Feature | Basic Mode | SaaS Mode |
| ----------------------- | ---------- | ---------------- |
| **Customer onboarding** | Manual | Self-service |
| **Landing page** | No | Yes |
| **Free trials** | No | Yes |
| **Prospect tracking** | No | Yes (Enterprise) |
| **Auto-deployment** | No | Yes |
| **Pricing pages** | No | Yes |
| **10-step funnel** | No | Yes |
## Auto-deploy configuration
When SaaS onboarding is enabled, auto-deploy activates AI agents automatically:
### How auto-deploy works
1. **Prospect completes Step 9** – Payment clears (or is skipped for free / pay-as-you-go)
2. **Step 10 confirms payment** – The system checks that the account is active
3. **Prospect clicks Deploy** – Setup begins
4. **System checks everything's ready** – Credits, phone number, and agent settings
5. **Agent deployed** – The AI Receptionist goes live
6. **Everyone's notified** – You get a deployment email; the customer gets a setup email (if configured)
7. **Ready for calls** – The agent starts handling calls right away
### Auto-deploy requirements
For auto-deploy to work, ensure:
* **Free AI Credits configured** – Customers need credits to use the agent
* **Default agent selected** – Set which agent template to deploy
* **Phone number assignment** – Configure number provisioning (optional)
## Pricing model configuration
### Subscription pricing
For subscription-based SaaS:
1. Set **Pricing Model** to "Subscription".
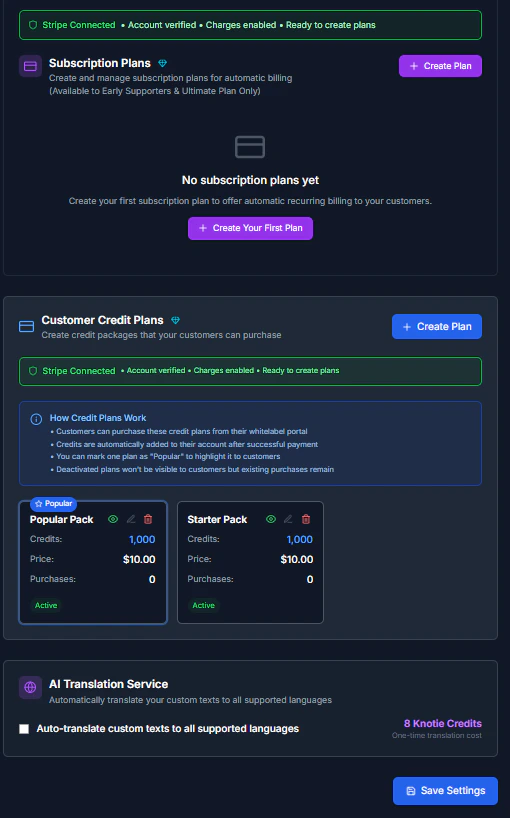
2. Configure subscription plans in **Subscription Plans** section.
3. Add monthly/annual tiers (Basic, Pro, Enterprise).
4. Enable Stripe for recurring billing.
**Step 9 plan display:** All plans with **Active** toggled ON are shown to prospects at Step 9 (Summary & Deploy). See [Subscription Plans](/partner-portal/settings/subscription-plans) for visibility rules and the constraint that applies when you're on subscription billing.
### Pay-as-you-go pricing
For usage-based billing:
1. Set **Pricing Model** to "Pay-as-you-go".
2. Set **Pay-as-you-go Rate** (e.g., \$0.10 per minute).
3. Customers are charged based on actual usage.
4. Requires AI Credits system enabled.
### Fixed price
For one-time setup fees or simple recurring access:
1. Set **Pricing Model** to "Fixed Price".
2. Fill in the three Fixed Price fields:
* **Fixed Price** – Amount the customer pays (e.g., `499`)
* **Fixed Price Currency** – Three-letter ISO code (default `USD`)
* **Fixed Price Period** – `one_time`, `month`, or `year`
3. Customers check out at Step 9 via Stripe Checkout, using your connected Stripe account:
* **One-time** – a single charge
* **Month / Year** – a recurring charge at that interval
4. After payment succeeds, the customer's account is activated and the prospect lands on Step 10 to deploy.
> You need to have **finished Stripe Connect setup** with **charges enabled** for Fixed Price checkout to work. If your Stripe setup isn't complete, the customer will be blocked at Step 9.
## SaaS mode vs Basic mode
| Feature | Basic Mode | SaaS Mode |
| ----------------------- | ---------- | ---------------- |
| **Customer onboarding** | Manual | Self-service |
| **Landing page** | No | Yes |
| **Free trials** | No | Yes |
| **Prospect tracking** | No | Yes (Enterprise) |
| **Auto-deployment** | No | Yes |
| **Pricing pages** | No | Yes |
| **10-step funnel** | No | Yes |
## Auto-deploy configuration
When SaaS onboarding is enabled, auto-deploy activates AI agents automatically:
### How auto-deploy works
1. **Prospect completes Step 9** – Payment clears (or is skipped for free / pay-as-you-go)
2. **Step 10 confirms payment** – The system checks that the account is active
3. **Prospect clicks Deploy** – Setup begins
4. **System checks everything's ready** – Credits, phone number, and agent settings
5. **Agent deployed** – The AI Receptionist goes live
6. **Everyone's notified** – You get a deployment email; the customer gets a setup email (if configured)
7. **Ready for calls** – The agent starts handling calls right away
### Auto-deploy requirements
For auto-deploy to work, ensure:
* **Free AI Credits configured** – Customers need credits to use the agent
* **Default agent selected** – Set which agent template to deploy
* **Phone number assignment** – Configure number provisioning (optional)
## Pricing model configuration
### Subscription pricing
For subscription-based SaaS:
1. Set **Pricing Model** to "Subscription".
2. Configure subscription plans in **Subscription Plans** section.
3. Add monthly/annual tiers (Basic, Pro, Enterprise).
4. Enable Stripe for recurring billing.
**Step 9 plan display:** All plans with **Active** toggled ON are shown to prospects at Step 9 (Summary & Deploy). See [Subscription Plans](/partner-portal/settings/subscription-plans) for visibility rules and the constraint that applies when you're on subscription billing.
### Pay-as-you-go pricing
For usage-based billing:
1. Set **Pricing Model** to "Pay-as-you-go".
2. Set **Pay-as-you-go Rate** (e.g., \$0.10 per minute).
3. Customers are charged based on actual usage.
4. Requires AI Credits system enabled.
### Fixed price
For one-time setup fees or simple recurring access:
1. Set **Pricing Model** to "Fixed Price".
2. Fill in the three Fixed Price fields:
* **Fixed Price** – Amount the customer pays (e.g., `499`)
* **Fixed Price Currency** – Three-letter ISO code (default `USD`)
* **Fixed Price Period** – `one_time`, `month`, or `year`
3. Customers check out at Step 9 via Stripe Checkout, using your connected Stripe account:
* **One-time** – a single charge
* **Month / Year** – a recurring charge at that interval
4. After payment succeeds, the customer's account is activated and the prospect lands on Step 10 to deploy.
> You need to have **finished Stripe Connect setup** with **charges enabled** for Fixed Price checkout to work. If your Stripe setup isn't complete, the customer will be blocked at Step 9.
 ## Advanced SaaS settings
### Language selection
Configure portal language:
* **Basic Portal Language** – For Basic/Professional modes
* **SaaS Portal Language** – For SaaS mode specifically
Supported languages: English, Spanish, French, German, Portuguese, etc.
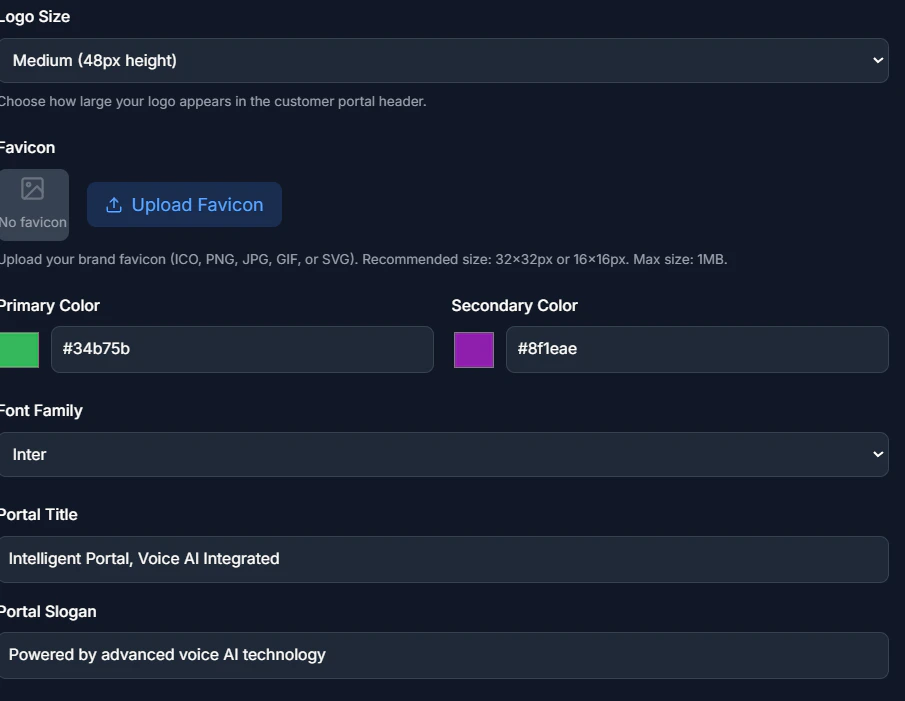
### Custom branding
Enhance your SaaS portal with:
* **Custom logo** – Upload your brand logo
* **Primary color** – Set brand color scheme
* **Portal title** – Custom portal name
* **Portal slogan** – Tagline for landing page
## Advanced SaaS settings
### Language selection
Configure portal language:
* **Basic Portal Language** – For Basic/Professional modes
* **SaaS Portal Language** – For SaaS mode specifically
Supported languages: English, Spanish, French, German, Portuguese, etc.
### Custom branding
Enhance your SaaS portal with:
* **Custom logo** – Upload your brand logo
* **Primary color** – Set brand color scheme
* **Portal title** – Custom portal name
* **Portal slogan** – Tagline for landing page
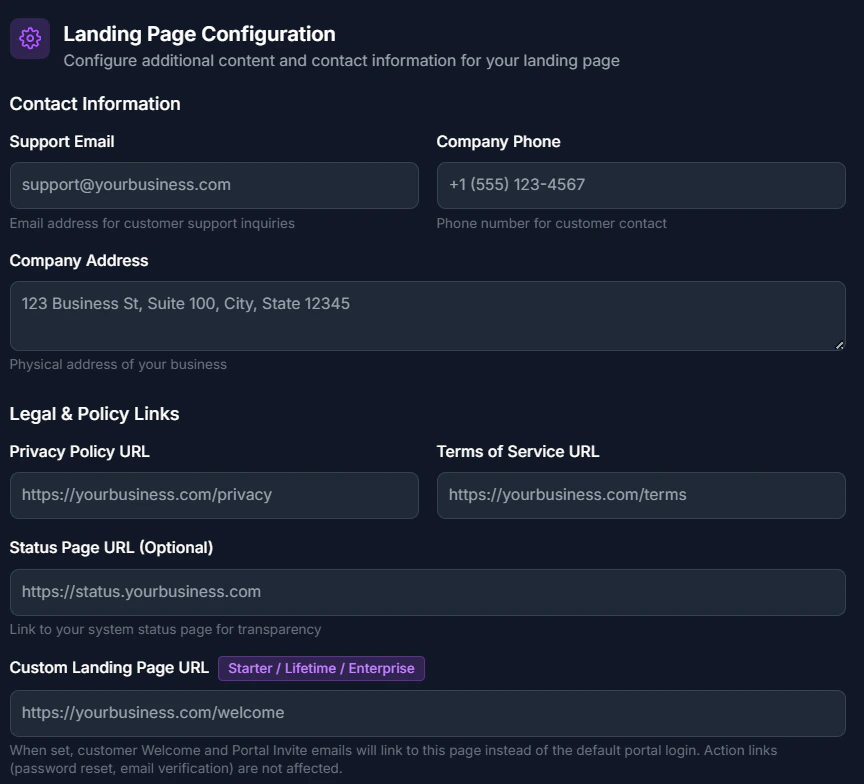
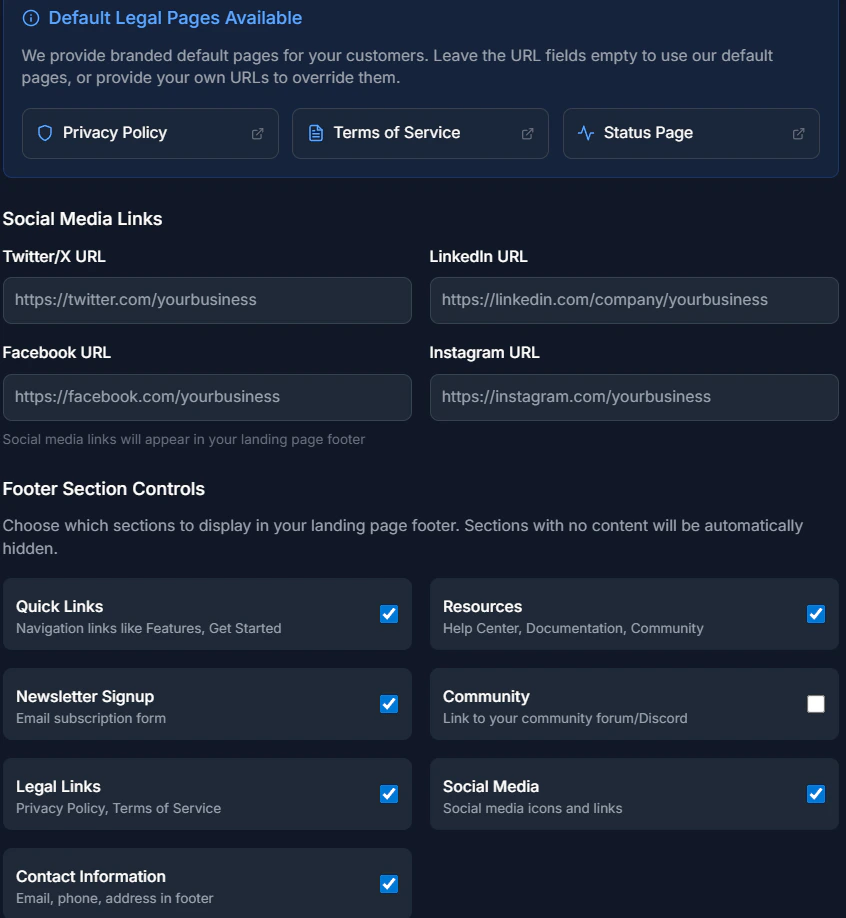
 ### Testimonials and social proof
Add credibility:
* **Customer testimonials** – Success stories
* **Testimonial images** – Customer logos
* **More testimonials URL** – Link to full testimonials page
* **Community URL** – Link to your community/forum
### Testimonials and social proof
Add credibility:
* **Customer testimonials** – Success stories
* **Testimonial images** – Customer logos
* **More testimonials URL** – Link to full testimonials page
* **Community URL** – Link to your community/forum
 ## Monitoring SaaS performance
### Key metrics to track
1. **Prospect conversion rate** – Prospects → Customers
2. **Onboarding completion rate** – % reaching Step 10 (deployed)
3. **Step 9 → Step 10 conversion** – % who pay vs drop at checkout
4. **Drop-off points** – Where prospects abandon
5. **Average time to activation** – Days from signup to deployment
6. **Free trial conversions** – Free → Paid
### Analytics
Monitor in:
* **Agent Analytics** – Usage by customer
* **Prospects page** – Funnel performance
* **Customer List** – Active customers
## Troubleshooting
### SaaS mode not available
* **Upgrade required** – You're on Free Forever plan, upgrade to Starter or above
* **Contact support** – Request manual SaaS mode enablement
### Landing page not showing
* **Portal mode not saved** – Verify SaaS mode is selected and saved
* **DNS not configured** – Check custom domain is verified
* **Cache issue** – Clear browser cache and try in incognito mode
### Onboarding flow not working
* **SaaS Onboarding disabled** – Toggle "SaaS Onboarding Enabled" to ON
* **Missing configuration** – Ensure all SaaS settings are filled in
* **Free credits not set** – Configure Free AI Credits amount
### Customer stuck on Step 9 (payment loop)
* **Stripe Connect not set up** – Finish Stripe Connect setup under Settings → Stripe Connect, then try again
* **Charges not enabled** – Stripe is still reviewing your account, so checkout can't be created yet
* **Fixed Price missing** – If your pricing model is set to Fixed Price but no amount is filled in, checkout can't be created. Add a Fixed Price amount.
* **Payment cancelled** – If the customer cancels, they're returned to Step 9 with their data preserved
### Customer paid but Step 10 sends them back to Step 9
* **Payment still confirming** – It can take a few seconds for Stripe to confirm; wait about 30 seconds and refresh
* **Try again** – Have the customer refresh the payment confirmation page; their onboarding data is preserved
* **Still stuck?** – Contact support with the customer's details
### Auto-deploy failing
* **Insufficient credits** – Increase Free AI Credits allocation
* **No agent selected** – Configure default agent template
* **Integration missing** – Check provider API keys are configured
## Best practices
* **Test the full funnel** – Go through onboarding as a prospect before going live
* **Set appropriate free credits** – Enough to test but not too much to abuse
* **Monitor drop-off points** – Improve steps where prospects abandon
* **A/B test pricing** – Try different models and rates
* **Provide clear value propositions** – Explain benefits on landing page
* **Optimize for mobile** – Many prospects will sign up on mobile devices
## Related pages
* [Whitelabel Subdomain](/customer-management/whitelabel-subdomain) – Basic portal setup
* [Prospects](/partner-portal/prospects) – Managing prospects in the funnel
* [Customer Credit Plans](/partner-portal/settings/customer-credit-plans) – Configure pricing packages
* [Subscription Plans](/partner-portal/settings/subscription-plans) – Monthly/annual billing
## Monitoring SaaS performance
### Key metrics to track
1. **Prospect conversion rate** – Prospects → Customers
2. **Onboarding completion rate** – % reaching Step 10 (deployed)
3. **Step 9 → Step 10 conversion** – % who pay vs drop at checkout
4. **Drop-off points** – Where prospects abandon
5. **Average time to activation** – Days from signup to deployment
6. **Free trial conversions** – Free → Paid
### Analytics
Monitor in:
* **Agent Analytics** – Usage by customer
* **Prospects page** – Funnel performance
* **Customer List** – Active customers
## Troubleshooting
### SaaS mode not available
* **Upgrade required** – You're on Free Forever plan, upgrade to Starter or above
* **Contact support** – Request manual SaaS mode enablement
### Landing page not showing
* **Portal mode not saved** – Verify SaaS mode is selected and saved
* **DNS not configured** – Check custom domain is verified
* **Cache issue** – Clear browser cache and try in incognito mode
### Onboarding flow not working
* **SaaS Onboarding disabled** – Toggle "SaaS Onboarding Enabled" to ON
* **Missing configuration** – Ensure all SaaS settings are filled in
* **Free credits not set** – Configure Free AI Credits amount
### Customer stuck on Step 9 (payment loop)
* **Stripe Connect not set up** – Finish Stripe Connect setup under Settings → Stripe Connect, then try again
* **Charges not enabled** – Stripe is still reviewing your account, so checkout can't be created yet
* **Fixed Price missing** – If your pricing model is set to Fixed Price but no amount is filled in, checkout can't be created. Add a Fixed Price amount.
* **Payment cancelled** – If the customer cancels, they're returned to Step 9 with their data preserved
### Customer paid but Step 10 sends them back to Step 9
* **Payment still confirming** – It can take a few seconds for Stripe to confirm; wait about 30 seconds and refresh
* **Try again** – Have the customer refresh the payment confirmation page; their onboarding data is preserved
* **Still stuck?** – Contact support with the customer's details
### Auto-deploy failing
* **Insufficient credits** – Increase Free AI Credits allocation
* **No agent selected** – Configure default agent template
* **Integration missing** – Check provider API keys are configured
## Best practices
* **Test the full funnel** – Go through onboarding as a prospect before going live
* **Set appropriate free credits** – Enough to test but not too much to abuse
* **Monitor drop-off points** – Improve steps where prospects abandon
* **A/B test pricing** – Try different models and rates
* **Provide clear value propositions** – Explain benefits on landing page
* **Optimize for mobile** – Many prospects will sign up on mobile devices
## Related pages
* [Whitelabel Subdomain](/customer-management/whitelabel-subdomain) – Basic portal setup
* [Prospects](/partner-portal/prospects) – Managing prospects in the funnel
* [Customer Credit Plans](/partner-portal/settings/customer-credit-plans) – Configure pricing packages
* [Subscription Plans](/partner-portal/settings/subscription-plans) – Monthly/annual billing