> ## Documentation Index
> Fetch the complete documentation index at: https://docs.knotie-ai.pro/llms.txt
> Use this file to discover all available pages before exploring further.
# Auto-deploy
> Automatically deploy AI agents for customers who complete the SaaS onboarding flow.
## What Auto-Deploy is for
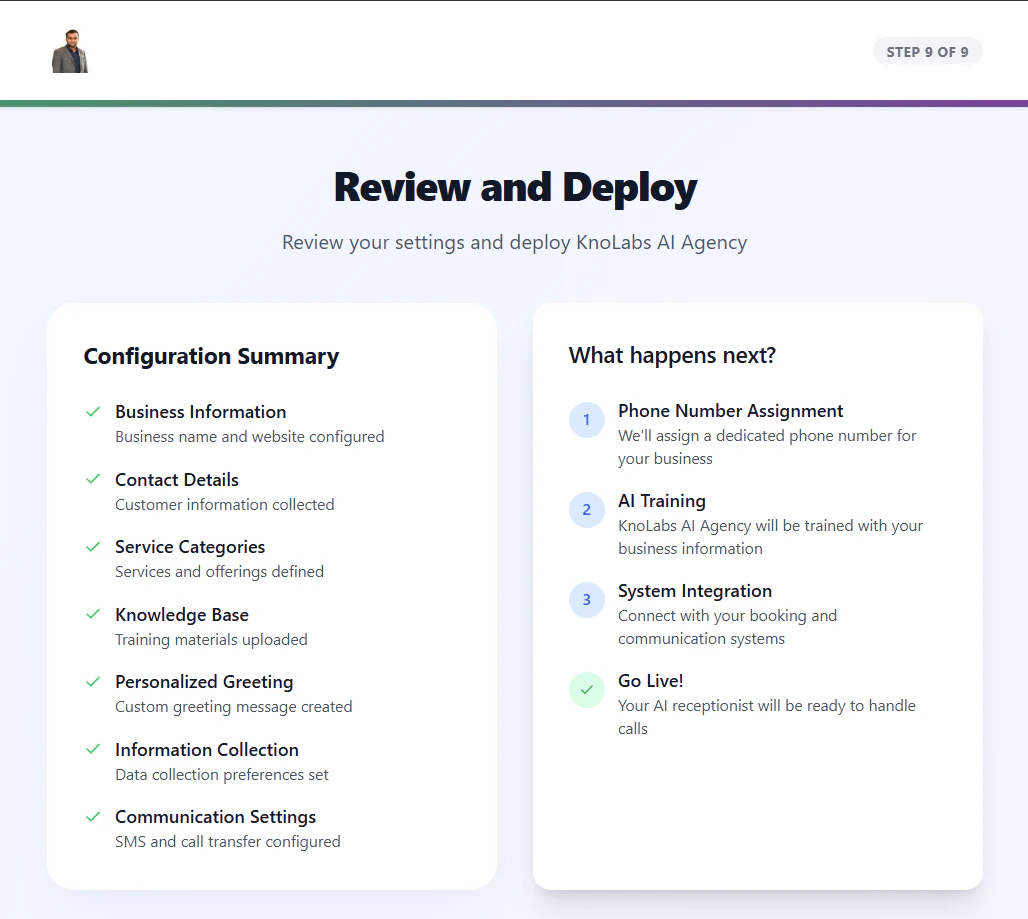
**Auto-Deploy** automatically activates AI agents for customers who complete payment and click **Deploy** on Step 9 (Summary & Deploy) of the SaaS onboarding process. It removes the manual setup work and gives self-service customers instant activation.
The onboarding flow is **9 steps**. Step 9 — **Summary & Deploy** — is where payment is confirmed and the customer clicks Deploy.
Use auto-deploy when:
* Running a SaaS portal with self-service onboarding
* You want customers to get instant access after signup (and payment, if applicable)
* You have sufficient credits to cover deployments
## How auto-deploy works
### The deployment flow
1. **Customer completes Step 9 (Summary & Deploy)** – Their payment goes through (or is skipped for free / pay-as-you-go portals)
2. **Deploy button unlocks** – Once payment is confirmed as active; otherwise the customer stays on Step 9 with an error
3. **Customer clicks Deploy** – This kicks off the setup
4. **Prerequisites are checked** – Credits and configuration are validated
5. **Deployment is queued** – The job joins the setup queue
6. **Agent is deployed** – The AI Receptionist is activated automatically
7. **Everyone's notified** – The customer gets a setup email, and you get a deployment notification
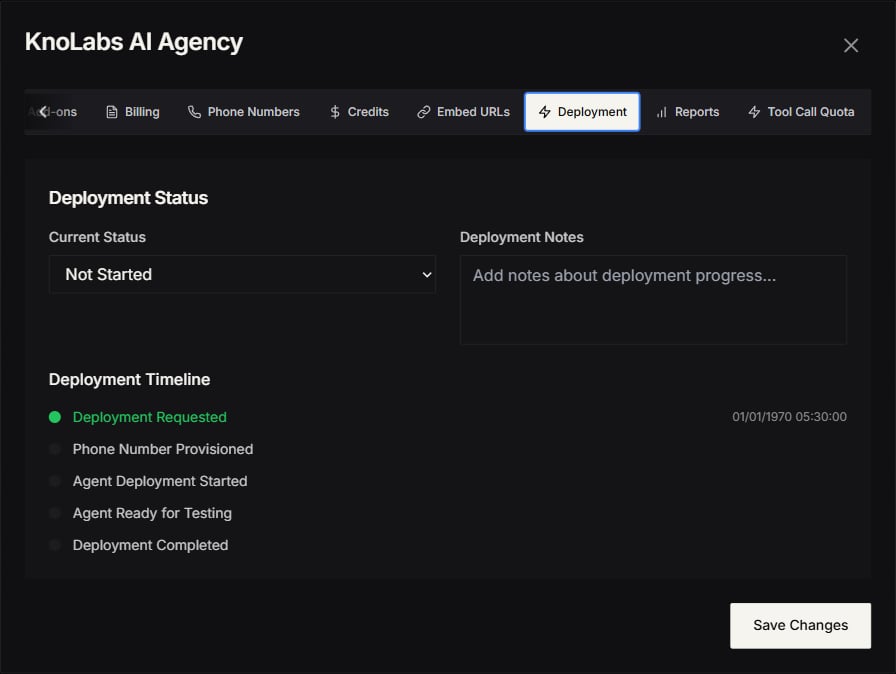
### Deployment statuses
A customer's deployment can be in one of these states:
* **Not started** – Onboarding isn't complete yet
* **Queued** – The deployment is in the queue
* **Pending credits** – Waiting for enough credits
* **Agent ready** – The agent is deployed but still needs a phone number
* **Completed** – Fully deployed and working
* **Failed** – Something went wrong during deployment
 ## Prerequisites for auto-deploy
### 1. SaaS Portal Mode enabled
Auto-deploy requires SaaS mode:
1. Go to **Settings → Whitelabel**.
2. Select **SaaS Portal** mode.
3. Enable **SaaS Onboarding**.
### 2. Sufficient credit balance
Your partner account needs minimum credits:
**Free Forever partners:**
* 1000 cents (\$10) Telephony Credits
* 200 Knotie Credits
**Paid tier partners:**
* 500 cents (\$5) Telephony Credits
* 200 Knotie Credits
If credits are insufficient, the deployment status becomes **Pending credits**.
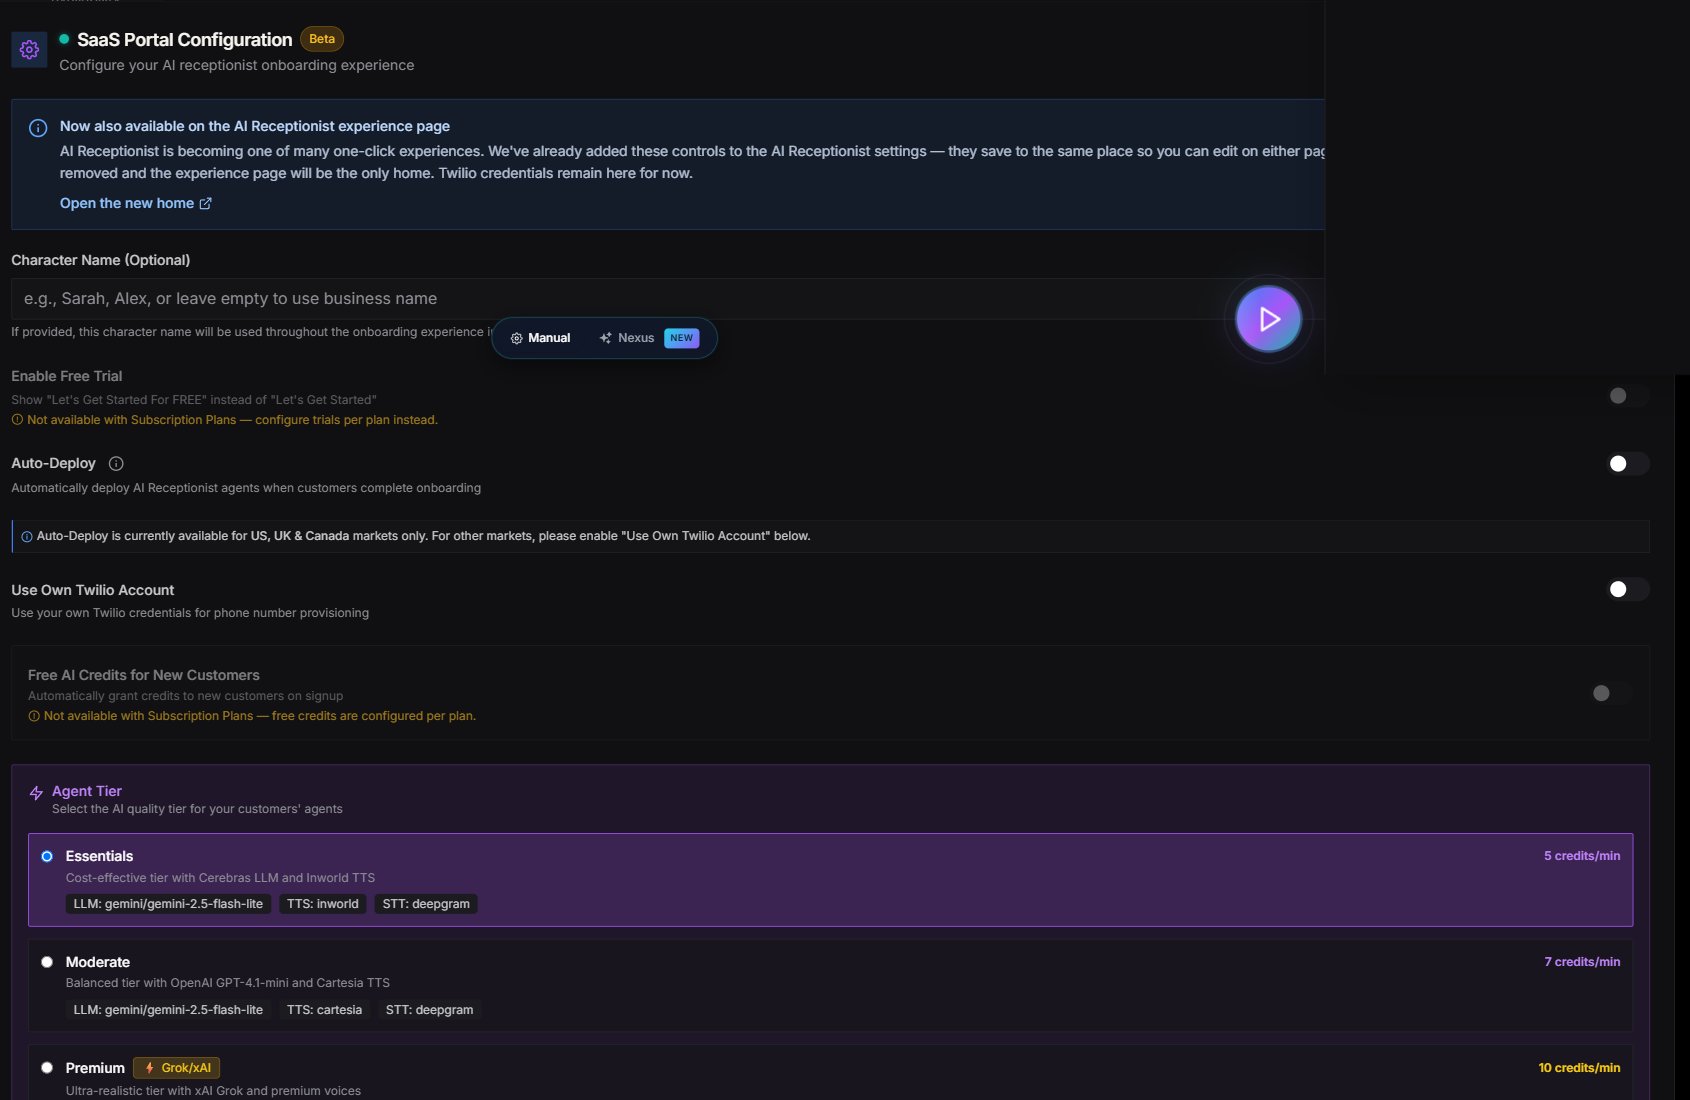
### 3. Auto-deploy enabled
Toggle auto-deploy in whitelabel settings:
1. Go to **Settings → Whitelabel**.
2. In **SaaS Portal Configuration**, find **Auto-Deploy Enabled**.
3. Toggle to ON.
4. Save settings.
## Prerequisites for auto-deploy
### 1. SaaS Portal Mode enabled
Auto-deploy requires SaaS mode:
1. Go to **Settings → Whitelabel**.
2. Select **SaaS Portal** mode.
3. Enable **SaaS Onboarding**.
### 2. Sufficient credit balance
Your partner account needs minimum credits:
**Free Forever partners:**
* 1000 cents (\$10) Telephony Credits
* 200 Knotie Credits
**Paid tier partners:**
* 500 cents (\$5) Telephony Credits
* 200 Knotie Credits
If credits are insufficient, the deployment status becomes **Pending credits**.
### 3. Auto-deploy enabled
Toggle auto-deploy in whitelabel settings:
1. Go to **Settings → Whitelabel**.
2. In **SaaS Portal Configuration**, find **Auto-Deploy Enabled**.
3. Toggle to ON.
4. Save settings.
 ## Enable auto-deploy
### Step 1: Configure SaaS settings
1. Navigate to **Settings → Whitelabel**.
2. Select **SaaS Portal** mode.
3. Configure:
* **SaaS Onboarding Enabled** – Toggle ON
* **Free AI Credits** – Set initial credits (e.g., 50)
* **SaaS Agent Tier** – Choose agent capability level
### Step 2: Enable auto-deploy
1. In the **SaaS Portal Configuration** section.
2. Find **Auto-Deploy Enabled** toggle.
3. Set to ON.
4. Click **Save Settings**.
### Step 3: Ensure credit availability
1. Check your credit balance in **Credits** page.
2. Top up if below minimum thresholds.
3. Set up low-credit alerts to avoid deployment failures.
## What happens during auto-deploy
### Phase 1: Customer completes onboarding
When a customer reaches Step 9 (Summary & Deploy) and clicks **Deploy**:
1. The system first confirms their payment is active; if not, they stay on Step 9 with an error message.
2. Their onboarding details (business info, knowledge base, greeting, voice, integrations, billing model) are checked and saved.
3. AI credits are turned on for the customer (only if **Free AI Credits** is set to more than 0).
4. The deployment status is set.
The billing model used for the deployment matches the pricing model on your account — subscription, fixed price, pay-as-you-go, or a free trial if none is set.
### Phase 2: Credit validation
The system checks your credit balance:
**If you have enough credits:**
* Status → **Queued**
* The setup job starts
**If you don't have enough:**
* Status → **Pending credits**
* You get an email letting you know
* The customer can still sign in, but their agent stays inactive
### Phase 3: Deployment
The setup runs automatically:
1. **Agent creation** – A [Knova AI Receptionist](/agents/knova/knova-agent) is created, personalized with the customer's business profile, knowledge base, and onboarding details
2. **Knowledge base setup** – The customer's uploaded documents are processed and added
3. **Phone number setup** – A phone number is purchased and connected so the agent can take calls
4. **Integrations** – Tools (email, SMS, calendar) and analytics are turned on
5. **Final check** – The system confirms everything is in place
### Phase 4: Completion
**On success:**
* Status → **Completed**
* The customer can make and receive calls
* A confirmation email is sent
**On failure:**
* Status → **Failed**
* The error is logged for review
* Support is notified
## Enable auto-deploy
### Step 1: Configure SaaS settings
1. Navigate to **Settings → Whitelabel**.
2. Select **SaaS Portal** mode.
3. Configure:
* **SaaS Onboarding Enabled** – Toggle ON
* **Free AI Credits** – Set initial credits (e.g., 50)
* **SaaS Agent Tier** – Choose agent capability level
### Step 2: Enable auto-deploy
1. In the **SaaS Portal Configuration** section.
2. Find **Auto-Deploy Enabled** toggle.
3. Set to ON.
4. Click **Save Settings**.
### Step 3: Ensure credit availability
1. Check your credit balance in **Credits** page.
2. Top up if below minimum thresholds.
3. Set up low-credit alerts to avoid deployment failures.
## What happens during auto-deploy
### Phase 1: Customer completes onboarding
When a customer reaches Step 9 (Summary & Deploy) and clicks **Deploy**:
1. The system first confirms their payment is active; if not, they stay on Step 9 with an error message.
2. Their onboarding details (business info, knowledge base, greeting, voice, integrations, billing model) are checked and saved.
3. AI credits are turned on for the customer (only if **Free AI Credits** is set to more than 0).
4. The deployment status is set.
The billing model used for the deployment matches the pricing model on your account — subscription, fixed price, pay-as-you-go, or a free trial if none is set.
### Phase 2: Credit validation
The system checks your credit balance:
**If you have enough credits:**
* Status → **Queued**
* The setup job starts
**If you don't have enough:**
* Status → **Pending credits**
* You get an email letting you know
* The customer can still sign in, but their agent stays inactive
### Phase 3: Deployment
The setup runs automatically:
1. **Agent creation** – A [Knova AI Receptionist](/agents/knova/knova-agent) is created, personalized with the customer's business profile, knowledge base, and onboarding details
2. **Knowledge base setup** – The customer's uploaded documents are processed and added
3. **Phone number setup** – A phone number is purchased and connected so the agent can take calls
4. **Integrations** – Tools (email, SMS, calendar) and analytics are turned on
5. **Final check** – The system confirms everything is in place
### Phase 4: Completion
**On success:**
* Status → **Completed**
* The customer can make and receive calls
* A confirmation email is sent
**On failure:**
* Status → **Failed**
* The error is logged for review
* Support is notified
 ## Monitor deployment status
### In Customer List
View deployment status for each customer:
1. Go to **Customers → Active Customers** in the Partner Portal sidebar.
2. Each customer shows a status badge:
* **Queued** – Deployment in progress (spinning icon)
* **Pending Credits** – Waiting for credits (amber)
* **Agent Ready** – Deployed successfully (green)
* **Completed** – Fully operational (green)
* **Failed** – Deployment error (red)
### Continue deployment manually
If a customer is stuck on **Pending credits**, you can resume deployment:
1. Top up your credits.
2. Find the customer in **Customers → Active Customers**.
3. Click **Continue Deployment** button.
4. System re-queues the deployment job.
## Deployment notifications
### Insufficient credits notification
When auto-deploy fails due to insufficient credits, you receive an email:
**Subject:** ⚠️ Auto-Deployment Pending - Credits Required - \[Customer Name]
**Contains:**
* Customer details
* Current credit balance
* Minimum required credits
* Link to top up credits
### Deployment failure notification
If deployment fails for other reasons, support receives notification with:
* Customer information
* Error details
* Troubleshooting steps
## Credit requirements explained
### Why minimum credits are required
Auto-deploy requires upfront credits to ensure:
* Agent can be activated without interruption
* Customer has immediate access to services
* No failed deployments due to insufficient funds
### How credits are consumed
During auto-deploy:
1. **Telephony Credits** – Phone number provisioning, call routing setup
2. **Knotie Credits** – AI agent processing, knowledge base embedding, tool initialization
The exact amount consumed depends on:
* Agent tier selected
* Knowledge base size
* Number of integrations
* Tool complexity
### Free AI Credits for customers
Customers receive **Free AI Credits** (configured in SaaS settings):
* These are separate from your partner credits
* Used for initial testing and onboarding calls
* Configurable per partner (default: 50 credits)
## Troubleshooting
### Auto-deploy not triggering
**Possible causes:**
* Auto-Deploy toggle is OFF
* SaaS Onboarding not enabled
* Customer didn't reach Step 9 (Summary & Deploy) — still stuck on a previous step (most commonly the payment verification within Step 9)
* Partner credits below minimum threshold
**Solution:**
1. Verify auto-deploy is enabled in Settings → White-Label Portal.
2. Check customer reached Step 9 (Summary & Deploy) in Prospects list — earlier step completion means payment didn't clear.
3. Confirm credit balance meets minimums.
### Deployment stuck in "Queued"
**Possible causes:**
* A backlog in the setup queue
* Network issues
* Configuration errors
**Solution:**
1. Wait 5-10 minutes for queue processing.
2. Check deployment status in **Customers → Active Customers**.
3. Contact support if stuck for >30 minutes.
### Deployment failed
**Possible causes:**
* Invalid customer data
* Missing required integrations
* Agent configuration errors
* Knowledge base processing failure
**Solution:**
1. Review customer's onboarding data for completeness.
2. Check error message in deployment logs.
3. Manually configure missing elements.
4. Retry deployment from **Customers → Active Customers**.
### Credits deducted but agent not deployed
**Possible causes:**
* Deployment job failed mid-process
* Credits consumed for partial setup
**Solution:**
1. Check **Customers → Active Customers** for deployment status.
2. Review credit history for transaction details.
3. Manually complete deployment if needed.
4. Contact support for credit refund if applicable.
## Manual deployment fallback
If auto-deploy is disabled or fails, you can deploy manually:
1. Go to **Customers → Active Customers** in the Partner Portal sidebar.
2. Select the customer.
3. Click **Manage**.
4. Go to **Deployment** tab.
5. Configure agent settings manually.
6. Click **Deploy Agent**.
This gives you full control over the deployment process.
## Best practices
### Credit management
* **Maintain buffer** – Keep 5-10x minimum credits for multiple deployments
* **Set up alerts** – Configure low-credit notifications
* **Monitor consumption** – Track credit usage per deployment
* **Automate top-ups** – Use recurring payments for credit purchases
### Deployment monitoring
* **Check daily** – Review pending deployments each morning
* **Follow up quickly** – Address Pending credits status within hours
* **Track success rate** – Monitor deployment success vs failure ratio
* **Optimize onboarding** – Reduce friction points causing deployment failures
### Customer experience
* **Set expectations** – Inform customers deployment may take 5-10 minutes
* **Provide generous free credits** – Allow thorough testing before purchase
* **Send confirmation emails** – Notify when deployment completes
* **Offer support** – Be available for questions during initial setup
## Auto-deploy vs manual deployment
| Feature | Auto-Deploy | Manual Deployment |
| ---------------------- | --------------------------- | ------------------------------- |
| **Speed** | Instant (5-10 min) | Requires partner action |
| **Scalability** | Handles unlimited customers | Limited by partner availability |
| **Customization** | Uses templates | Full control |
| **Credit requirement** | Upfront minimums | Per-deployment |
| **Best for** | SaaS/self-service | Custom/enterprise customers |
## Related pages
* [Knova AI Receptionist agent](/agents/knova/knova-agent) – What gets deployed and how to configure it
* [SaaS Portal Mode](/partner-portal/settings/saas-portal-mode) – Configure SaaS mode
* [Prospects](/partner-portal/prospects) – Track onboarding progress
* [Credits Management](/partner-portal/credits) – Top up credits
* [Deployment Status Tracking](/partner-portal/customers/deployment-status-tracking) – Monitor deployments
## Monitor deployment status
### In Customer List
View deployment status for each customer:
1. Go to **Customers → Active Customers** in the Partner Portal sidebar.
2. Each customer shows a status badge:
* **Queued** – Deployment in progress (spinning icon)
* **Pending Credits** – Waiting for credits (amber)
* **Agent Ready** – Deployed successfully (green)
* **Completed** – Fully operational (green)
* **Failed** – Deployment error (red)
### Continue deployment manually
If a customer is stuck on **Pending credits**, you can resume deployment:
1. Top up your credits.
2. Find the customer in **Customers → Active Customers**.
3. Click **Continue Deployment** button.
4. System re-queues the deployment job.
## Deployment notifications
### Insufficient credits notification
When auto-deploy fails due to insufficient credits, you receive an email:
**Subject:** ⚠️ Auto-Deployment Pending - Credits Required - \[Customer Name]
**Contains:**
* Customer details
* Current credit balance
* Minimum required credits
* Link to top up credits
### Deployment failure notification
If deployment fails for other reasons, support receives notification with:
* Customer information
* Error details
* Troubleshooting steps
## Credit requirements explained
### Why minimum credits are required
Auto-deploy requires upfront credits to ensure:
* Agent can be activated without interruption
* Customer has immediate access to services
* No failed deployments due to insufficient funds
### How credits are consumed
During auto-deploy:
1. **Telephony Credits** – Phone number provisioning, call routing setup
2. **Knotie Credits** – AI agent processing, knowledge base embedding, tool initialization
The exact amount consumed depends on:
* Agent tier selected
* Knowledge base size
* Number of integrations
* Tool complexity
### Free AI Credits for customers
Customers receive **Free AI Credits** (configured in SaaS settings):
* These are separate from your partner credits
* Used for initial testing and onboarding calls
* Configurable per partner (default: 50 credits)
## Troubleshooting
### Auto-deploy not triggering
**Possible causes:**
* Auto-Deploy toggle is OFF
* SaaS Onboarding not enabled
* Customer didn't reach Step 9 (Summary & Deploy) — still stuck on a previous step (most commonly the payment verification within Step 9)
* Partner credits below minimum threshold
**Solution:**
1. Verify auto-deploy is enabled in Settings → White-Label Portal.
2. Check customer reached Step 9 (Summary & Deploy) in Prospects list — earlier step completion means payment didn't clear.
3. Confirm credit balance meets minimums.
### Deployment stuck in "Queued"
**Possible causes:**
* A backlog in the setup queue
* Network issues
* Configuration errors
**Solution:**
1. Wait 5-10 minutes for queue processing.
2. Check deployment status in **Customers → Active Customers**.
3. Contact support if stuck for >30 minutes.
### Deployment failed
**Possible causes:**
* Invalid customer data
* Missing required integrations
* Agent configuration errors
* Knowledge base processing failure
**Solution:**
1. Review customer's onboarding data for completeness.
2. Check error message in deployment logs.
3. Manually configure missing elements.
4. Retry deployment from **Customers → Active Customers**.
### Credits deducted but agent not deployed
**Possible causes:**
* Deployment job failed mid-process
* Credits consumed for partial setup
**Solution:**
1. Check **Customers → Active Customers** for deployment status.
2. Review credit history for transaction details.
3. Manually complete deployment if needed.
4. Contact support for credit refund if applicable.
## Manual deployment fallback
If auto-deploy is disabled or fails, you can deploy manually:
1. Go to **Customers → Active Customers** in the Partner Portal sidebar.
2. Select the customer.
3. Click **Manage**.
4. Go to **Deployment** tab.
5. Configure agent settings manually.
6. Click **Deploy Agent**.
This gives you full control over the deployment process.
## Best practices
### Credit management
* **Maintain buffer** – Keep 5-10x minimum credits for multiple deployments
* **Set up alerts** – Configure low-credit notifications
* **Monitor consumption** – Track credit usage per deployment
* **Automate top-ups** – Use recurring payments for credit purchases
### Deployment monitoring
* **Check daily** – Review pending deployments each morning
* **Follow up quickly** – Address Pending credits status within hours
* **Track success rate** – Monitor deployment success vs failure ratio
* **Optimize onboarding** – Reduce friction points causing deployment failures
### Customer experience
* **Set expectations** – Inform customers deployment may take 5-10 minutes
* **Provide generous free credits** – Allow thorough testing before purchase
* **Send confirmation emails** – Notify when deployment completes
* **Offer support** – Be available for questions during initial setup
## Auto-deploy vs manual deployment
| Feature | Auto-Deploy | Manual Deployment |
| ---------------------- | --------------------------- | ------------------------------- |
| **Speed** | Instant (5-10 min) | Requires partner action |
| **Scalability** | Handles unlimited customers | Limited by partner availability |
| **Customization** | Uses templates | Full control |
| **Credit requirement** | Upfront minimums | Per-deployment |
| **Best for** | SaaS/self-service | Custom/enterprise customers |
## Related pages
* [Knova AI Receptionist agent](/agents/knova/knova-agent) – What gets deployed and how to configure it
* [SaaS Portal Mode](/partner-portal/settings/saas-portal-mode) – Configure SaaS mode
* [Prospects](/partner-portal/prospects) – Track onboarding progress
* [Credits Management](/partner-portal/credits) – Top up credits
* [Deployment Status Tracking](/partner-portal/customers/deployment-status-tracking) – Monitor deployments