> ## Documentation Index
> Fetch the complete documentation index at: https://docs.knotie-ai.pro/llms.txt
> Use this file to discover all available pages before exploring further.
# Whitelabel subdomain
> Set up a whitelabel page on a partner subdomain for customer access and support.
## What a whitelabel subdomain does
A whitelabel subdomain gives you a branded login link for your Customer Portal without needing any DNS work.
Most partners use a whitelabel subdomain first, then upgrade to a custom domain later.
## When a whitelabel subdomain is the best choice
* **Fast setup**: you want a working portal link in minutes.
* **No DNS access**: the customer can’t (or won’t) update domain records.
* **Pilot launches**: you want to test the portal with a small group first.
## Set up your whitelabel subdomain
1. In the Partner Portal, open **Settings**.
2. Go to **White-Label Portal**.
3. Find the **Domain** section in the left navigation panel and expand it.
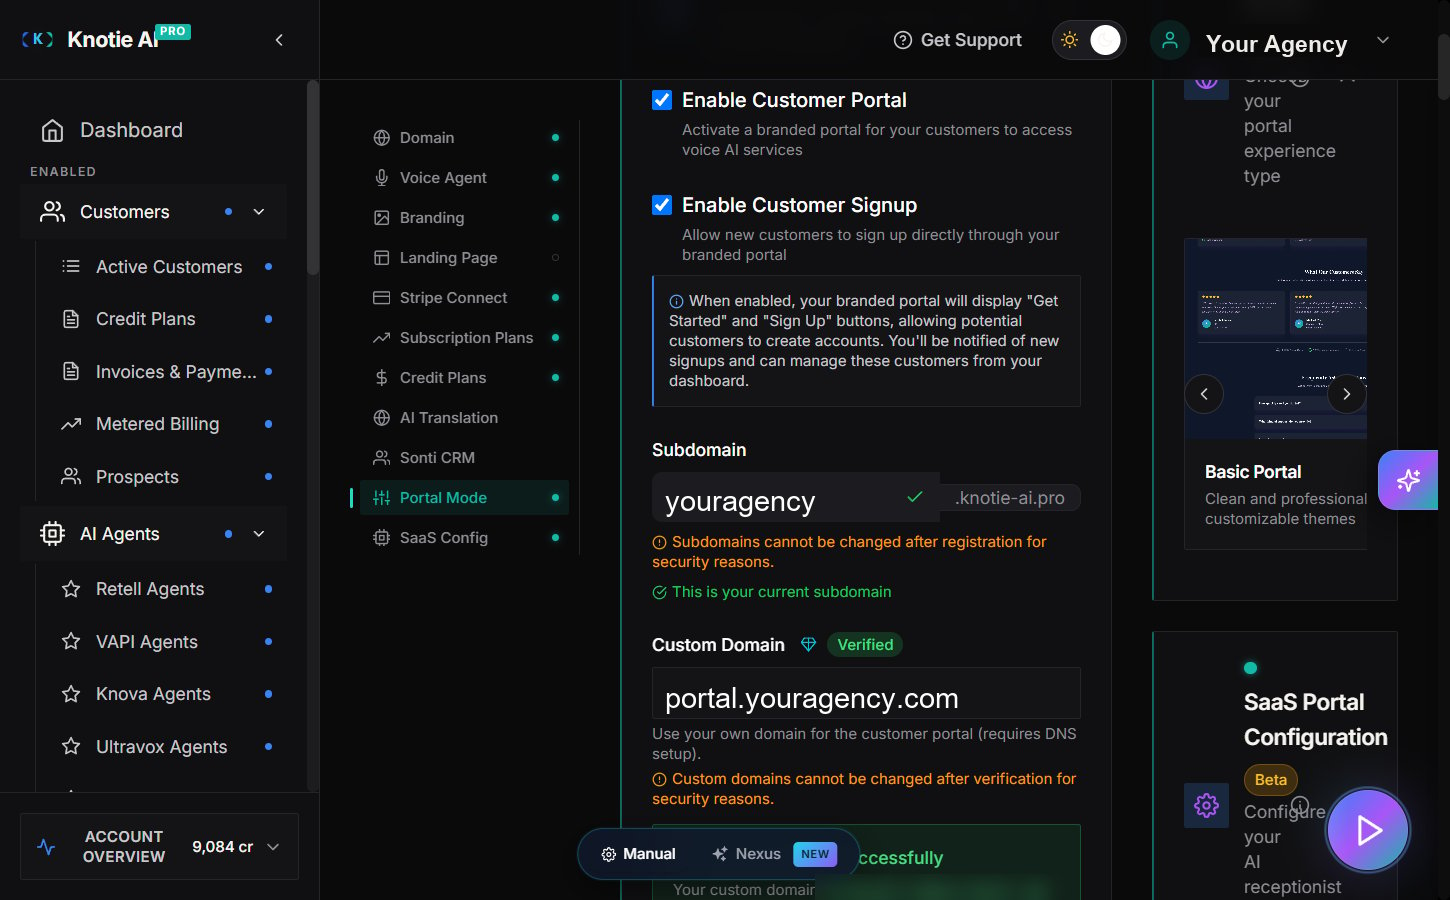
4. Enter the subdomain you want customers to use.
5. Click **Save**.
6. Open the portal link in a private/incognito window to confirm:
* The portal loads.
* The branding looks right.
* Customers can sign in.
**Subdomains cannot be changed after registration for security reasons.** Once saved, the subdomain field becomes disabled. Choose your subdomain carefully.
> The Domain Settings section also includes **Enable Customer Portal** and **Enable Customer Signup** checkboxes. Make sure these are enabled so customers can access and sign up for the portal.
## Share the login link with customers
* Use the whitelabel portal URL as the “single source of truth” for logins.
* If you send portal invites, paste the same URL in the email so customers don’t bookmark an old link.
## Full white label portal setup
Beyond just the subdomain, you can customize the entire portal experience:
### Branding customization
1. Go to **Settings → White-Label Portal** and open the **Branding** section in the left navigation panel.
2. Configure:
* **Portal title** – Your company name or product name
* **Portal slogan** – Tagline or description
* **Logo** – Upload your company logo (light and dark versions)
* **Brand colors** – Primary color, accent colors
* **Favicon** – Small icon that appears in browser tabs
 ### Custom domain (advanced)
For a fully branded experience, use a custom domain instead of a subdomain:
1. Go to **Settings → White-Label Portal → Domain**.
2. Enter your domain (e.g., `portal.yourcompany.com`).
3. Add the required DNS records to your domain provider.
4. Verify the domain.
5. Wait for SSL certificate provisioning.
See [Custom Domain](/customer-management/custom-domain) for detailed instructions.
### Email branding
Ensure emails sent from the portal match your brand:
1. Configure **Email Settings** with your domain.
2. Set up **Email Domain Management** for custom sender addresses.
3. Test emails to confirm branding appears correctly.
### Custom domain (advanced)
For a fully branded experience, use a custom domain instead of a subdomain:
1. Go to **Settings → White-Label Portal → Domain**.
2. Enter your domain (e.g., `portal.yourcompany.com`).
3. Add the required DNS records to your domain provider.
4. Verify the domain.
5. Wait for SSL certificate provisioning.
See [Custom Domain](/customer-management/custom-domain) for detailed instructions.
### Email branding
Ensure emails sent from the portal match your brand:
1. Configure **Email Settings** with your domain.
2. Set up **Email Domain Management** for custom sender addresses.
3. Test emails to confirm branding appears correctly.
 ## Support notes (common issues)
* **Portal opens but looks unbranded**
* Double-check you saved the whitelabel settings.
* Refresh the page (hard refresh) or test in an incognito window.
* **Customer says the link doesn't work**
* Confirm they copied the full URL (no trailing spaces).
* Confirm the customer is active and has portal access.
* **Customer can't sign in**
* Make sure they're using the email address you invited.
* **Subdomain field is disabled**
* Subdomains are immutable after registration. Contact support if you need to change it.
## What customers will see after login
Once a customer can sign in, the exact sidebar items they see depend on the customer's enabled features.
For the current customer-side menu behavior, including:
* **Billing & Payments**
* **AI Credits**
* **Payment Methods**
* **AI Gateway**
* feature-driven menu visibility
see [Client portal navigation, billing, and AI Gateway](/customer-management/client-portal-navigation-and-ai-gateway).
## Screenshots
## Support notes (common issues)
* **Portal opens but looks unbranded**
* Double-check you saved the whitelabel settings.
* Refresh the page (hard refresh) or test in an incognito window.
* **Customer says the link doesn't work**
* Confirm they copied the full URL (no trailing spaces).
* Confirm the customer is active and has portal access.
* **Customer can't sign in**
* Make sure they're using the email address you invited.
* **Subdomain field is disabled**
* Subdomains are immutable after registration. Contact support if you need to change it.
## What customers will see after login
Once a customer can sign in, the exact sidebar items they see depend on the customer's enabled features.
For the current customer-side menu behavior, including:
* **Billing & Payments**
* **AI Credits**
* **Payment Methods**
* **AI Gateway**
* feature-driven menu visibility
see [Client portal navigation, billing, and AI Gateway](/customer-management/client-portal-navigation-and-ai-gateway).
## Screenshots