> ## Documentation Index
> Fetch the complete documentation index at: https://docs.knotie-ai.pro/llms.txt
> Use this file to discover all available pages before exploring further.
# Partner Login Flow
> Step-by-step guide to logging into the Knotie AI Pro Partner Portal — from first-time credentials to your onboarding path.
## Overview
This guide walks you through logging into the **Knotie AI Pro Partner Portal** as a new partner. By the end, you'll be on your dashboard with full access to the onboarding checklist.
**Time to complete:** \~5 minutes for first login (password change + optional MFA).
***
## Step 1 — Navigate to Partner Login
Go to the partner login page:
```
https://knotie-ai.pro/partner/login
```
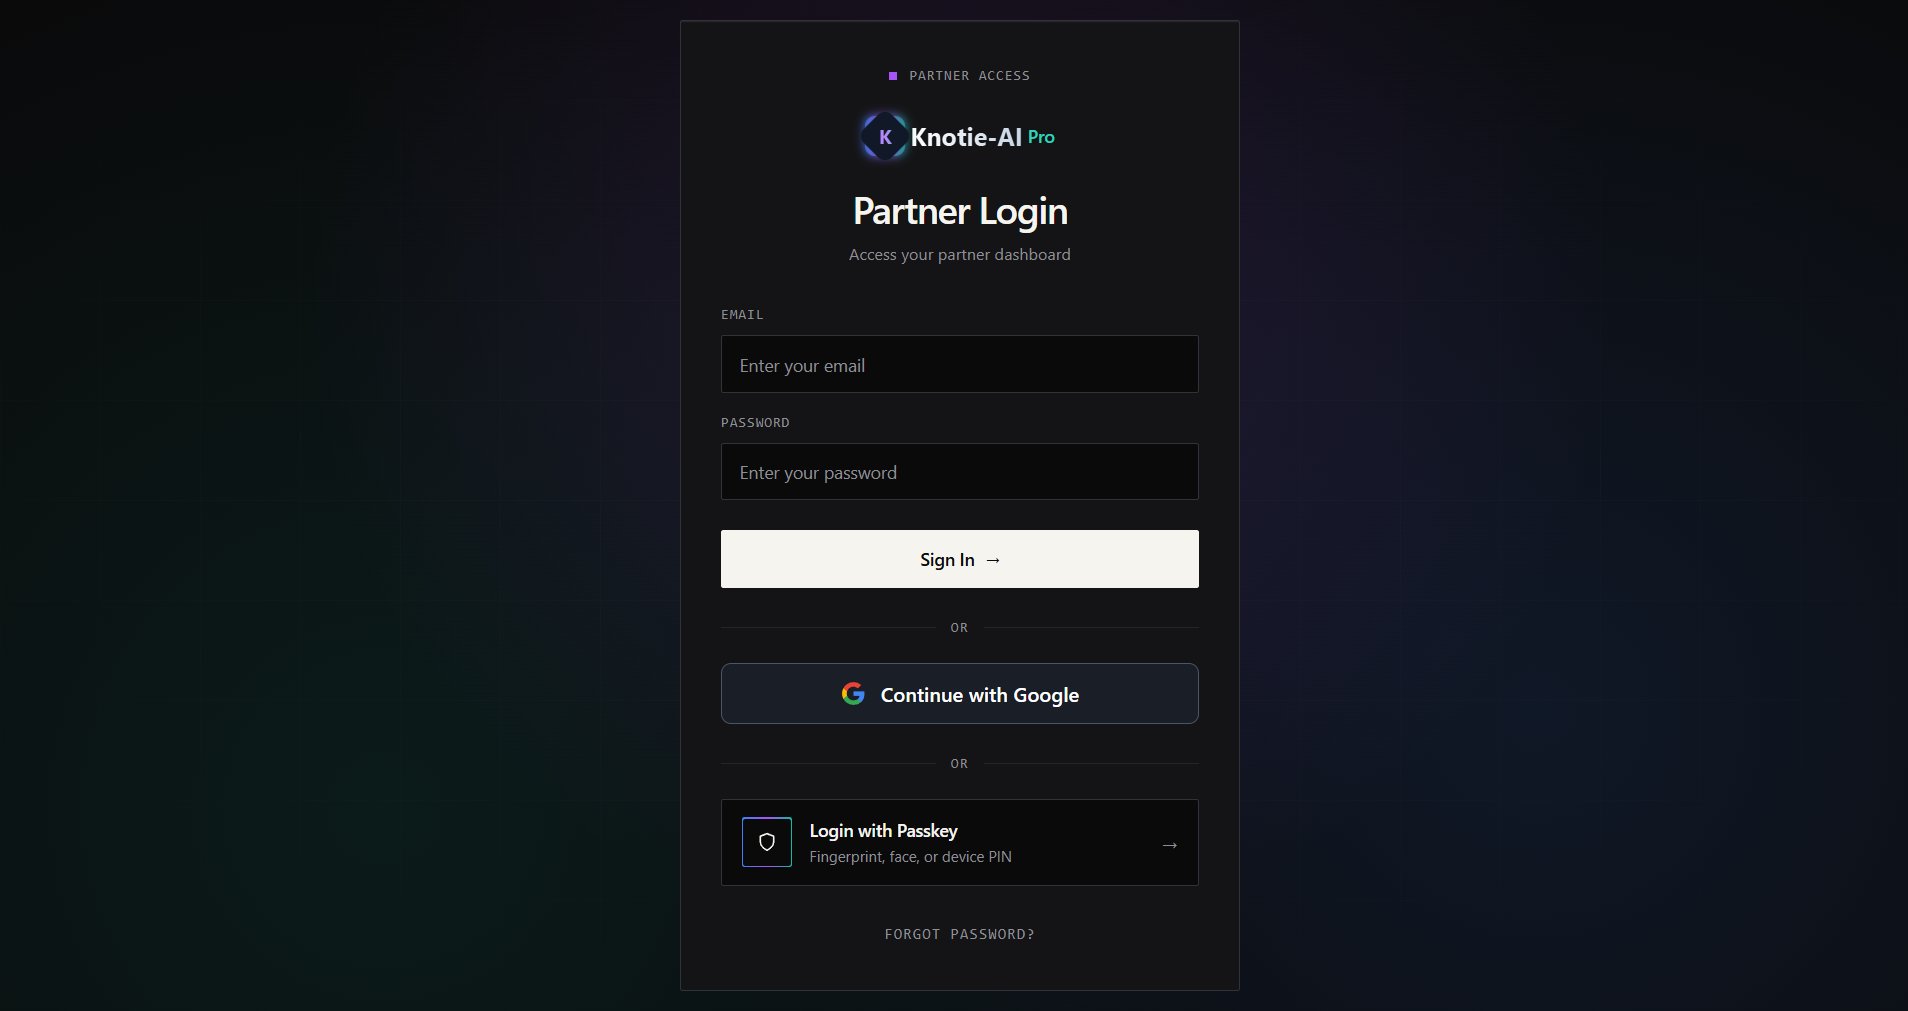 **What you'll see:**
* Email and password fields
* Sign In button
* "Continue with Google" option
* "Login with Passkey" option
* "Forgot password?" link
***
## Step 2 — Enter Credentials
Enter the email address and temporary password provided in your welcome email.
* **Email:** your partner email (e.g. `partner@example.com`)
* **Password:** the temporary password from the welcome email
Click **Sign In**.
> **First login only:** If this is your first time logging in, you'll be prompted to change your password immediately after this step.
***
## Step 3 — Set a New Password (First Login Only)
If this is your first login, you'll see the **Change Password** screen:
**Fill in all three fields:**
* **Current Password** — enter your temporary password
* **New Password** — create a strong password (min. 8 characters, mixed case, numbers)
* **Confirm New Password** — re-enter your new password
Click **Change Password** to continue.
***
## Step 4 — Secure Your Account / Passkey Setup
After your first password change, you'll see the **"Secure Your Account"** modal offering passkey setup, followed by the **Welcome** screen.
**Choose one of:**
* **Set Up Later** — skip passkey setup and go to the dashboard *(you can enable it later under Settings → Profile Settings)*
* **Create a Passkey** — follow the browser prompt to register a passkey
The passkey prompt appears *before* the extra sign-in security (MFA) setup. Both are available — a passkey is the newer option and works across all your devices. Your password, MFA, and passkey controls all live under **Settings → Profile Settings**.
You can enable **MFA** (a code from an authenticator app) separately any time from **Settings → Profile Settings**.
## Step 5 — Choose How You Start
After the security prompt, you land on your dashboard. A small selector lets you switch how you want to work, and a **Watch Tutorial** button is always available:
* **Manual** — the standard dashboard (this is where you'll spend most of your time).
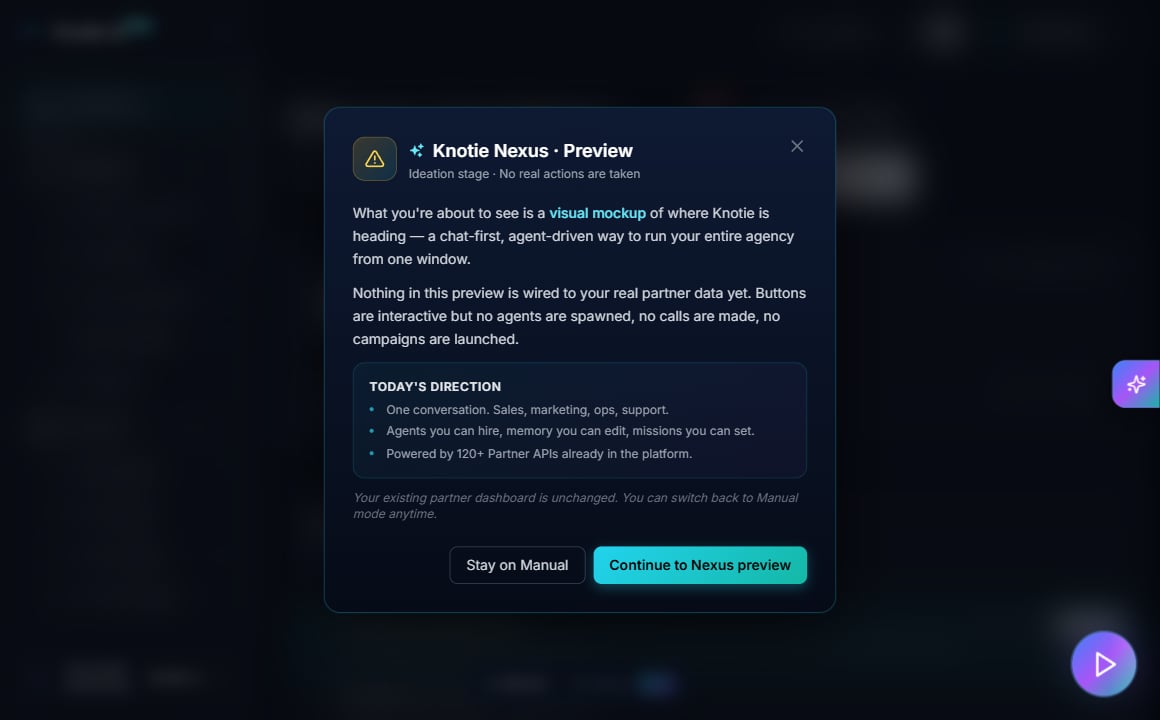
* **Nexus** — a preview of a new chat-first way to run your whole agency from one window. Choosing it opens the preview below.
* **Watch Tutorial** — play a guided tour of the portal.
If you pick **Nexus**, you'll see a preview screen. It's an early look — nothing here touches your real data yet, and you can return to **Manual** at any time.
**What you'll see:**
* Email and password fields
* Sign In button
* "Continue with Google" option
* "Login with Passkey" option
* "Forgot password?" link
***
## Step 2 — Enter Credentials
Enter the email address and temporary password provided in your welcome email.
* **Email:** your partner email (e.g. `partner@example.com`)
* **Password:** the temporary password from the welcome email
Click **Sign In**.
> **First login only:** If this is your first time logging in, you'll be prompted to change your password immediately after this step.
***
## Step 3 — Set a New Password (First Login Only)
If this is your first login, you'll see the **Change Password** screen:
**Fill in all three fields:**
* **Current Password** — enter your temporary password
* **New Password** — create a strong password (min. 8 characters, mixed case, numbers)
* **Confirm New Password** — re-enter your new password
Click **Change Password** to continue.
***
## Step 4 — Secure Your Account / Passkey Setup
After your first password change, you'll see the **"Secure Your Account"** modal offering passkey setup, followed by the **Welcome** screen.
**Choose one of:**
* **Set Up Later** — skip passkey setup and go to the dashboard *(you can enable it later under Settings → Profile Settings)*
* **Create a Passkey** — follow the browser prompt to register a passkey
The passkey prompt appears *before* the extra sign-in security (MFA) setup. Both are available — a passkey is the newer option and works across all your devices. Your password, MFA, and passkey controls all live under **Settings → Profile Settings**.
You can enable **MFA** (a code from an authenticator app) separately any time from **Settings → Profile Settings**.
## Step 5 — Choose How You Start
After the security prompt, you land on your dashboard. A small selector lets you switch how you want to work, and a **Watch Tutorial** button is always available:
* **Manual** — the standard dashboard (this is where you'll spend most of your time).
* **Nexus** — a preview of a new chat-first way to run your whole agency from one window. Choosing it opens the preview below.
* **Watch Tutorial** — play a guided tour of the portal.
If you pick **Nexus**, you'll see a preview screen. It's an early look — nothing here touches your real data yet, and you can return to **Manual** at any time.
 For everyday use, stay on **Manual**.
***
## Step 6 — Partner Dashboard & Your Onboarding Path
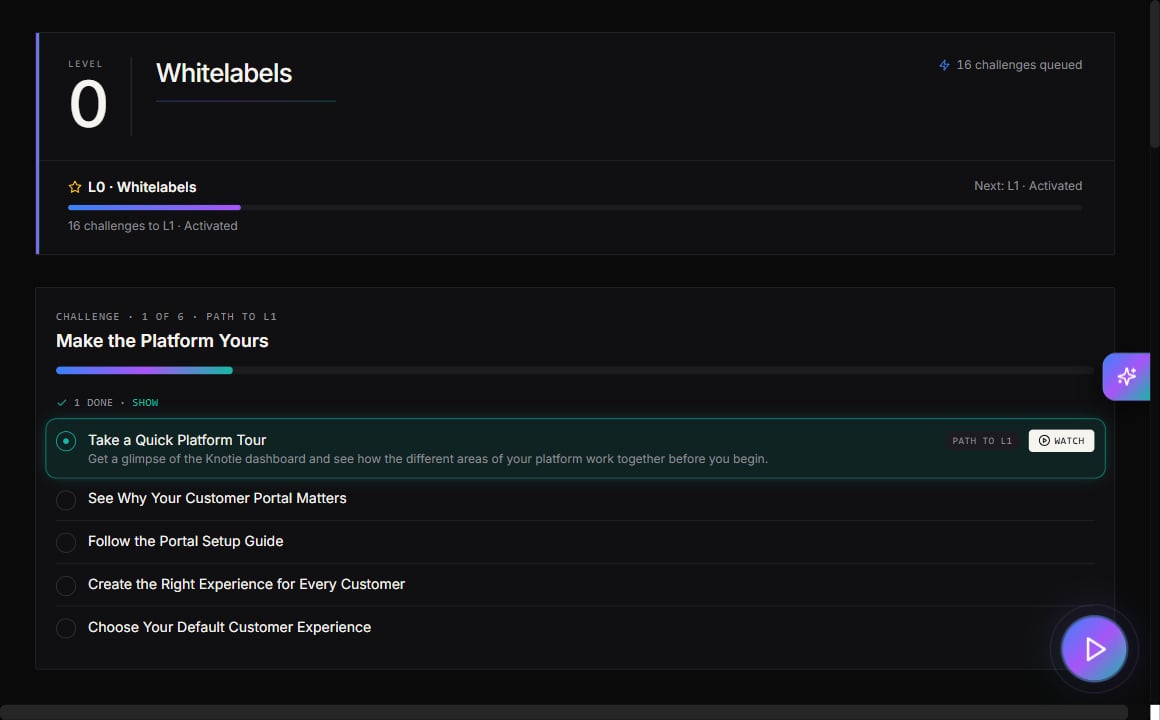
You're now on the **Partner Dashboard**. Your onboarding is laid out as a series of **levels** — you complete short challenges to move from one level to the next.
For everyday use, stay on **Manual**.
***
## Step 6 — Partner Dashboard & Your Onboarding Path
You're now on the **Partner Dashboard**. Your onboarding is laid out as a series of **levels** — you complete short challenges to move from one level to the next.
 ### Your first challenge
You start at **Level 0**, with your first challenge — **Make the Platform Yours** — front and center. It walks you through a few quick steps to get set up:
* **Take a Quick Platform Tour** — a short overview of how the dashboard fits together.
* **See Why Your Customer Portal Matters** — the value of your white-label portal.
* **Follow the Portal Setup Guide** — set up your portal.
* **Create the Right Experience for Every Customer** — tailor what customers see.
* **Choose Your Default Customer Experience** — pick the default portal experience for new customers.
As you finish challenges, the progress bar fills and you unlock the next level.
### What's coming up next
Later levels guide you through the rest of your setup:
* **Onboard Your First Customer**
* **Launch Your First AI Agent**
* **Connect Stripe and Start Getting Paid**
> **Progress is saved automatically** — you can pick up where you left off across multiple sessions.
### Quick Actions (Top of Dashboard)
* **Pricing Calculator** — estimate pricing for new customers
* **Onboard New Customer** — start the customer onboarding flow
### Account Overview (Top-Right)
* **Knotie Credits** — your current balance (5,000 credits on signup)
* **Telephony** — call spend to date
* **Auto-recharge** — toggle auto-recharge settings
* **Quick Buy Credits** — purchase more credits
* **Storage** — portal storage used vs. allocated
***
## Credential Reference
| Field | Where to find |
| ---------------------- | ---------------------------------------------------------------------- |
| **Partner email** | Your registered partner email (e.g. `partner@example.com`) |
| **Temporary password** | Sent in the welcome email from `welcome@knotie-ai.pro` |
| **Dashboard URL** | `https://knotie-ai.pro/partner/dashboard` |
| **Support** | Click **Get Support** in the sidebar or email `partners@knotie-ai.pro` |
***
## Troubleshooting
**"Invalid credentials" on login**
* Check your email spelling — use the address from your welcome email
* Your temporary password expires after first use — must be changed immediately
* If you forgot your password, use **"Forgot password?"** to reset
**MFA setup failing**
* Use an authenticator app (Google Authenticator, Authy, etc.)
* Save the backup codes in a secure location
* You can skip and enable MFA later from **Settings → Profile Settings**
**Dashboard shows "Setting up your command center"**
* This is a loading screen — wait a few seconds
* If it persists more than 30s, refresh the page
**Onboarding steps not saving progress**
* Progress saves automatically after each step
* If a step doesn't save, try completing it again or refresh the dashboard
### Your first challenge
You start at **Level 0**, with your first challenge — **Make the Platform Yours** — front and center. It walks you through a few quick steps to get set up:
* **Take a Quick Platform Tour** — a short overview of how the dashboard fits together.
* **See Why Your Customer Portal Matters** — the value of your white-label portal.
* **Follow the Portal Setup Guide** — set up your portal.
* **Create the Right Experience for Every Customer** — tailor what customers see.
* **Choose Your Default Customer Experience** — pick the default portal experience for new customers.
As you finish challenges, the progress bar fills and you unlock the next level.
### What's coming up next
Later levels guide you through the rest of your setup:
* **Onboard Your First Customer**
* **Launch Your First AI Agent**
* **Connect Stripe and Start Getting Paid**
> **Progress is saved automatically** — you can pick up where you left off across multiple sessions.
### Quick Actions (Top of Dashboard)
* **Pricing Calculator** — estimate pricing for new customers
* **Onboard New Customer** — start the customer onboarding flow
### Account Overview (Top-Right)
* **Knotie Credits** — your current balance (5,000 credits on signup)
* **Telephony** — call spend to date
* **Auto-recharge** — toggle auto-recharge settings
* **Quick Buy Credits** — purchase more credits
* **Storage** — portal storage used vs. allocated
***
## Credential Reference
| Field | Where to find |
| ---------------------- | ---------------------------------------------------------------------- |
| **Partner email** | Your registered partner email (e.g. `partner@example.com`) |
| **Temporary password** | Sent in the welcome email from `welcome@knotie-ai.pro` |
| **Dashboard URL** | `https://knotie-ai.pro/partner/dashboard` |
| **Support** | Click **Get Support** in the sidebar or email `partners@knotie-ai.pro` |
***
## Troubleshooting
**"Invalid credentials" on login**
* Check your email spelling — use the address from your welcome email
* Your temporary password expires after first use — must be changed immediately
* If you forgot your password, use **"Forgot password?"** to reset
**MFA setup failing**
* Use an authenticator app (Google Authenticator, Authy, etc.)
* Save the backup codes in a secure location
* You can skip and enable MFA later from **Settings → Profile Settings**
**Dashboard shows "Setting up your command center"**
* This is a loading screen — wait a few seconds
* If it persists more than 30s, refresh the page
**Onboarding steps not saving progress**
* Progress saves automatically after each step
* If a step doesn't save, try completing it again or refresh the dashboard